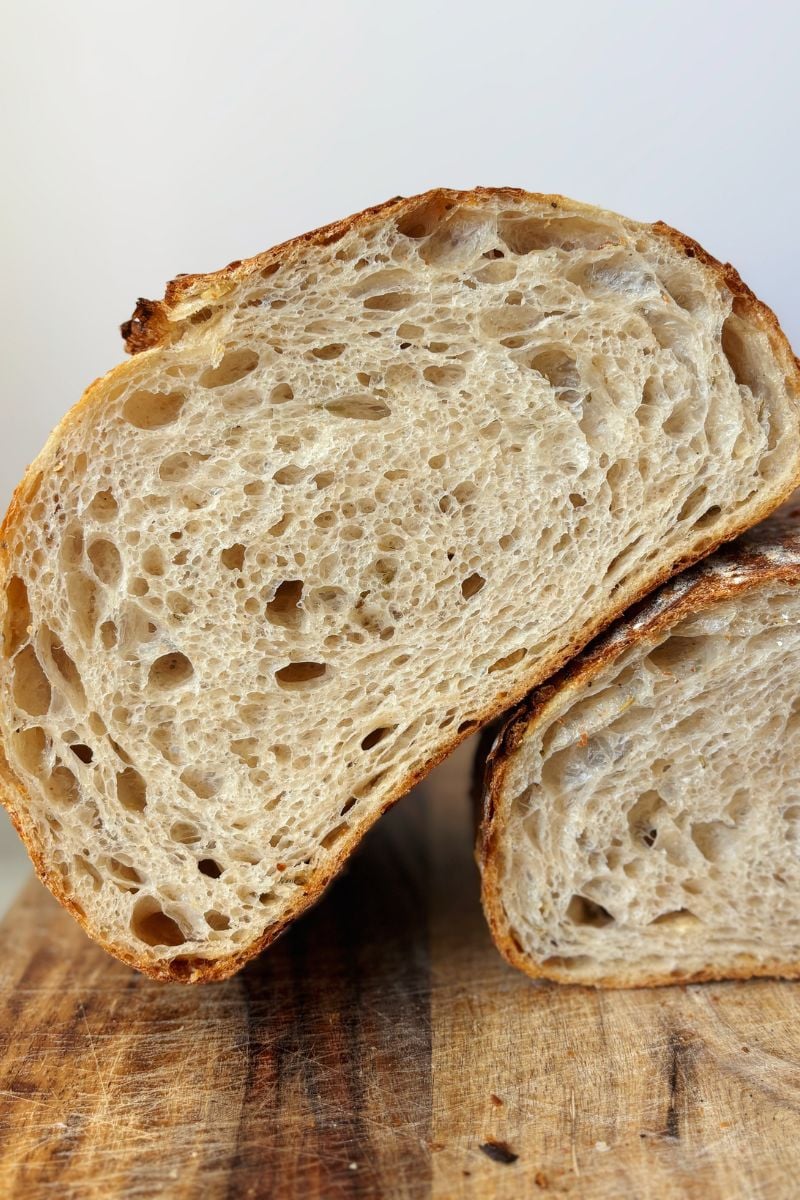
Roasted Garlic and Parmesan Sourdough-
I was thinking the other day, how can I bring the elements of garlic bread into a loaf of sourdough? And of course, there’s nothing better than roasted garlic and Parmesan cheese baked right into the dough! When you slice into this Roasted Garlic and Parmesan Sourdough and spread a little butter on top, it’s truly out of this world. Built on my fluffiest sourdough base (with just 10% whole wheat for that incredible oven spring), this loaf is soft, flavorful, and surprisingly easy to make at home.
This website uses affiliate links that earn commission from purchases at no extra cost to you. Thank you for using them and supporting my content!

Why You’ll Love This Roasted Garlic & Parmesan Sourdough
- Tall and fluffy: 10% whole wheat keeps the crumb soft and airy.
- Savory flavor boost: Roasted garlic adds flavor, Parmesan brings richness, and the optional addition of rosemary ties it together.
- Beginner-friendly method: Add-ins are worked in during stretch and folds—simple and effective.
Ingredients
- 100g active sourdough starter (fed and bubbly) – gives the bread rise, flavor, and structure.
- 375g warm filtered water – hydrates the dough and the warmth helps kick off fermentation.
- 450g unbleached bread flour – provides strong gluten development for a tall, fluffy loaf.
- 50g whole wheat flour – adds flavor, color, and boosts fermentation without weighing it down.
- 10g fine sea salt – balances flavor and strengthens the dough.
- 1 head garlic (to roast)– brings a mellow, nutty roasted flavor throughout the loaf.
- 50g Parmesan cheese, freshly grated – adds depth and little pockets of umami.
- Optional: 1–2 tsp dried rosemary – gives a fragrant, herby finish.
Step-by-Step Instructions
Step 1 – Mix the Dough & Roast the Garlic
In a large bowl, combine:
- 100g active sourdough starter
- 375g warm filtered water
Stir until the starter dissolves and the water looks milky. Then add:
- 450g unbleached bread flour
- 50g whole wheat flour
- 10g sea salt
Mix until you have a shaggy dough. Cover and let rest for 1 hour.
While the dough rests, roast the garlic so it’s ready for later:

Oven Method:
- Preheat oven to 400°F (204°C).
- Slice the top off 1 head of garlic to expose the cloves.
- Place on foil, drizzle with 1–2 tsp olive oil, salt, and wrap tightly.
- Roast for 35–40 minutes until soft and caramelized.
- Cool slightly, then squeeze out the cloves.
Air Fryer Method:
- Preheat air fryer to 380°F (193°C).
- Slice the top off 1 head of garlic, drizzle with olive oil, salt, and wrap in foil.
- Air fry for 20–25 minutes until tender and golden.
- Cool slightly, then squeeze out the cloves.
While that is roasting, grate your parmesan cheese and set to the side.
Step 2 – Stretch & Fold and Add Roasted Garlic and Parmesan
To strengthen the dough, do four total rounds of stretch and folds, spaced 30 minutes apart:
- First round: With wet hands, lift one side of the dough, stretch it upward, and fold it over the center. Rotate the bowl and repeat on all four sides. This begins to build strength in the dough. Cover and rest 30 minutes.
- Second round (adding inclusions): Gradually incorporate the roasted garlic cloves, 50g grated Parmesan cheese, and, if using, 1–2 tsp rosemary. To do this, sprinkle a portion of the garlic, cheese, and herbs over the dough before each stretch-and-fold motion. Stretch, fold, add more, and continue until they are layered throughout the dough. This method helps distribute the flavor evenly throughout the loaf.
- Third round and Fourth round: For the final rounds, you can either do traditional folds or switch to coil folds. This gently strengthens the dough while keeping the garlic and cheese tucked neatly inside.

Step 3 – Bulk Fermentation
Bulk fermentation is the first long rise after mixing your dough, where the sourdough starter ferments the flour, creating air bubbles and developing flavor. Let the dough rise, covered, until it’s roughly doubled, jiggly, and bubbly. Warmer kitchens move faster; cooler ones take more time.
I like to use this chart as a guideline, but I use the visual cues (mentioned above) to know when my dough is done. This may take some practice to get down if you’re new to baking sourdough.
| Dough Temp | Typical Bulk Time* |
|---|---|
| 80°F / 27°C | 5–6 hours |
| 75°F / 24°C | 7–8 hours |
| 70°F / 21°C | 11–12 hours |
| 65°F / 18°C | 15–16 hours |
*Time starts from the initial mix in step 1. Whole wheat tends to speed fermentation along, so start checking early!

Be careful not to let this stage go too long—overfermentation can cause the yeast to break down the gluten structure, leaving you with dough that’s overly sticky and hard to shape.
Step 4 – Shape
Once your dough is showing visual signs (doubled, bubbly, and airy), gently turn it out onto a surface. Using wet hands and a wet bench scraper, shape it into a round or oval loaf depending on the shape of your proofing basket. If shaping feels tricky, check out the video below for a guide.

Step 5 – Final Proof
Now it’s time for the proof (or second rise). You have two options:
- Cold Proof (my go-to!): Best for beginners- Place the shaped dough seam side up in a well-floured banneton or towel-lined bowl. Cover and refrigerate overnight (I find 14-18hrs the sweet spot, but this can stay up to 24 hours).
- Room Temperature: Faster option. Cover and let it proof at a warm room temperature for about 2 more hours, until the dough has puffed up and filled the banneton. Then, bake immediately.
I recommend the cold proof because it makes the dough easier to handle, easier to score, improves flavor, and you can bake on your own schedule!
Step 6 – Bake
When you’re ready to bake:
Preheat your oven to 450°F (232°C) with a Dutch oven inside for 30 minutes.
Take your dough out of the fridge and flip it over onto a piece of parchment paper.
- Score the top with a sharp knife or bread lame (this prevents bursting).
- Carefully place the dough into the hot Dutch oven.
- Bake covered for 30 minutes, then uncovered for 15 minutes.
- Remove the bread from the Dutch oven and let it cool on a rack for at least 1-2 hours before slicing. It will continue to bake inside, cutting into it too early can lead to a gummy texture.

If You Liked This Recipe, Try:
Roasted Garlic and Parmesan Sourdough Loaf
Equipment
- 1 Medium/ Large Mixing Bowl
- 1 sheet of foil for roasting garlic
- 1 Knife to cut garlic
- 1 Banneton Basket (or towel-lined bowl)
Ingredients
Dough
- 100 g active sourdough starter fed and bubbly
- 375 g warm filtered water
- 450 g unbleached bread flour
- 50 g whole wheat flour
- 10 g fine sea salt
Inclusions
- 1 head garlic to roast
- 1 drizzle olive oil for roasted garlic
- 50 g Parmesan cheese freshly grated
- 1-2 tsp dried rosemary optional
Instructions
- Mix the Dough: In a bowl, stir together 100g starter and 375g warm water until dissolved. Add 450g unbleached bread flour, 50g whole wheat flour, and 10g salt. Mix into shaggy dough. Cover and rest 1 hour.
- Roast the garlic while dough is resting:Oven: Preheat 400°F (204°C). Slice top off garlic head, drizzle with olive oil and a sprinkle of salt, wrap in foil, roast 35–40 min. Cool, squeeze cloves.Air Fryer: Preheat 380°F (193°C). Prep same way, wrap in foil, air fry 20–25 min. Cool, squeeze cloves.While that is roasting, grate your parmesan cheese and set to the side.
- Stretch & Fold: Do 4 rounds of folds spaced 30 min apart.On the 2nd round, gradually incorporate the roasted garlic cloves, 50g grated Parmesan cheese, and, if using, 1–2 tsp dried rosemary. To do this, sprinkle a portion of the garlic, cheese, and herbs over the dough before each stretch-and-fold motion. Stretch, fold, add more, and continue until they are layered throughout the dough. This method helps distribute the flavor evenly throughout the loaf.
- Bulk Fermentation: Let the dough rise, covered, until it’s roughly doubled, jiggly, and bubbly. Warmer kitchens move faster; cooler ones take more time.I like to use this chart as a guideline, but I use the visual cues (mentioned above) to know when my dough is done. This may take some practice to get down if you’re new to baking sourdough.Dough Temp vs. Typical Bulk Time80°F / 27°C ~ 5–6 hours75°F / 24°C ~ 7–8 hours70°F / 21°C ~ 11–12 hours65°F / 18°C ~ 15–16 hours*Time starts from the initial mix in step 1.Be careful not to let this stage go too long—overfermentation can make dough overly sticky and hard to shape.
- Shape: Turn out, shape into round or oval loaf, place seam-side up in floured banneton. (see blog post for video tutorial if needed)
- Final Proof: Now it’s time for the proof (or second rise). You have two options:Cold Proof (recommended): Best for beginners- Cover and refrigerate dough overnight (I find 14-18hrs the sweet spot, but this can stay up to 24 hours).Room Temperature: Faster option. Cover and let it proof at a warm room temperature for about 2 more hours, until the dough has puffed up and filled the banneton. Then, bake immediately.
- Bake: Preheat oven with Dutch oven inside to 450°F (232°C).Take dough out of the refrigerator (if cold proofed) and flip dough onto parchment, score, place in Dutch oven.Bake 30 min covered, 15 min uncovered.
- Cool 1–2 hours before slicing. Enjoy!
Video

One response to “Roasted Garlic and Parmesan Sourdough Loaf”
I love all.