How to Get Fluffy Sourdough Bread
After baking sourdough for a few years, I’ve learned a lot just by experimenting—and one of the most surprising things I’ve discovered is how much of a difference a little whole wheat can make.
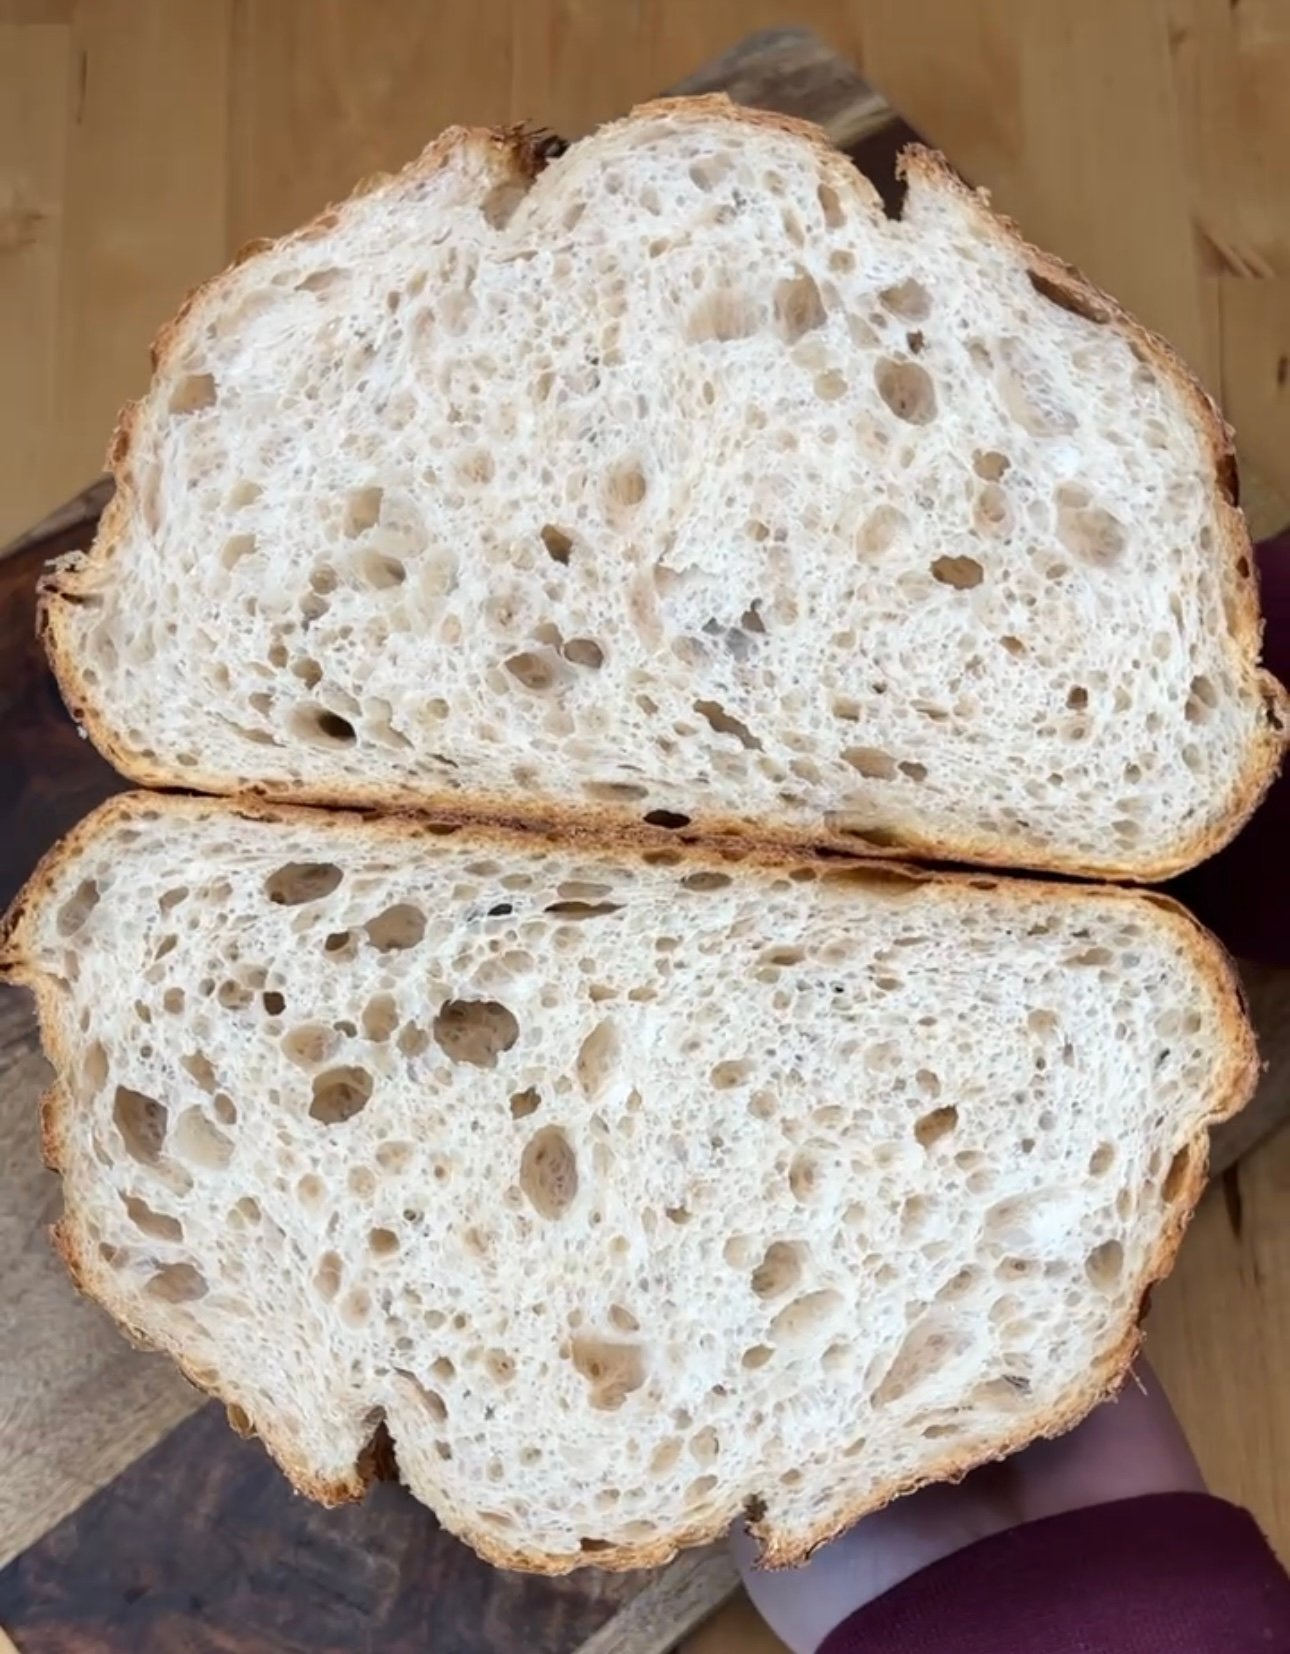
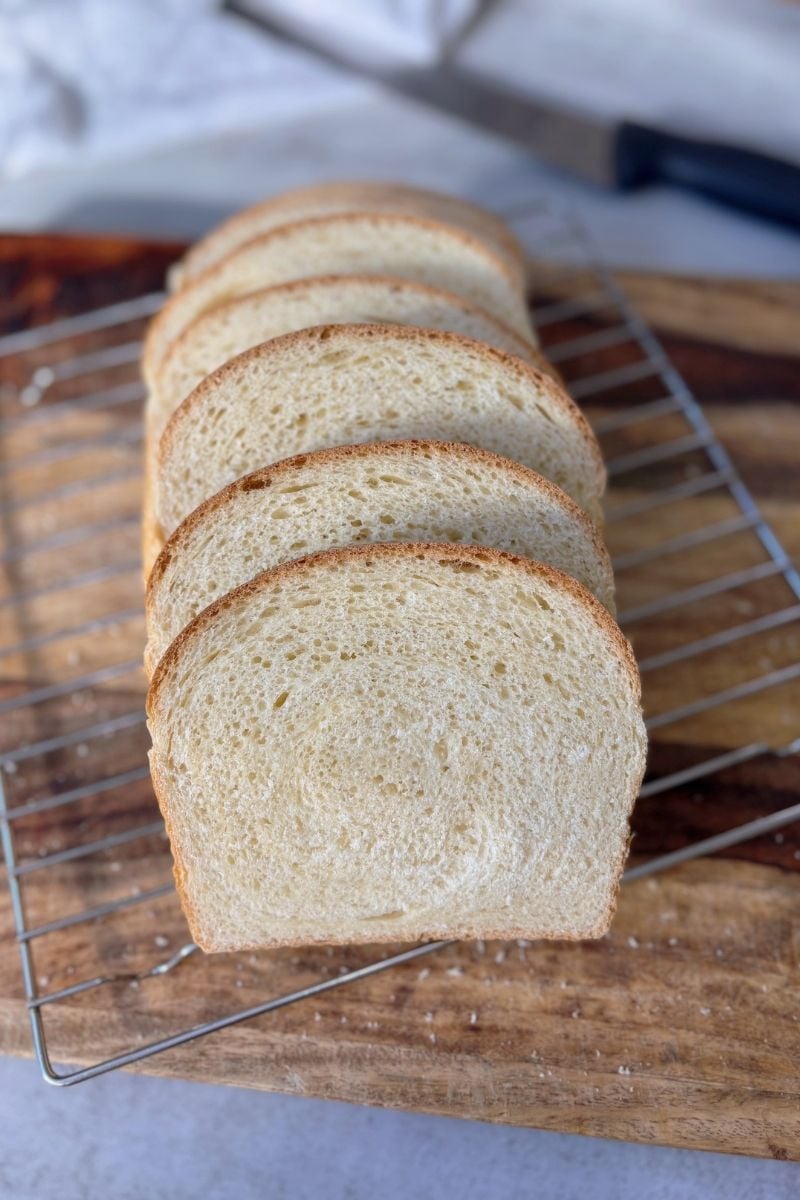
The first time I swapped just 10% of my bread flour for whole wheat, I couldn’t believe the result. It came out as the fluffiest loaf I had ever made—beautiful oven spring, a soft crumb, and a defined score! Since then, this has been my go-to base for any loaf I want to visually impress. If I’m aiming for a dramatic rise or a photo-worthy score, this is exactly the recipe I make.
This website uses affiliate links that earn commission from purchases at no extra cost to you. Thank you for using them and supporting my content!
Why Does 10% Whole Wheat Work So Well?
- Adds flavor + color: You get a slightly nutty taste and golden crumb without it tasting like full-on whole wheat bread.
- Boosts fermentation: Whole wheat has extra nutrients that help your dough rise.
- Better oven spring: More rise = bigger, fluffier loaves.
- Won’t weigh it down: At just 10% your bread stays light and airy.
Here’s How to Make Fluffy Sourdough Bread-
Step 1 – Mix the Dough
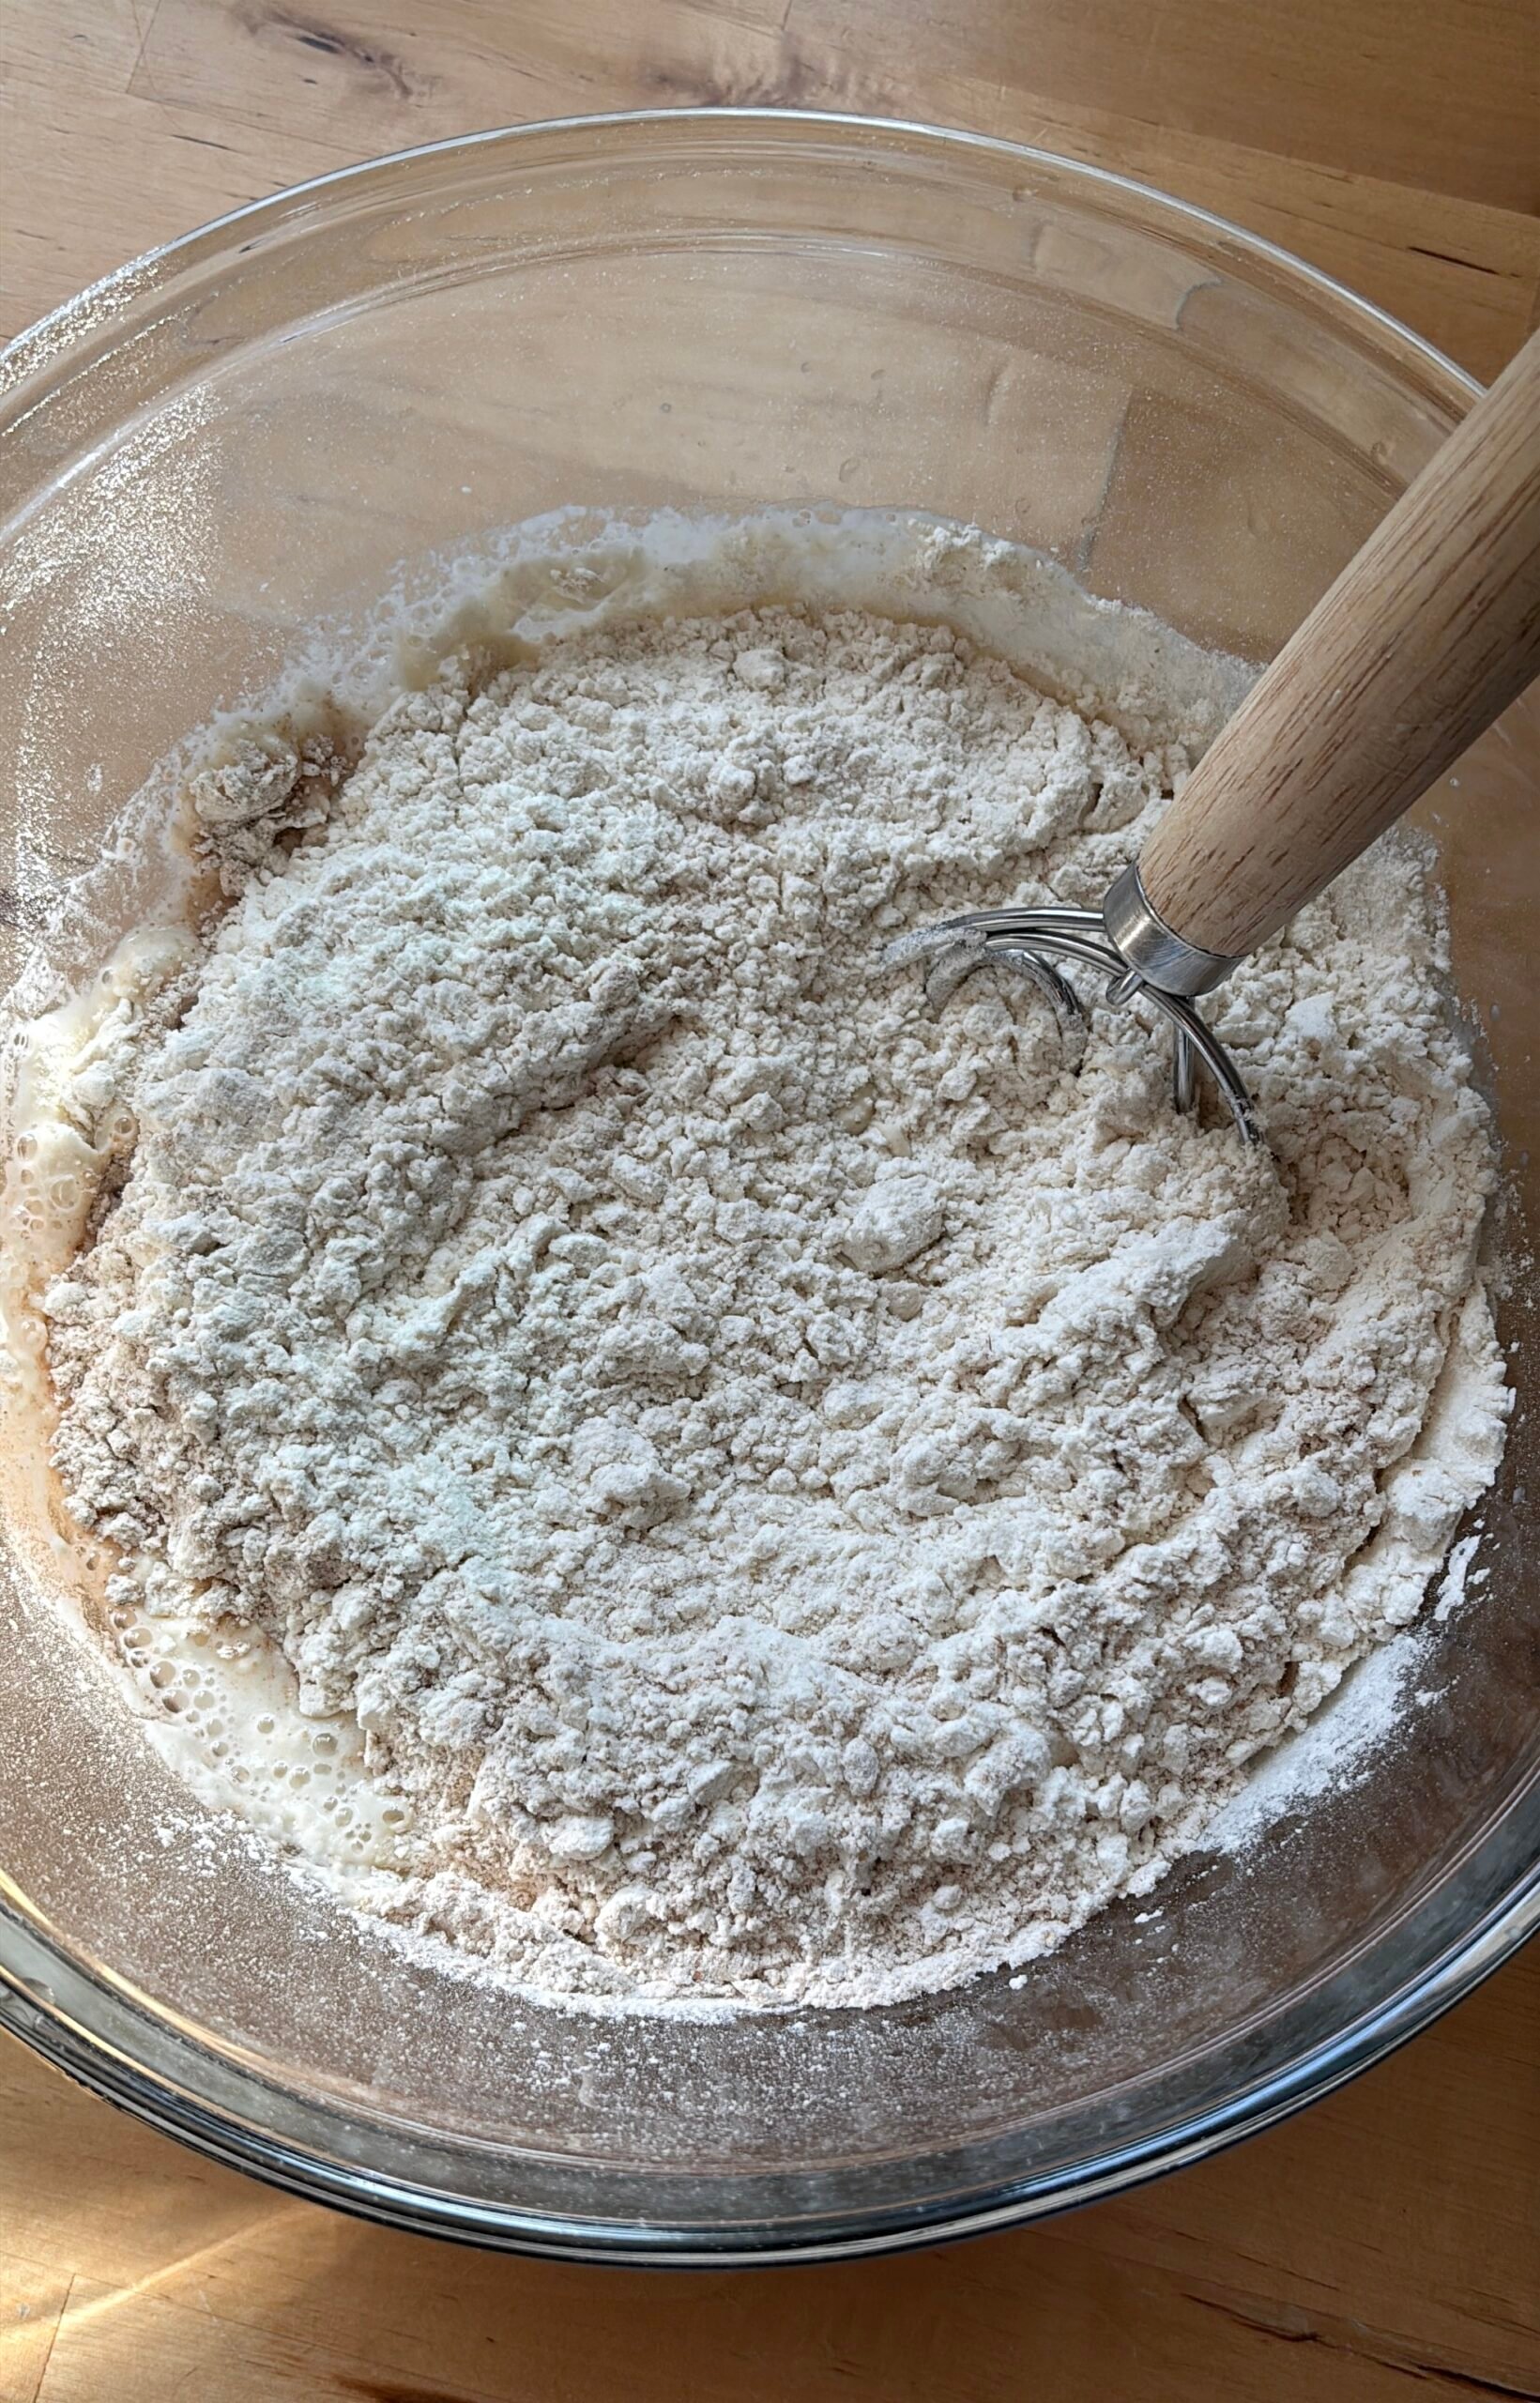
In a large bowl, combine:
- 100g active sourdough starter
- 375g warm filtered water
Stir until the starter dissolves and the water looks milky. Then add:
- 450g unbleached bread flour
- 50g whole wheat flour
- 10g sea salt
Mix until you have a shaggy dough. Cover and let rest for 1 hour.
Step 2 – Stretch & Fold
After the dough has rested, you’ll do four rounds of stretch and folds, 30 minutes apart:
- With wet hands, grab one side of the dough, stretch it up, and fold it over itself.
- Rotate the bowl and repeat on all four sides.
- Cover and let rest for 30 minutes.
- Repeat this process four times total.
This step helps develop the gluten, so your bread has structure without kneading.
Step 3 – Bulk Fermentation
Bulk fermentation is the first long rise after mixing your dough, where the sourdough starter ferments the flour, creating air bubbles and developing flavor. Let the dough rise, covered, until it’s roughly doubled, jiggly, and bubbly. Warmer kitchens move faster; cooler ones take more time.
I like to use this chart as a guideline, but I use the visual cues (mentioned above) to know when my dough is done. This may take some practice to get down if you’re new to baking sourdough.
| Dough Temp | Typical Bulk Time* |
|---|---|
| 80°F / 27°C | 5–6 hours |
| 75°F / 24°C | 7–8 hours |
| 70°F / 21°C | 11–12 hours |
| 65°F / 18°C | 15–16 hours |
*Time starts from the initial mix in step 1. Whole wheat’s extra minerals tend to speed fermentation along, so start checking early!
Be careful not to let this stage go too long—overfermentation can cause the yeast to break down the gluten structure, leaving you with dough that’s overly sticky and hard to shape.
Step 4 – Shape
Once your dough is showing visual signs (doubled, bubbly, and airy), gently turn it out onto a surface. Using wet hands and a wet bench scraper, shape it into a round or oval loaf depending on the shape of your proofing basket. If shaping feels tricky, check out the video below for a guide.

Step 5 – Final Proof
Now it’s time for the proof (or second rise). You have two options:
- Cold Proof (my go-to!): Best for beginners or doing fancy scoring. Place the shaped dough seam side up in a well-floured banneton or towel-lined bowl. Cover and refrigerate overnight (I find 14-18hrs the sweet spot, but this can stay up to 24 hours).
- Room Temperature: Faster option. Let it proof at room temperature for about 2 more hours, until the dough has puffed up and filled the banneton. Then, bake immediately.
I recommend the cold proof because it makes the dough easier to handle, easier to score, improves flavor, and you can bake on your own schedule!
Step 6 – Bake
When you’re ready to bake:
Preheat your oven to 450°F (232°C) with a Dutch oven inside for 30 minutes.
Take your dough out of the fridge and flip it over onto a piece of parchment paper. Sprinkle and rub Thai rice flour into the dough.
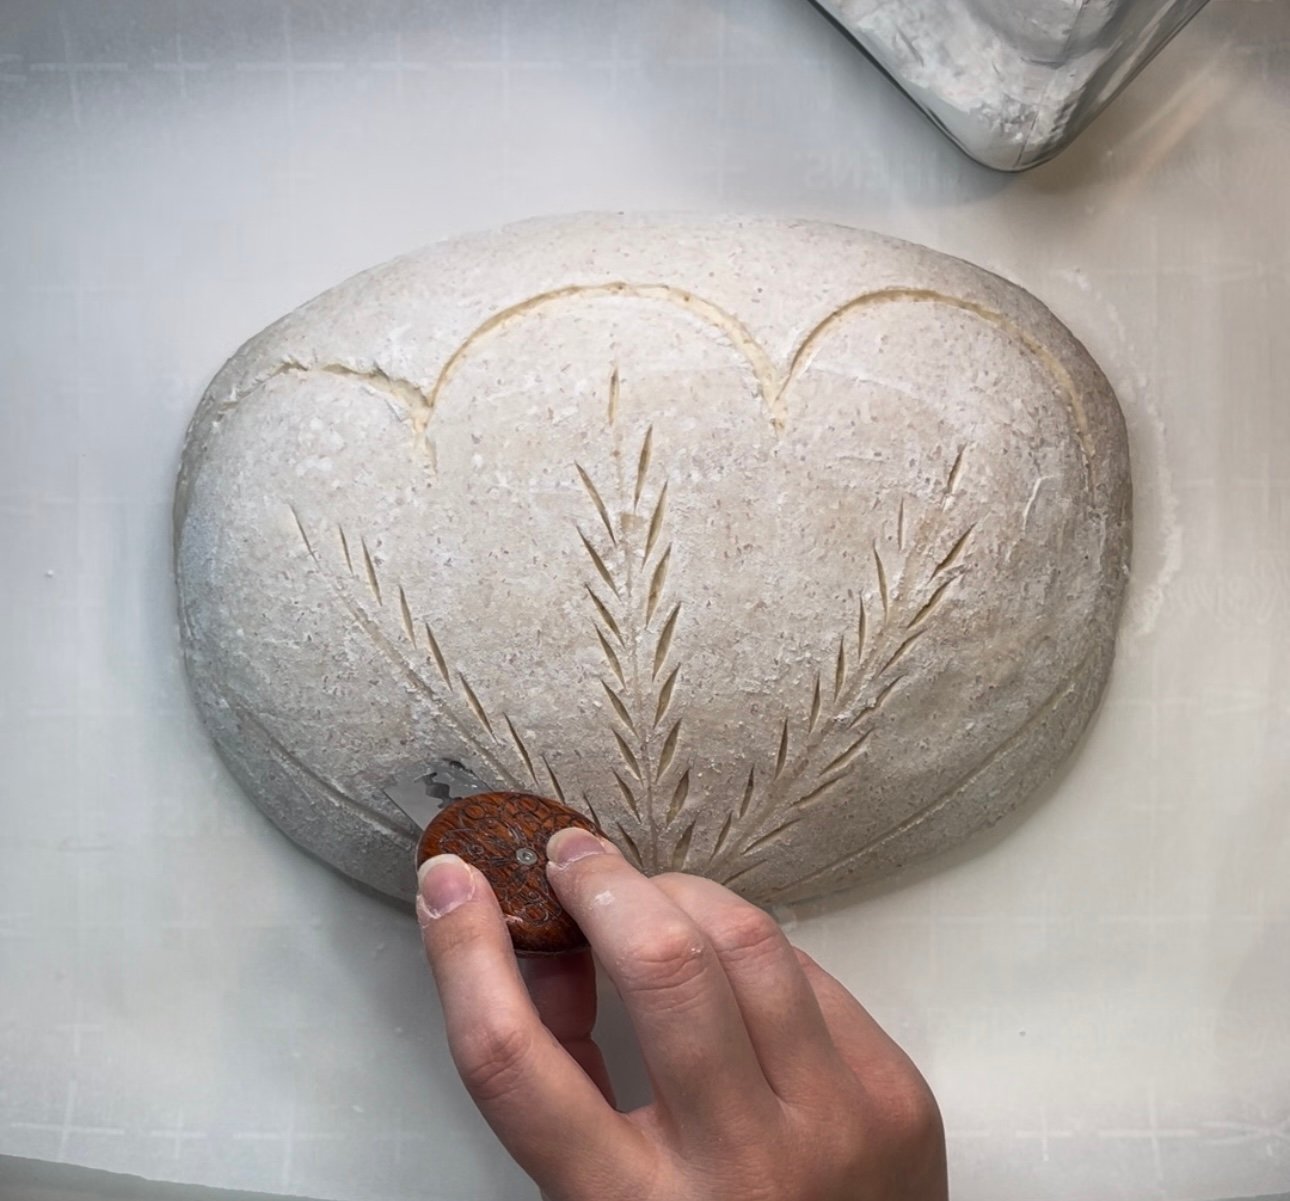
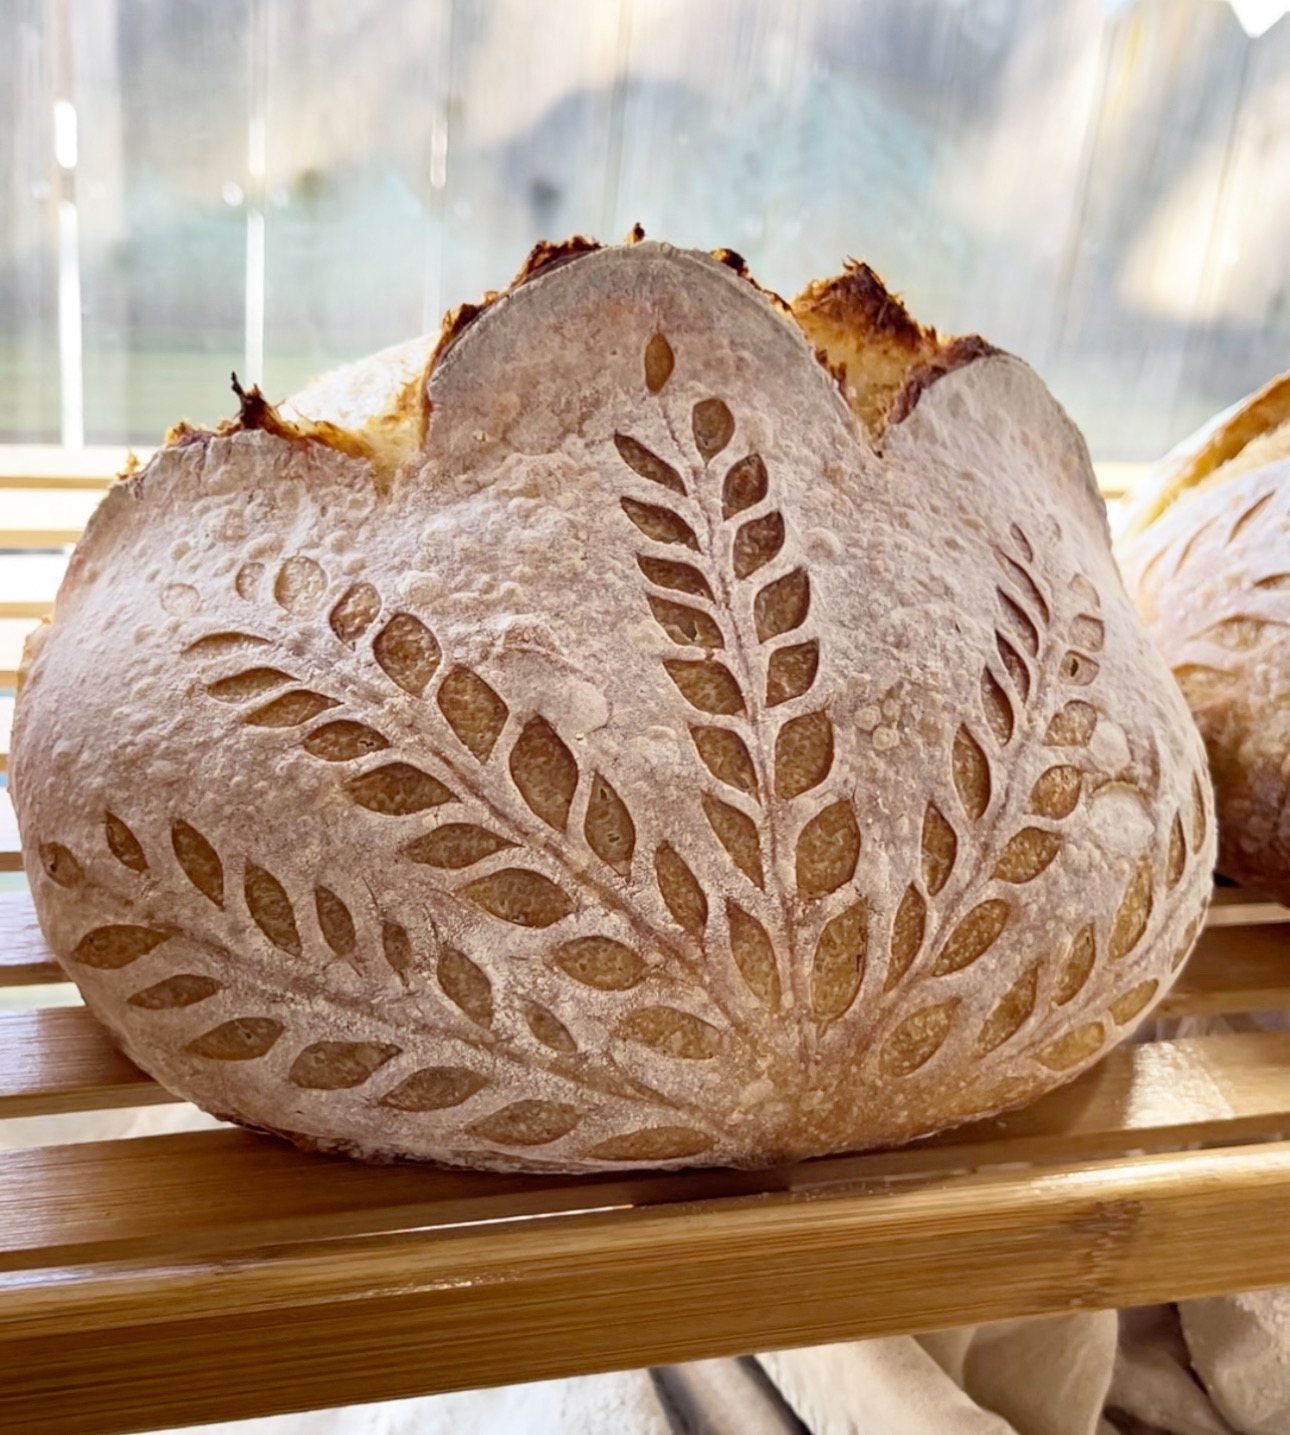
- Score the top with a sharp knife or bread lame (this prevents bursting).
- Carefully place the dough into the hot Dutch oven.
- Bake covered for 30 minutes, then uncovered for 15 minutes.
- Remove the bread from the Dutch oven and let it cool on a rack for at least 1-2 hours before slicing. It will continue to bake inside, cutting into it too early can lead to a gummy texture.
Tips for Success
- Don’t overproof—especially with that little extra fermentation boost from the whole wheat. Watch for the visual cues!
- Add-ins like cheese, herbs, or dried fruits can be added in during stretch and folds or while shaping.
Want this exact scoring tutorial?

If You Liked This, Try This:
- Mini Sourdough Loaves for Bread Bowls – perfect for soup night, these cozy mini loaves (with a hint of rye) are crusty outside, soft inside, and double as personal loaves or edible bread bowls.
The Fluffiest Sourdough Bread with a Hint of Whole Wheat!
Equipment
- 1 Medium/ Large Mixing Bowl
Ingredients
- 100 g active sourdough starter
- 375 g warm filtered water
- 450 g unbleached bread flour I like King Arthur (blue bag)
- 50 g whole wheat flour
- 10 g sea salt
For Decorative Scoring (optional)
- 1/2 tbsp Thai Rice Flour
Instructions
- Mix the Dough: In a large bowl, stir together 100g active sourdough starter and 375g warm filtered water until the starter dissolves and the mixture looks milky. Add 450g unbleached bread flour, 50g whole wheat flour, and 10g sea salt.Mix until no dry spots remain and you have a shaggy dough. Cover and let rest for 1 hour.
- Stretch & Fold: After resting, complete 4 rounds of stretch and folds, 30 minutes apart: With wet hands, stretch one side of the dough up and fold it over itself. Rotate the bowl and repeat on all four sides. Cover and let rest between each round.
- Bulk Fermentation: Let the dough rise, covered, until it’s about doubled, bubbly, and jiggly. This may take anywhere from 5 to 16 hours depending on dough temperature:80°F (27°C) → 5–6 hours75°F (24°C) → 7-8 hours70°F (21°C) → 11–12 hours65°F (18°C) → 15–16 hoursDon’t let it go too long—overproofed dough can become sticky and hard to shape.
- Shape the Dough: Turn the dough onto a clean surface. With wet hands and a wet bench scraper, gently shape into a round or oval loaf depending on your proofing basket. Place it seam-side up in a floured banneton or towel-lined bowl.
- Final Proof: You have two options: Cold proof (recommended): Cover and refrigerate for 12 to 24 hours (14–18 hours is ideal). Room temp: Let sit at room temp for about 2 hours until puffy and ready to bake.
- Bake: Preheat your oven to 450°F (232°C) with a Dutch oven inside for 30 minutes.Remove the dough from the fridge and flip it onto parchment paper. Sprinkle with Thai rice flour (optional), rub rice flour into dough, and score the top with a sharp knife or bread lame. Carefully place the dough into the hot Dutch oven. Bake 30 minutes covered, then 15 minutes uncovered, until the crust is deep golden. Let cool on a wire rack for 1–2 hours before


14 responses to “The Fluffiest Sourdough Bread with a Hint of Whole Wheat!”
Thank you for sharing this recipe. I am a beginner using rye sourdough starter and am close to making a loaf. Can I change out the bread flour for rye flour?
I wouldn’t swap the bread flour for rye in this recipe, it would be a pretty dense loaf. You can however use a rye starter for this recipe, and I think it would work great.
Thank you! I actually did that! Great bread…!
Can’t wait to try this method. Thanks for the recipe!❤️
I’m so excited to be making this today—and I’m going to give your scoring technique a try too! I’ve been on my sourdough journey since March and have learned so much along the way. This will be my first time using wheat flour, so fingers crossed!
Hi! You stated 10% wheat which equals 45gm but you used 50gm?
Hi Debra, I calculate it based on the total flour amount for the recipe, which is 500g. Adding 50g of whole wheat flour would equal 10% of the total flour.
Oh thank you for the explanation!! I must have missed that note of 500gm total flour!
Love your tutorial on the scoring it’s another thing I want to try!
Hello! I am following the recipe exactly but I am at the fourth stretch and fold and the dough just feels so wet and watery. I’m not sure what I did wrong.
hmm This dough definitely isn’t supposed to be wet and watery. Are you in a more humid climate and did you make any flour substitutions at all?
How many grams of add-ins are recommended?
I usually add about 150ish grams of inclusions depending on what the inclusion is and how big it is.
If I’m in an area that is warmer/more humid, will a lower hydration work with the addition of wheat flour? I normally use 325g of water
Hi Terri, Usually it’s okay to cut back on hydration if you live in a more humid area. You can always start with 325g and add in 25g more if you feel it needs it. It’ll definitely come down to how your dough is feeling and responding!