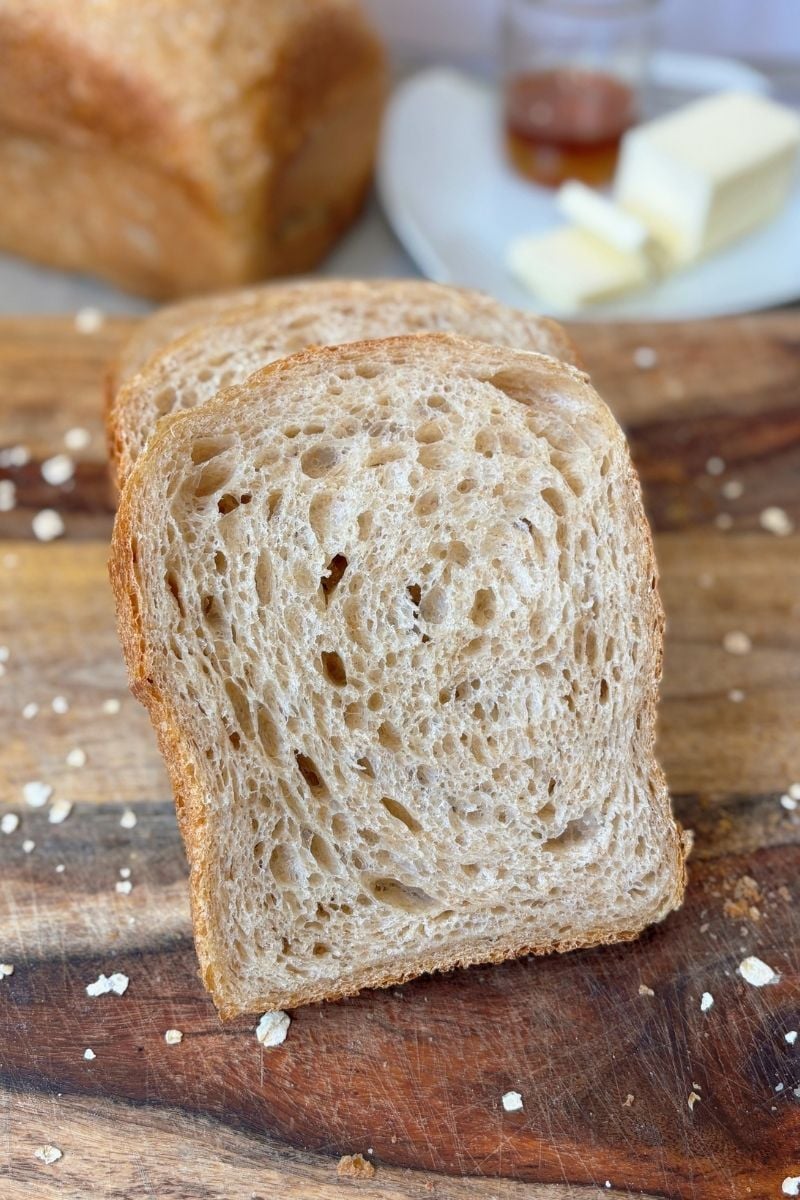
Honey Wheat Sourdough Sandwich Bread
My readers love my soft sourdough sandwich bread, so I knew I had to create a new twist on it—honey wheat sourdough sandwich bread. By blending bread flour with whole wheat flour, this recipe gives you a nutty, whole wheat flavor while maintaining the light, fluffy texture of classic sandwich bread. Since 100% whole wheat sourdough can often bake up dense, I love that this version strikes the perfect balance—great flavor but still soft enough for sandwiches.
This website contains affiliate links that may earn commission at no extra cost to you. Thank you for using them and supporting my content!
How to Make Honey Wheat Sourdough Sandwich Bread
Makes 1 loaf
Step 1: Mix the Dough
In a large mixing bowl, whisk together 150g active sourdough starter, 325g warm filtered water, 30g avocado oil, and 50g honey until combined. Stir in 350g unbleached bread flour, 150g whole wheat flour, and 10g salt until a shaggy dough forms. Cover and let it rest for 1 hour.
Step 2: Stretch & Fold
Perform four sets of stretch and folds—one set every 30 minutes— to build structure in the dough. This helps develop the gluten for a structured loaf. Spray or wet your hands with water to prevent the dough from sticking.
How to perform a stretch and fold:
- With damp hands, grab one side of the dough in the bowl.
- Gently stretch it upward until it resists, then fold it back down over the center.
- Rotate the bowl a quarter turn and repeat on the next side.
- Continue until you’ve stretched and folded all four sides.
Step 3: Bulk Ferment
Bulk fermentation is the first long rise after mixing your dough, where the sourdough starter ferments the flour, creating air bubbles and developing flavor.
Let the dough rise, covered, until it’s roughly doubled, jiggly, and bubbly. Warmer kitchens move faster; cooler ones take more time.
I like to use this chart as a guideline, but I use the visual cues (mentioned above) to know when my dough is done. This may take some practice to get down if you’re new to baking sourdough.
| Dough Temp | Typical Bulk Time* |
|---|---|
| 80°F / 27°C | 5–6 hours |
| 75°F / 24°C | 7–8 hours |
| 70°F / 21°C | 11–12 hours |
| 65°F / 18°C | 15–16 hours |
*Time starts from the initial mix in step 1. Whole wheat tends to speed fermentation along, so start checking early!
Be careful not to let this stage go too long—overfermentation can cause the yeast to break down the gluten structure, leaving you with dough that’s overly sticky and hard to shape.
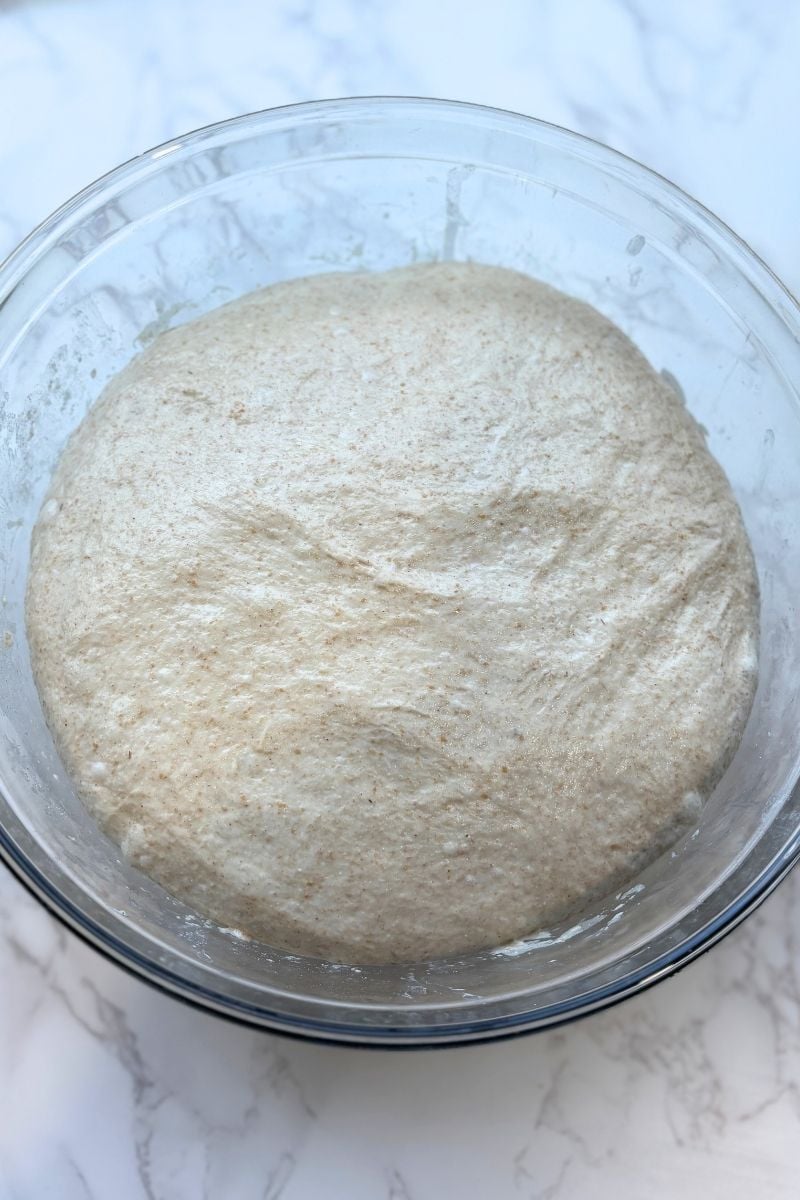
This dough is ready to shape!
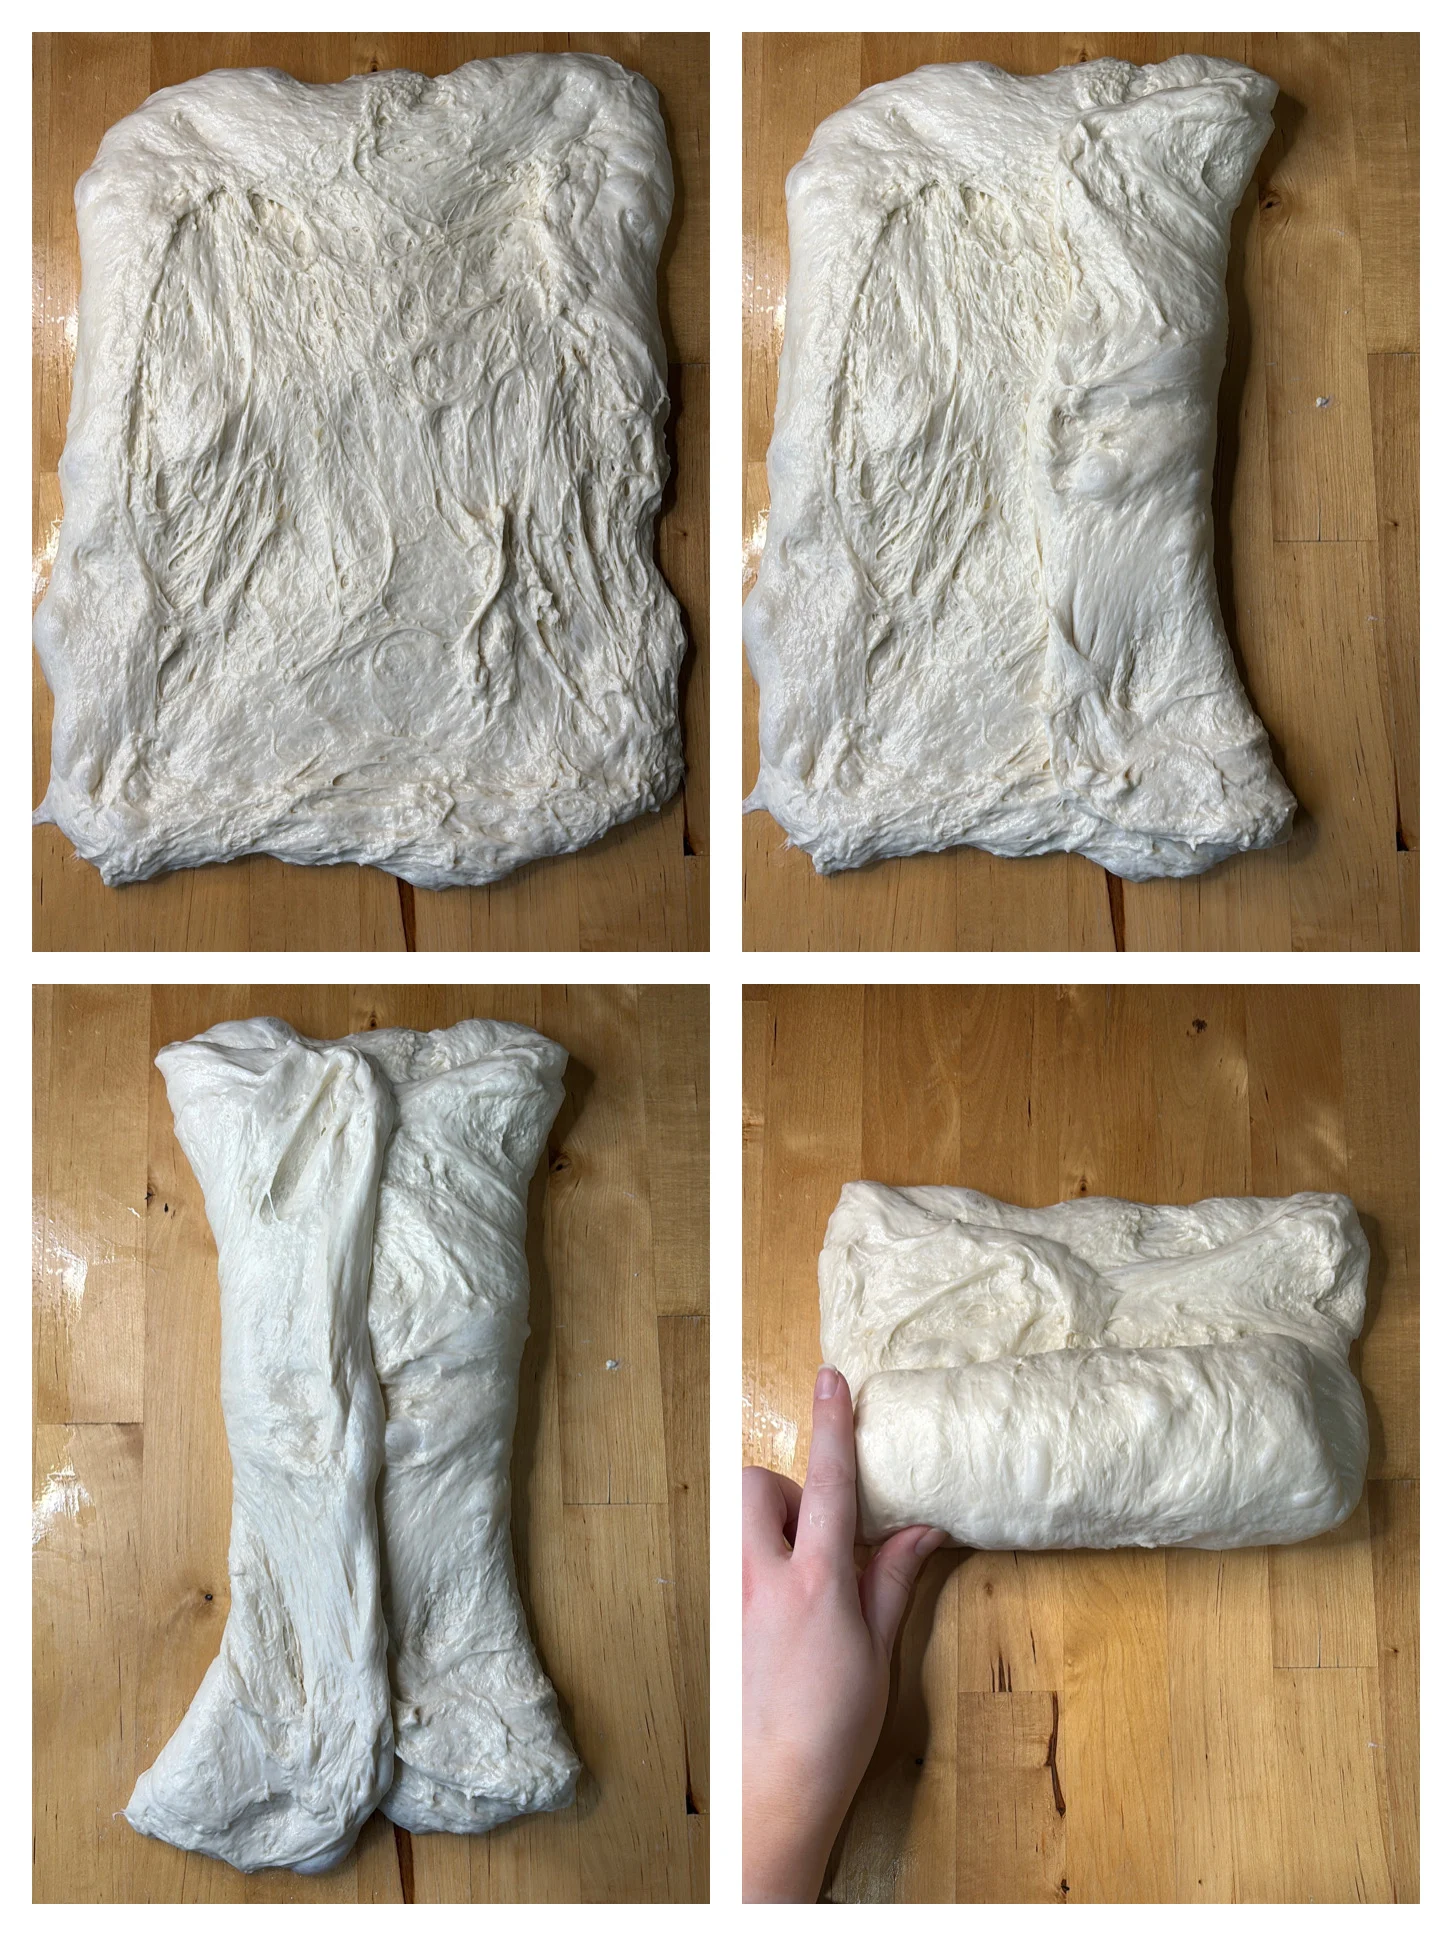
Step 4: Shape the Dough
Dump the dough from the bowl onto a clean surface. Spray or wet your hands with water to prevent the dough from sticking. Gently shape the dough into a loaf by stretching it into a rectangle, folding in the right side to the middle, then the left side into the middle, and rolling upward into a log. Place it seam-side down in a well-greased loaf pan.
Baker’s Tip:
If you prefer a more tight, closed crumb, roll the dough out with a rolling pin while it is in a rectangle. This will pop any larger air bubbles. Just keep in mind—it may need a longer proofing time when using this method.
Step 5: Second Rise – Proof
Now it’s time for the second rise. This is one of the most important steps to ensure fluffy bread!
You have two options:
- Same day bake option: Let it proof at a warm room temperature for about 2 more hours before baking. Make sure the dough is puffed up in the pan before baking—this is more important than the time frame.
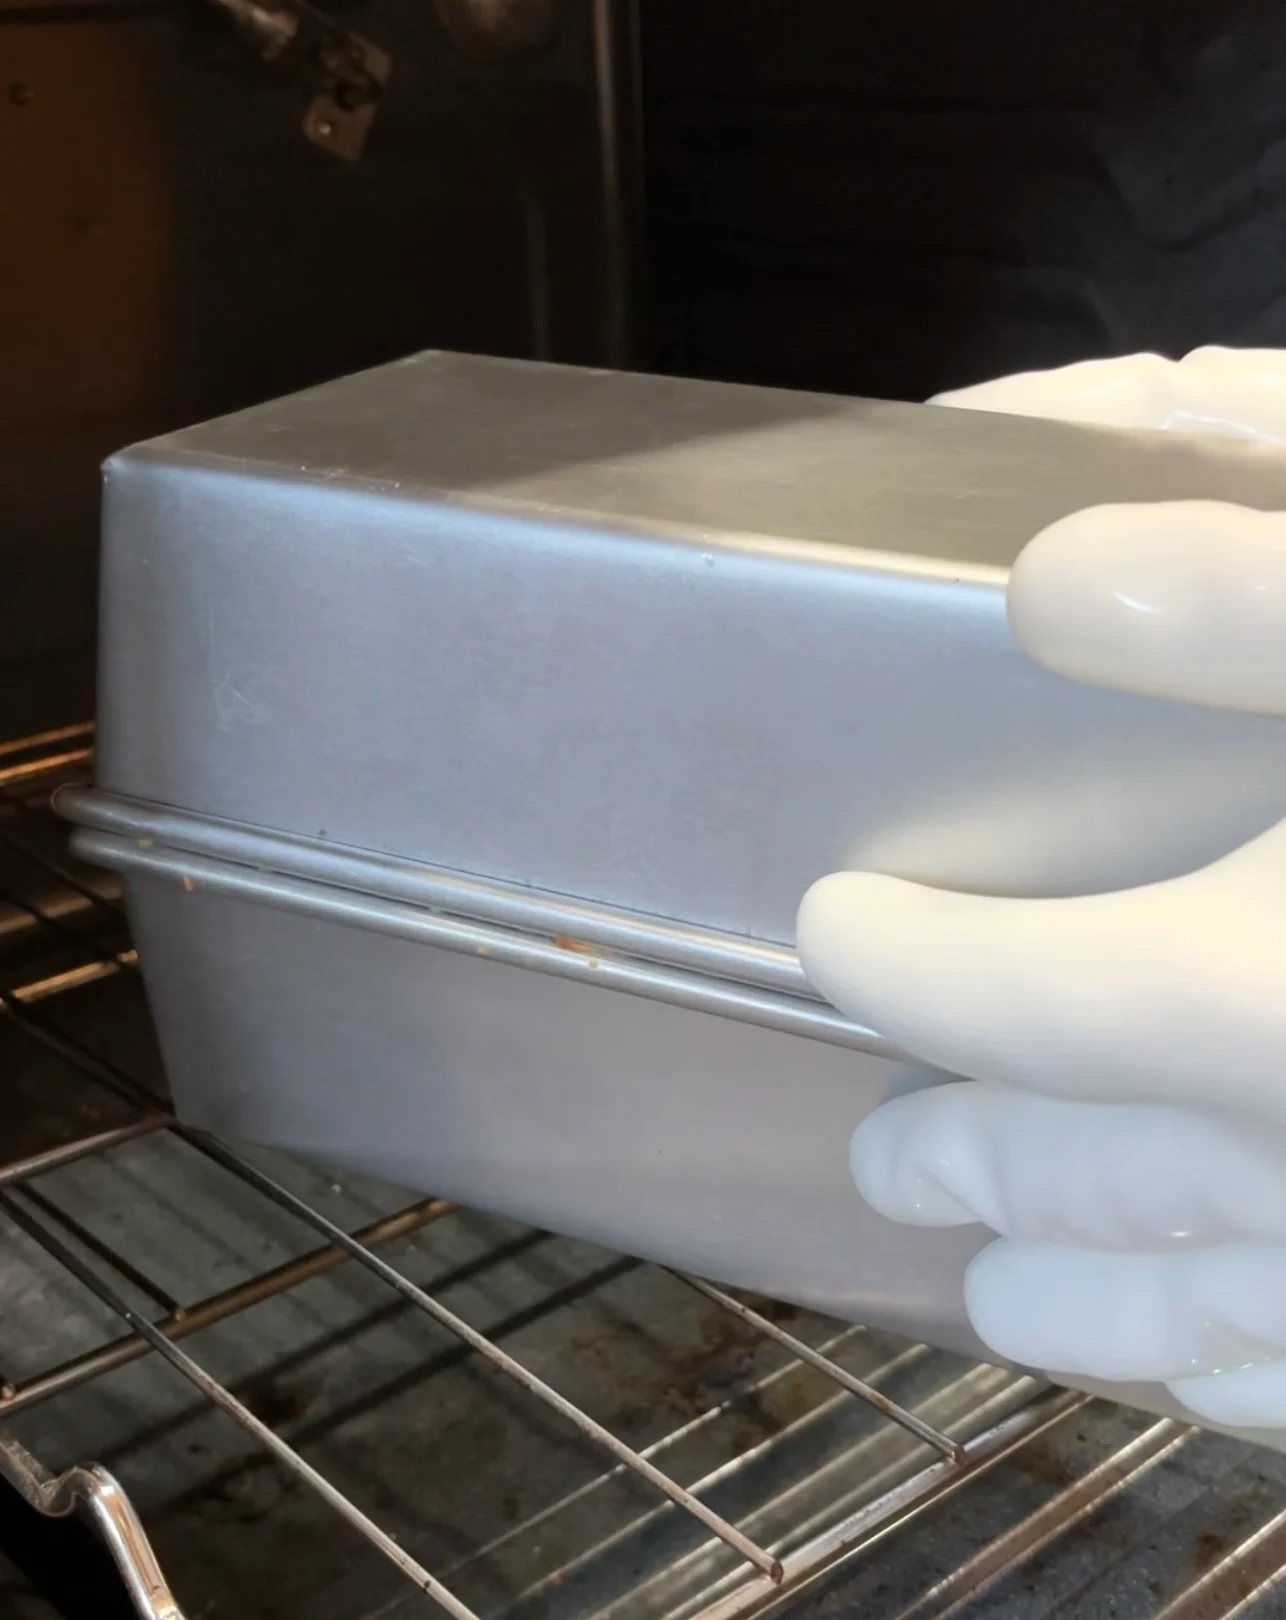
- Overnight cold proof option: Let it cold proof in the refrigerator overnight or up to 24 hours. Take the dough out of the refrigerator the next morning and allow it to puff up in the pan before baking (as shown below). This may take 2+ hours.
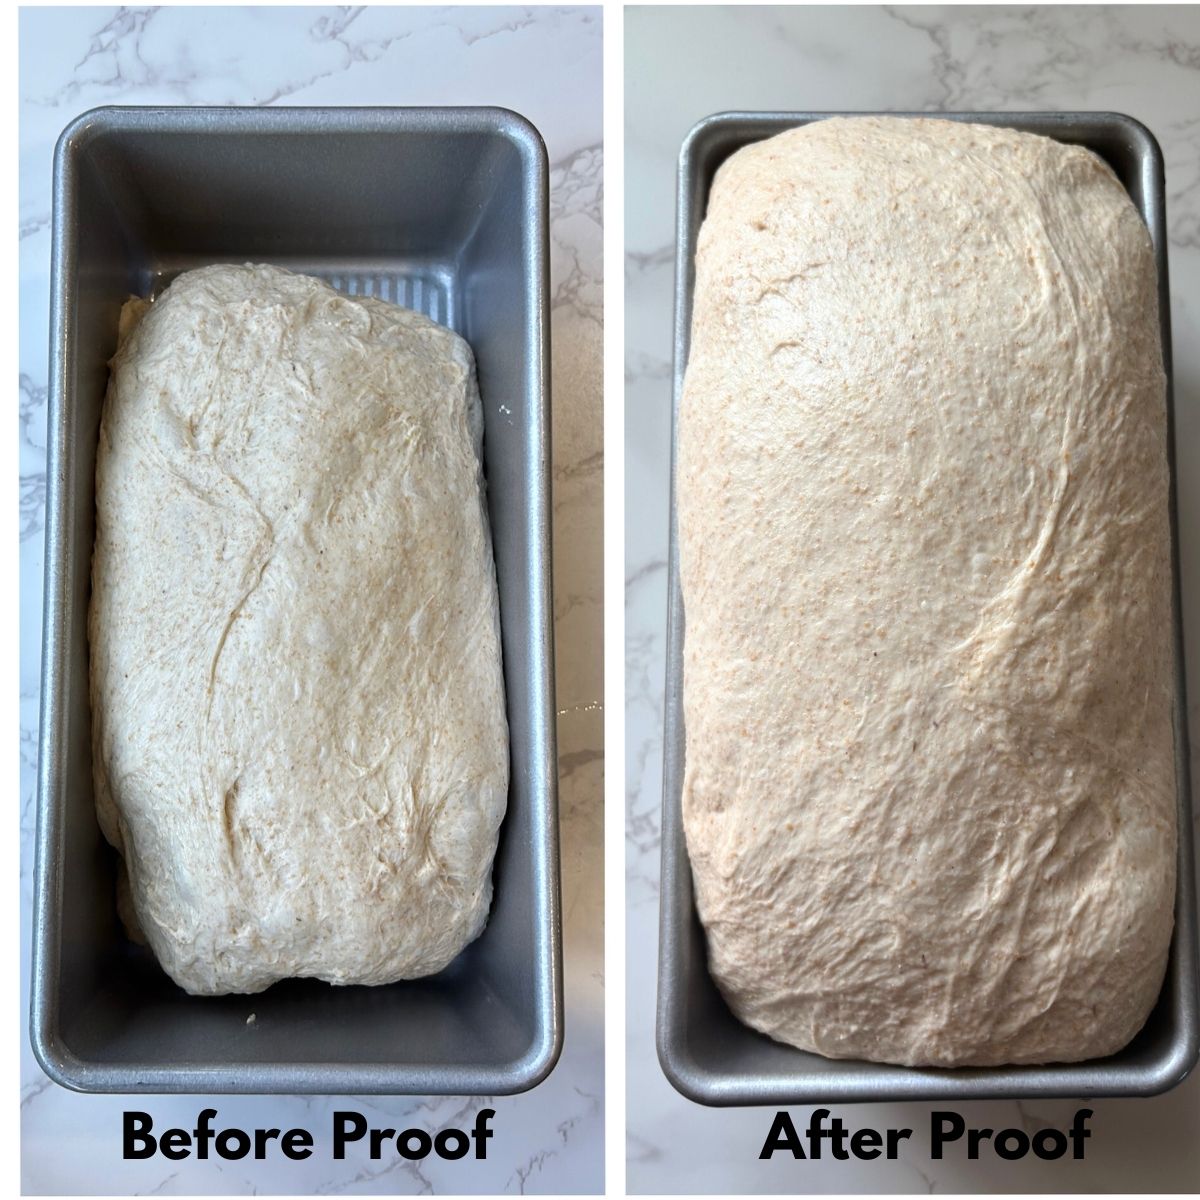
Super important: make sure dough is puffed up in the pan before baking!
Step 6: Bake
- Preheat oven to 400°F (200°C).
- Score the top of the dough and lightly mist with water. Scoring allows the loaf to expand as it bakes, while the added water helps generate steam for a taller, fluffier loaf.
- Cover with an inverted second loaf pan (or loosely greased foil) to trap steam for the softest loaf. The inverted loaf pan method is shown below.
- Bake for 30 minutes at 400°F, then uncover and bake for 15 minutes at 375°F.
Step 7: Check for Doneness
Use a digital thermometer—your bread is fully baked when the internal temperature reaches 205°F (96°C).
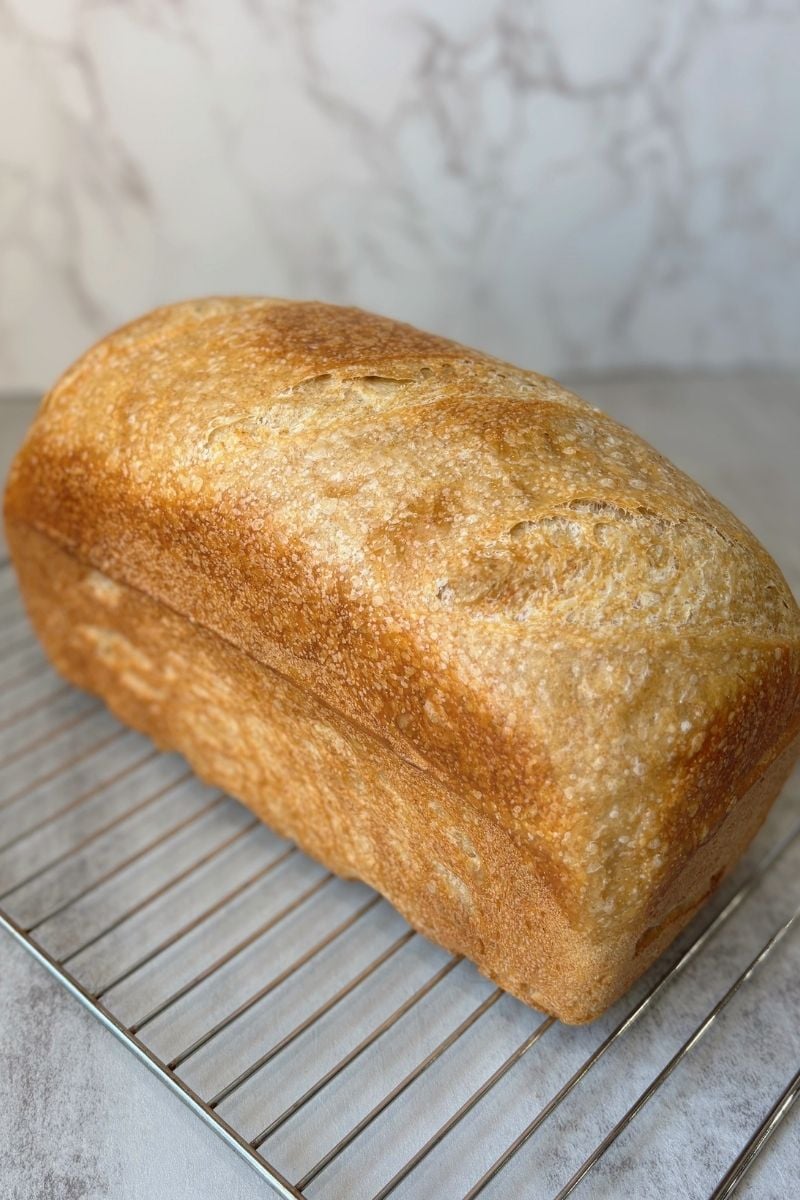
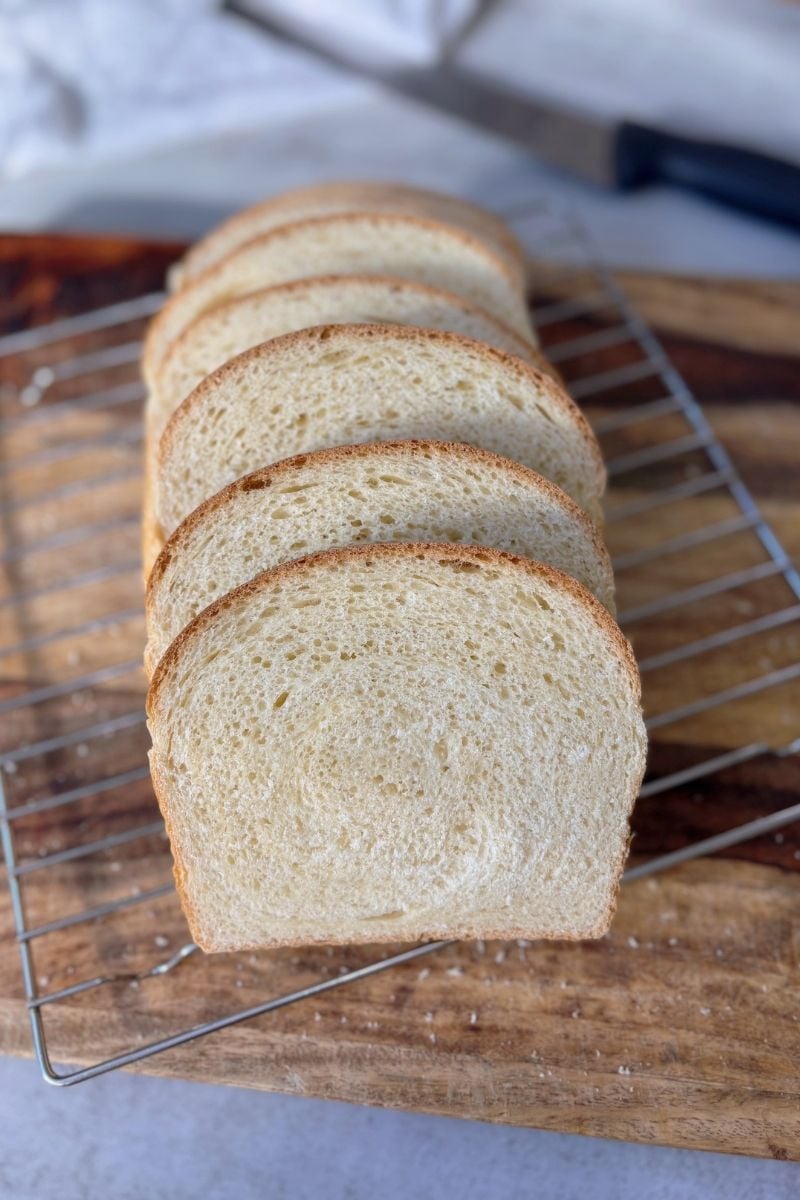
Step 8: Cool & Enjoy!
Remove from the pan immediately and let it cool on a rack completely before slicing. This helps set the crumb and keeps it soft.
How to store:
To keep my sourdough fresh, I store it in these sandwich bags from Amazon, which come with twist ties and mimic traditional storage methods. I usually keep the loaf on the counter for up to 2 days, then slice and freeze any leftovers. Sourdough freezes exceptionally well—just thaw slices as needed for fresh tasting bread anytime!

Honey Wheat Sourdough Sandwich Bread FAQ
Q: What size bread pan do you use?
A: I bake this bread in 10×5 USA Pans, which gives the loaf plenty of room to rise tall and fluffy. 9×5 pans also works well for this recipe.
Q: Can I make this recipe with 100% whole wheat flour?
A: You can, but I don’t recommend it. The loaf will turn out much denser with a tighter crumb. Using a blend of bread flour and whole wheat flour keeps this loaf soft and fluffy while still giving you that hearty whole wheat flavor.
Q: Can I use a different oil instead of avocado oil?
A: Yes! Olive oil, melted butter, or another neutral oil all work well in this recipe. I like to use avocado oil for its neutral flavor and high heat tolerance. Melted butter tends to yield a long proofing time.
Q: How do I know when my dough has finished bulk fermenting?
A: Look for visual cues rather than just the clock. The dough should be roughly doubled in size, airy, and bubbly. If you gently shake the bowl, the dough should jiggle. This takes practice!
Q: How can I make the crumb tighter and less open?
A: For a more tight, closed crumb, roll the dough out with a rolling pin while shaping it into a rectangle. This pops larger air bubbles, but keep in mind it may need a slightly longer proofing time.
Make it your own!
This honey wheat sourdough sandwich bread is a great base recipe—and it’s super versatile! Once you’ve nailed the original, feel free to get creative by mixing in your favorite add-ins like shredded cheese, fresh or dried herbs, cinnamon & sugar, or seeds.
Here are a couple variations to inspire your next loaf:
- Soft Sourdough Soft Sandwich Bread – My super soft original sandwich bread recipe!
- Sourdough Lemon Blueberry Loaf with Lemon Jell-O Pudding Mix — Soft and lightly sweet, packed with lemon flavor!

Honey Wheat Sourdough Sandwich Bread
Equipment
- 1 Large mixing bowl
- 2 Bread Pans or 1 Bread pan and a sheet of greased foil
- 1 Spray bottle with water (for misting dough)
Ingredients
- 150 g active sourdough starter fed and bubbly
- 325 g warm filtered water
- 30 g avocado oil or cooled melted butter/olive oil
- 50 g honey
- 350 g unbleached bread flour
- 150 g whole wheat flour
- 10 g fine sea salt
Instructions
- Mix the Dough: In a large mixing bowl, whisk together 150g active sourdough starter, 325g warm filtered water, 30g avocado oil, and 50g honey until combined. Stir in 350g bread flour, 150g whole wheat flour, and 10g salt until a shaggy dough forms. Cover and let it rest for 1 hour.
- Stretch & Fold: Perform four sets of stretch and folds—one set every 30 minutes—to build structure in the dough. Spray or wet your hands with water to prevent the dough from sticking.How to perform a stretch and fold:With damp hands, grab one side of the dough in the bowl.Gently stretch it upward until it resists, then fold it back down over the center.Rotate the bowl a quarter turn and repeat on the next side.Continue until you’ve stretched and folded all four sides.
- Bulk Ferment:Bulk fermentation is the first long rise after mixing your dough, where the sourdough starter ferments the flour, creating air bubbles and developing flavor.Let the dough rise, covered, until it’s roughly doubled, jiggly, and bubbly. Warmer kitchens move faster; cooler ones take more time.Typical bulk fermentation times:80°F / 27°C → 5–6 hours75°F / 24°C → 7–8 hours70°F / 21°C → 11–12 hours65°F / 18°C → 15–16 hoursWhole wheat tends to speed fermentation along, so start checking early!Be careful not to let this stage go too long—overfermentation can cause the yeast to break down the gluten structure, leaving you with dough that’s overly sticky and hard to shape.
- Shape the Dough: Turn the dough out onto a clean surface. With damp hands, gently stretch it into a rectangle. Fold the right side into the middle, then the left side into the middle, and roll it up into a log. Place seam-side down in a well-greased loaf pan.If you prefer a more tight, closed crumb, roll the dough out with a rolling pin while it is in a rectangle. This will pop any larger air bubbles. Just keep in mind—it may need a longer proofing time when using this method.
- Second Rise – ProofYou have two options: Same day bake option: Let it proof at a warm room temperature for about 2 more hours before baking. Make sure the dough is puffed up in the pan before baking—this is more important than the time frame.Overnight cold proof option: Let it cold proof in the refrigerator overnight or up to 24 hours. Take the dough out of the refrigerator the next morning and allow it to puff up in the pan before baking. This may take 2+ hours
- Bake: Preheat oven to 400°F (200°C). Score the top of the dough and lightly mist with water. Cover with an inverted second loaf pan (or loosely with greased foil) to trap steam. Bake for 30 minutes, then uncover and bake another 15 minutes at 375°F (190°C).
- Check for Doneness: Bread is fully baked when the internal temperature reaches 205°F (96°C).
- Cool & Enjoy: Remove the bread from the pan immediately and let it cool completely before slicing to set the crumb and keep it soft.
Video


12 responses to “Honey Wheat Sourdough Sandwich Bread”
I emailed you before but never received an answer. Trying again. My dough is not firm enough to slice with my lame so I found another option: bake for 7 minutes and then vent with lame. That works but I would much rather do it before I even put it in the oven but my bread is just never firm enough to do it as easily as you make it look anyway. I guess I could stick it in the refrigerator for a little bit. Maybe I’ll get an answer from you this time. I go by your recipe to the T also.
Hi Monica, I’m so sorry, I was having issues with my contact form a few months ago but it’s fixed now! I’m not sure which recipe you’re using, but I usually score the dough straight from the fridge since the cold firms it up. (this specific recipe is a bit different since it needs to rise more) A few other things that can help: you could be using too much water in the recipe for the flour you’re using or your climate (different flours absorb water differently), make sure you’re using a fresh sharp blade, and watch for over-proofing since over proofed dough is harder to score. I hope one of those suggestions can help you out!
Hayley
Can you please say why you won’t tell the size of the loaf pans your using? I don’t even want to attempt a recipe before I know and I can’t get a response….I’m still trying to find out the loaf pan size for the Soft Sourdough Sandwich Bread!
Hi Donna, the answer to this question is in the Q&A section of this recipe post. I use a 10×5 USA bread pan… but most sizes like 12×4 or 9×5 will work as well. If you’re ever curious about any of the sizes or products I use, they are linked and highlighted blue on the recipe card.
Thank you very much!!
Hi there! I’m thinking my Pullman pan will work……your thoughts?
If I had ant to make two loaves do I need 300g starter?
Yes, everything would be doubled.
Hello, do you think this will work in a 13×4 USA pan or would I need to double for that size of pan?
yes it would work it just may not be as tall!
Hayley, you are my new besti. Every recipe I follow from your website for sourdough baking has become my New Favorite. Your recipe instructions are clear & helpful with detail.
The bulk fermentation Video, so perfect my dough shaping has finally improved.
You are given 5 Stars with every baked recipe I share with family & friends.
Wish you could hear their praise of enjoyment of the gift.
Thank you again for sharing your hard work with us all. Best Wishes, Joy Bakes
Hi Joy! This absolutely made my day! I’m so happy my recipes and videos are helpful to you, that’s always my hope when I share them. Thank you for taking the time to leave such a kind message and for sharing your bakes with your family and friends. Hugs from your sourdough bestie!!