This website contains affiliate links that earn commission at no extra cost to you. Thank you for using them and supporting my content!
One Recipe, Two Ways: Sourdough Bread Bowls or Mini Loaves
I think we can all agree — soup night just hits different when there’s fresh, warm sourdough on the table. Around here, that usually means either a crusty bread bowl filled to the brim or personal-sized mini sourdough loaves on the side for dipping. I used to think you had to go out to get something like this, but once I started making sourdough, I realized it’s so easy (and way better) to make them at home. They’re simple, fun, and the touch of rye flour gives them such a good flavor.
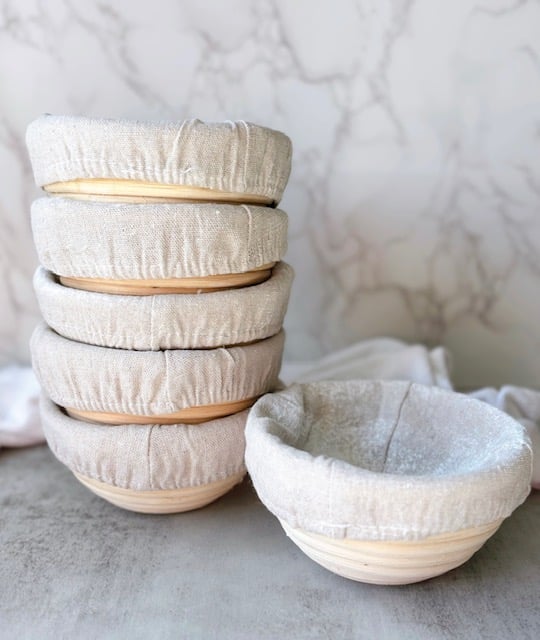
If you’re going for that perfect round shape, I like using these 5-inch mini bannetons. They help the dough keep its structure while proofing so it bakes up nice and even. If you don’t have mini bannetons, no problem — cereal bowls lined with a lint-free towel work great too. Whether you’re making mini loaves or bread bowls, the shaping process is the same… so let’s get started!
Step 1 – Mix the Dough
In a large bowl, combine:
- 133g active sourdough starter
- 467g warm filtered water
Stir until the starter dissolves and the water looks milky. Then add:
- 600g unbleached bread flour
- 67g rye flour (can sub all bread flour if you don’t have rye)
- 13g sea salt
Mix until you have a shaggy dough. Cover and let rest for 1 hour.
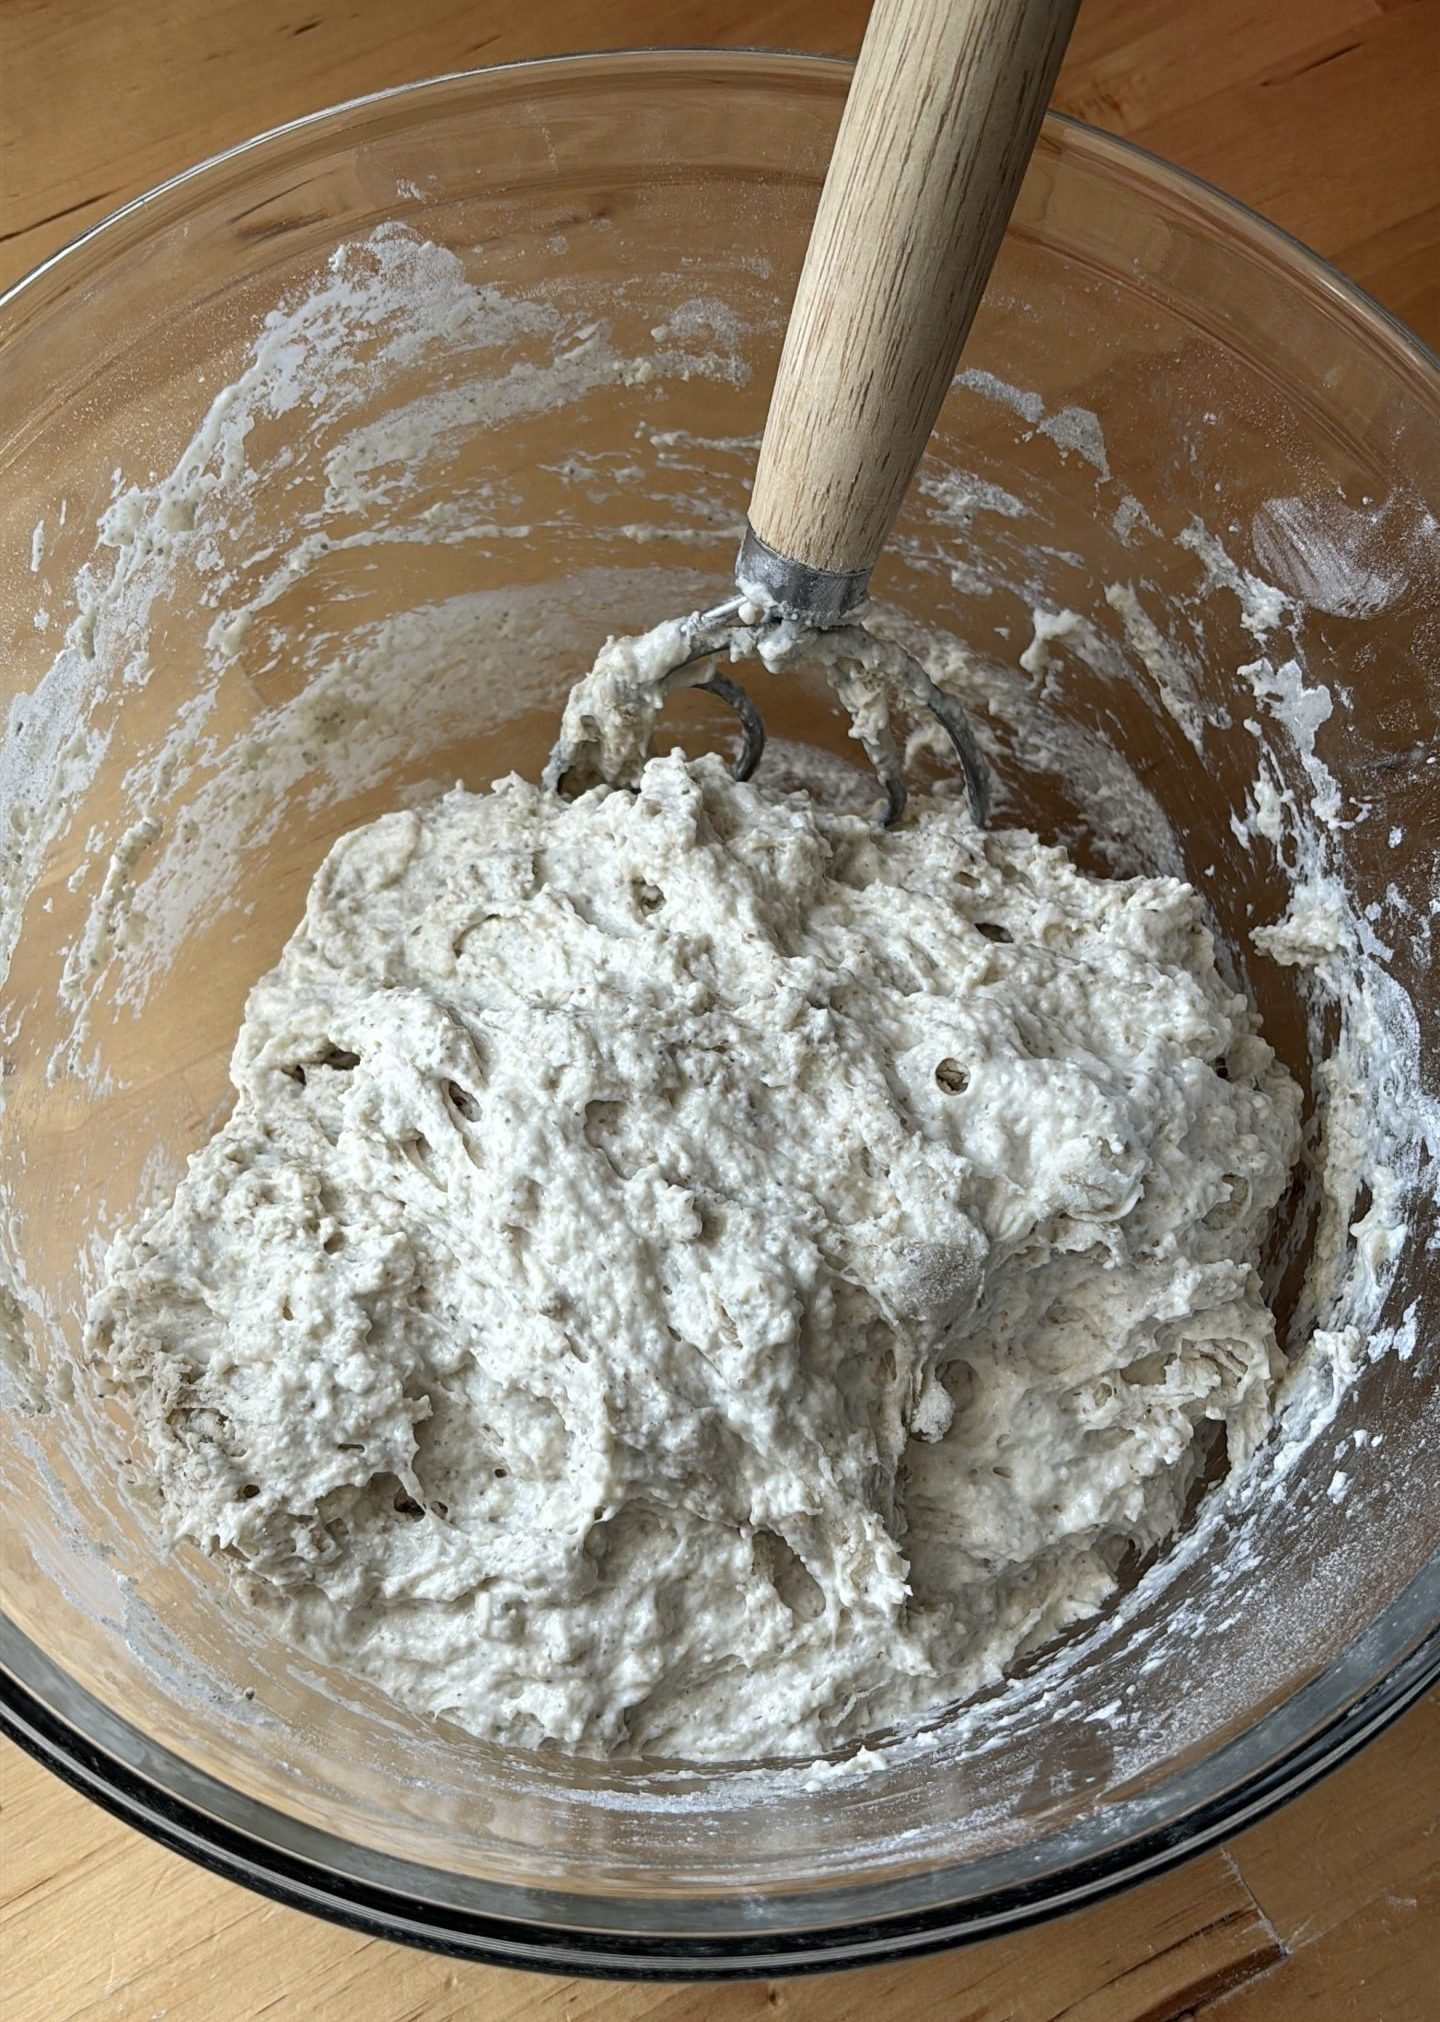
Step 2 – Stretch & Fold or Coil Fold
After the dough has rested, you’ll do four rounds of stretch and folds or coil folds, 30 minutes apart:
- With wet hands, grab one side of the dough, stretch it up, and fold it over itself.
- Rotate the bowl and repeat on all four sides.
- Cover and let rest for 30 minutes.
Repeat this process four times total. This helps develop gluten so your mini loaves keep their shape.
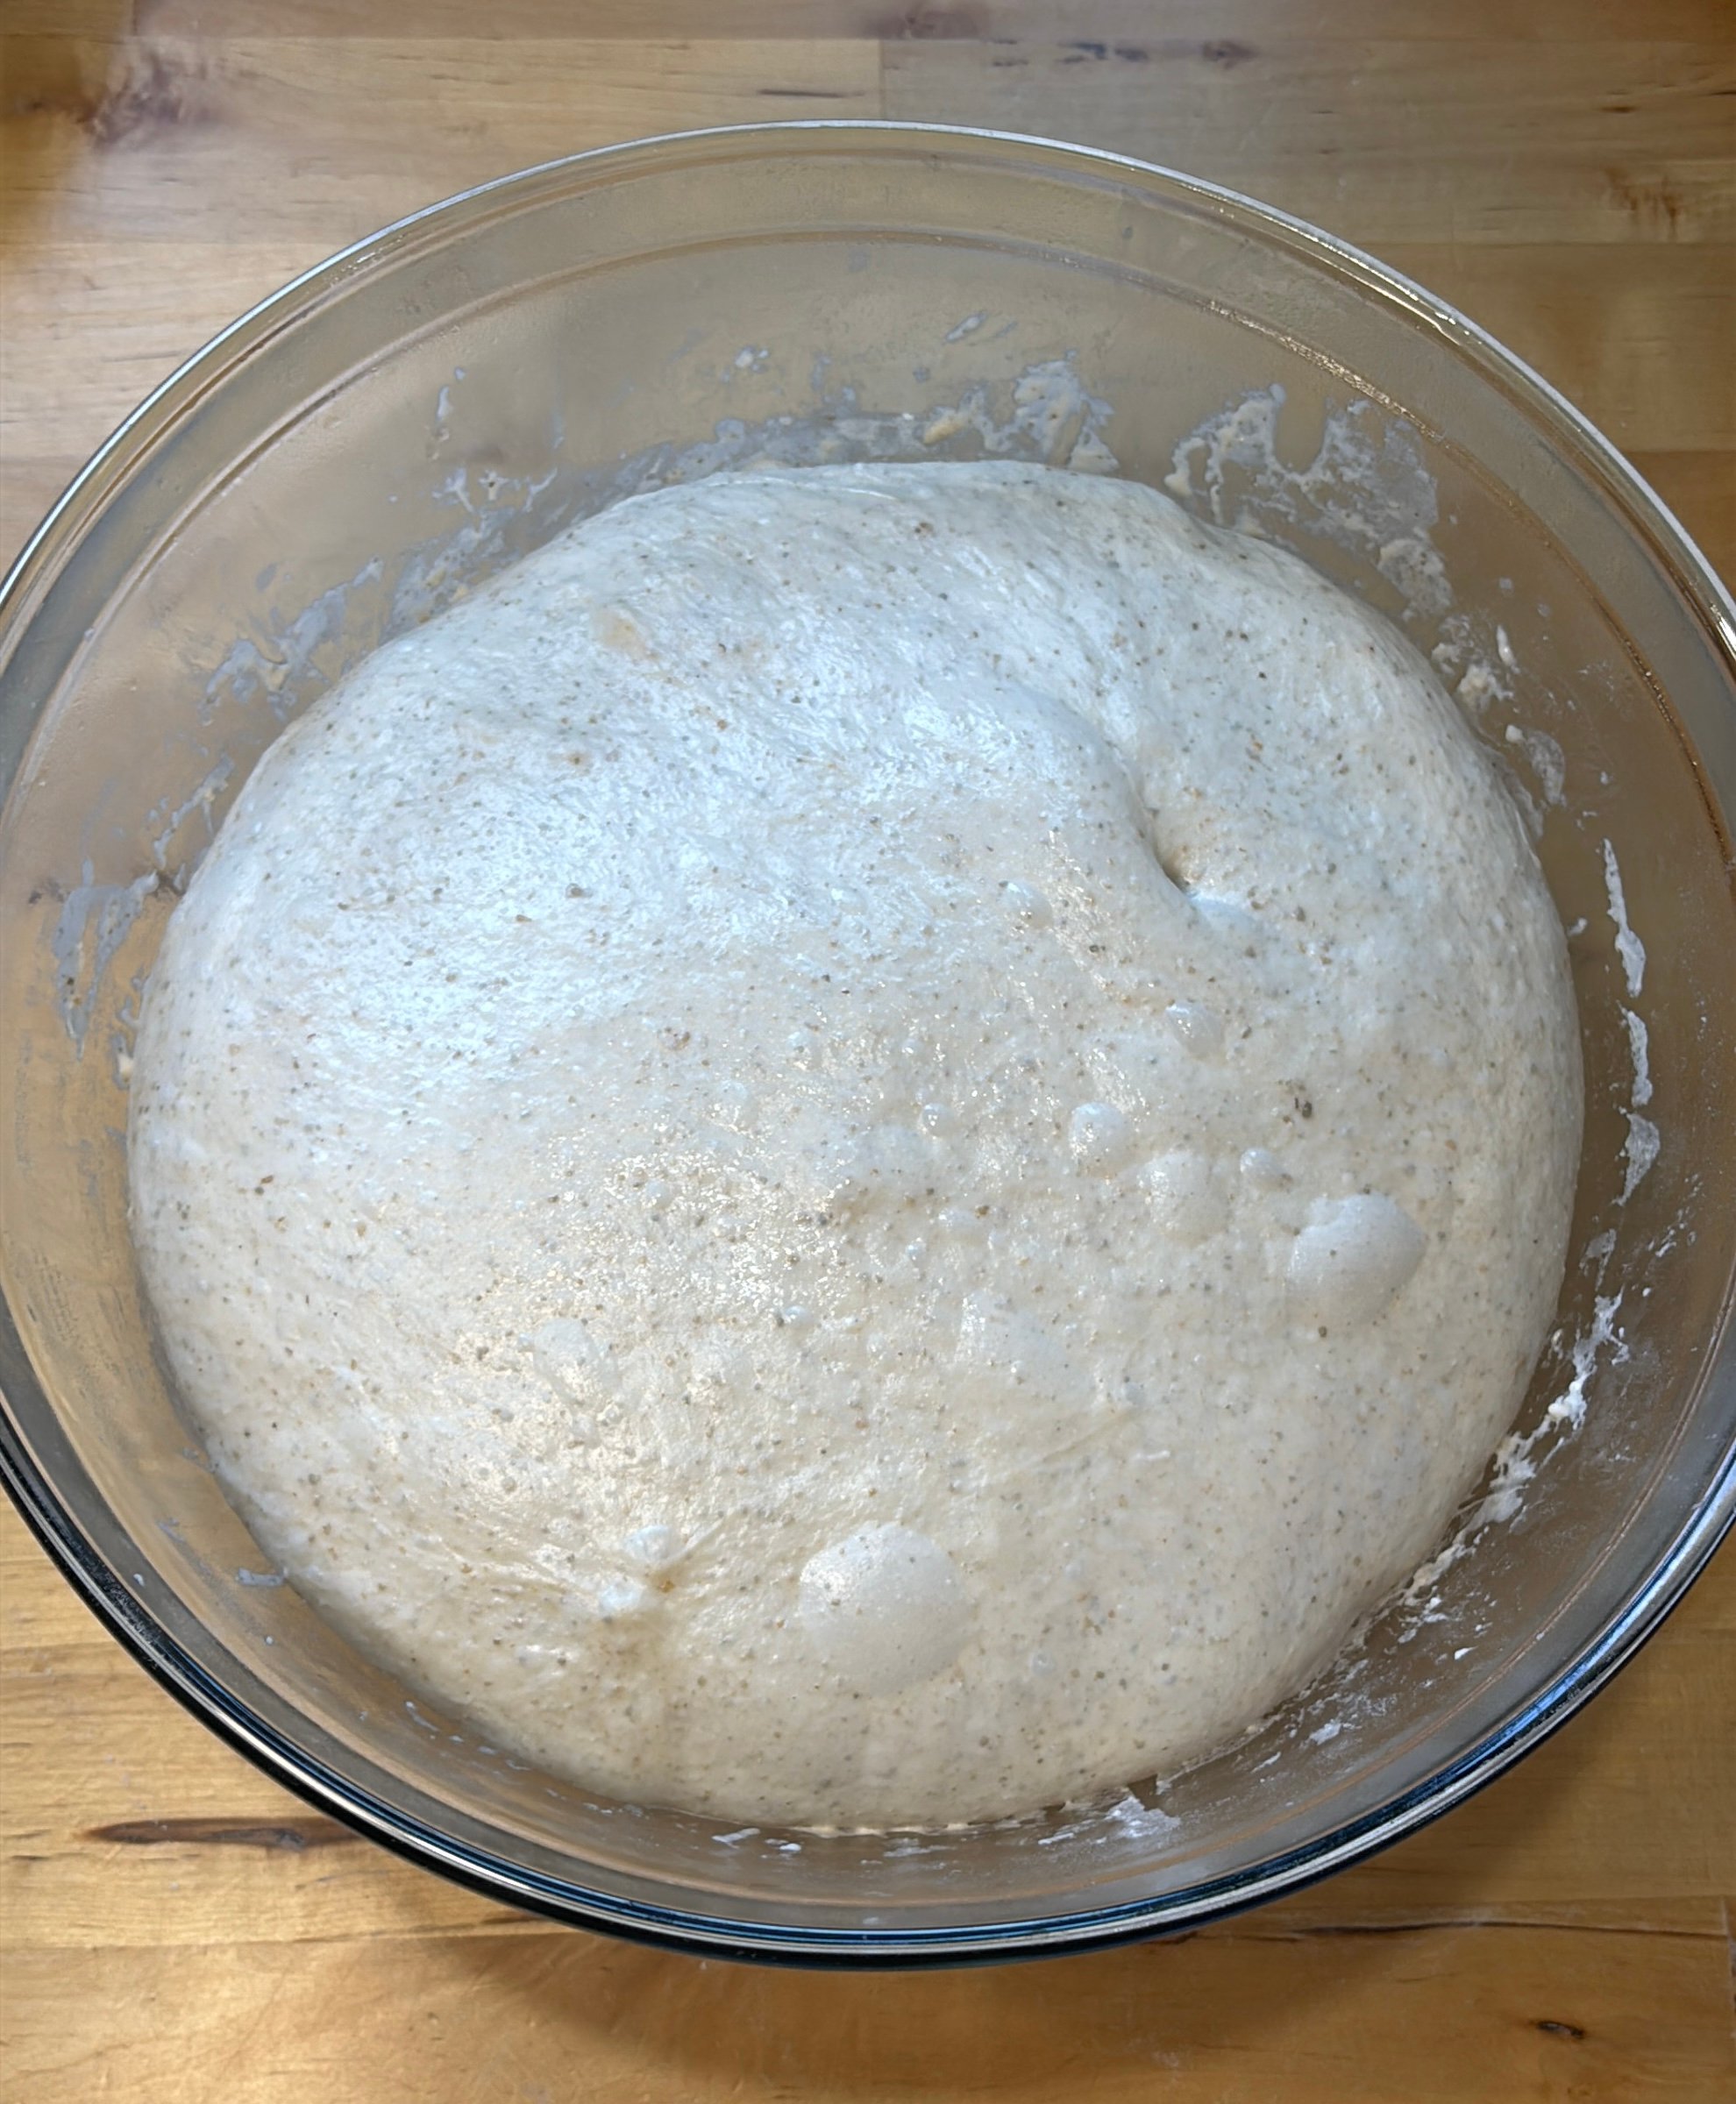
Step 3 – Bulk Fermentation
Bulk fermentation is the first long rise after mixing your dough, where the sourdough starter ferments the flour, creating air bubbles and developing flavor.
Let the dough rise, covered, until it’s
- Roughly doubled in size
- Jiggly when you shake it
- Bubbly on the tops and sides of the bowl
I like to use this chart as a guideline, but I use the visual cues (mentioned above) to know when my dough is done. This may take some practice to get down if you’re new to baking sourdough. Time starts when you mixed your dough in step 1!
| Dough Temp | Typical Bulk Time |
|---|---|
| 80°F / 27°C | 5–6 hours |
| 75°F / 24°C | 7–8 hours |
| 70°F / 21°C | 11–12 hours |
| 65°F / 18°C | 15–16 hours |
Start checking early — overfermentation can make the dough unmanageable, sticky, and hard to shape.
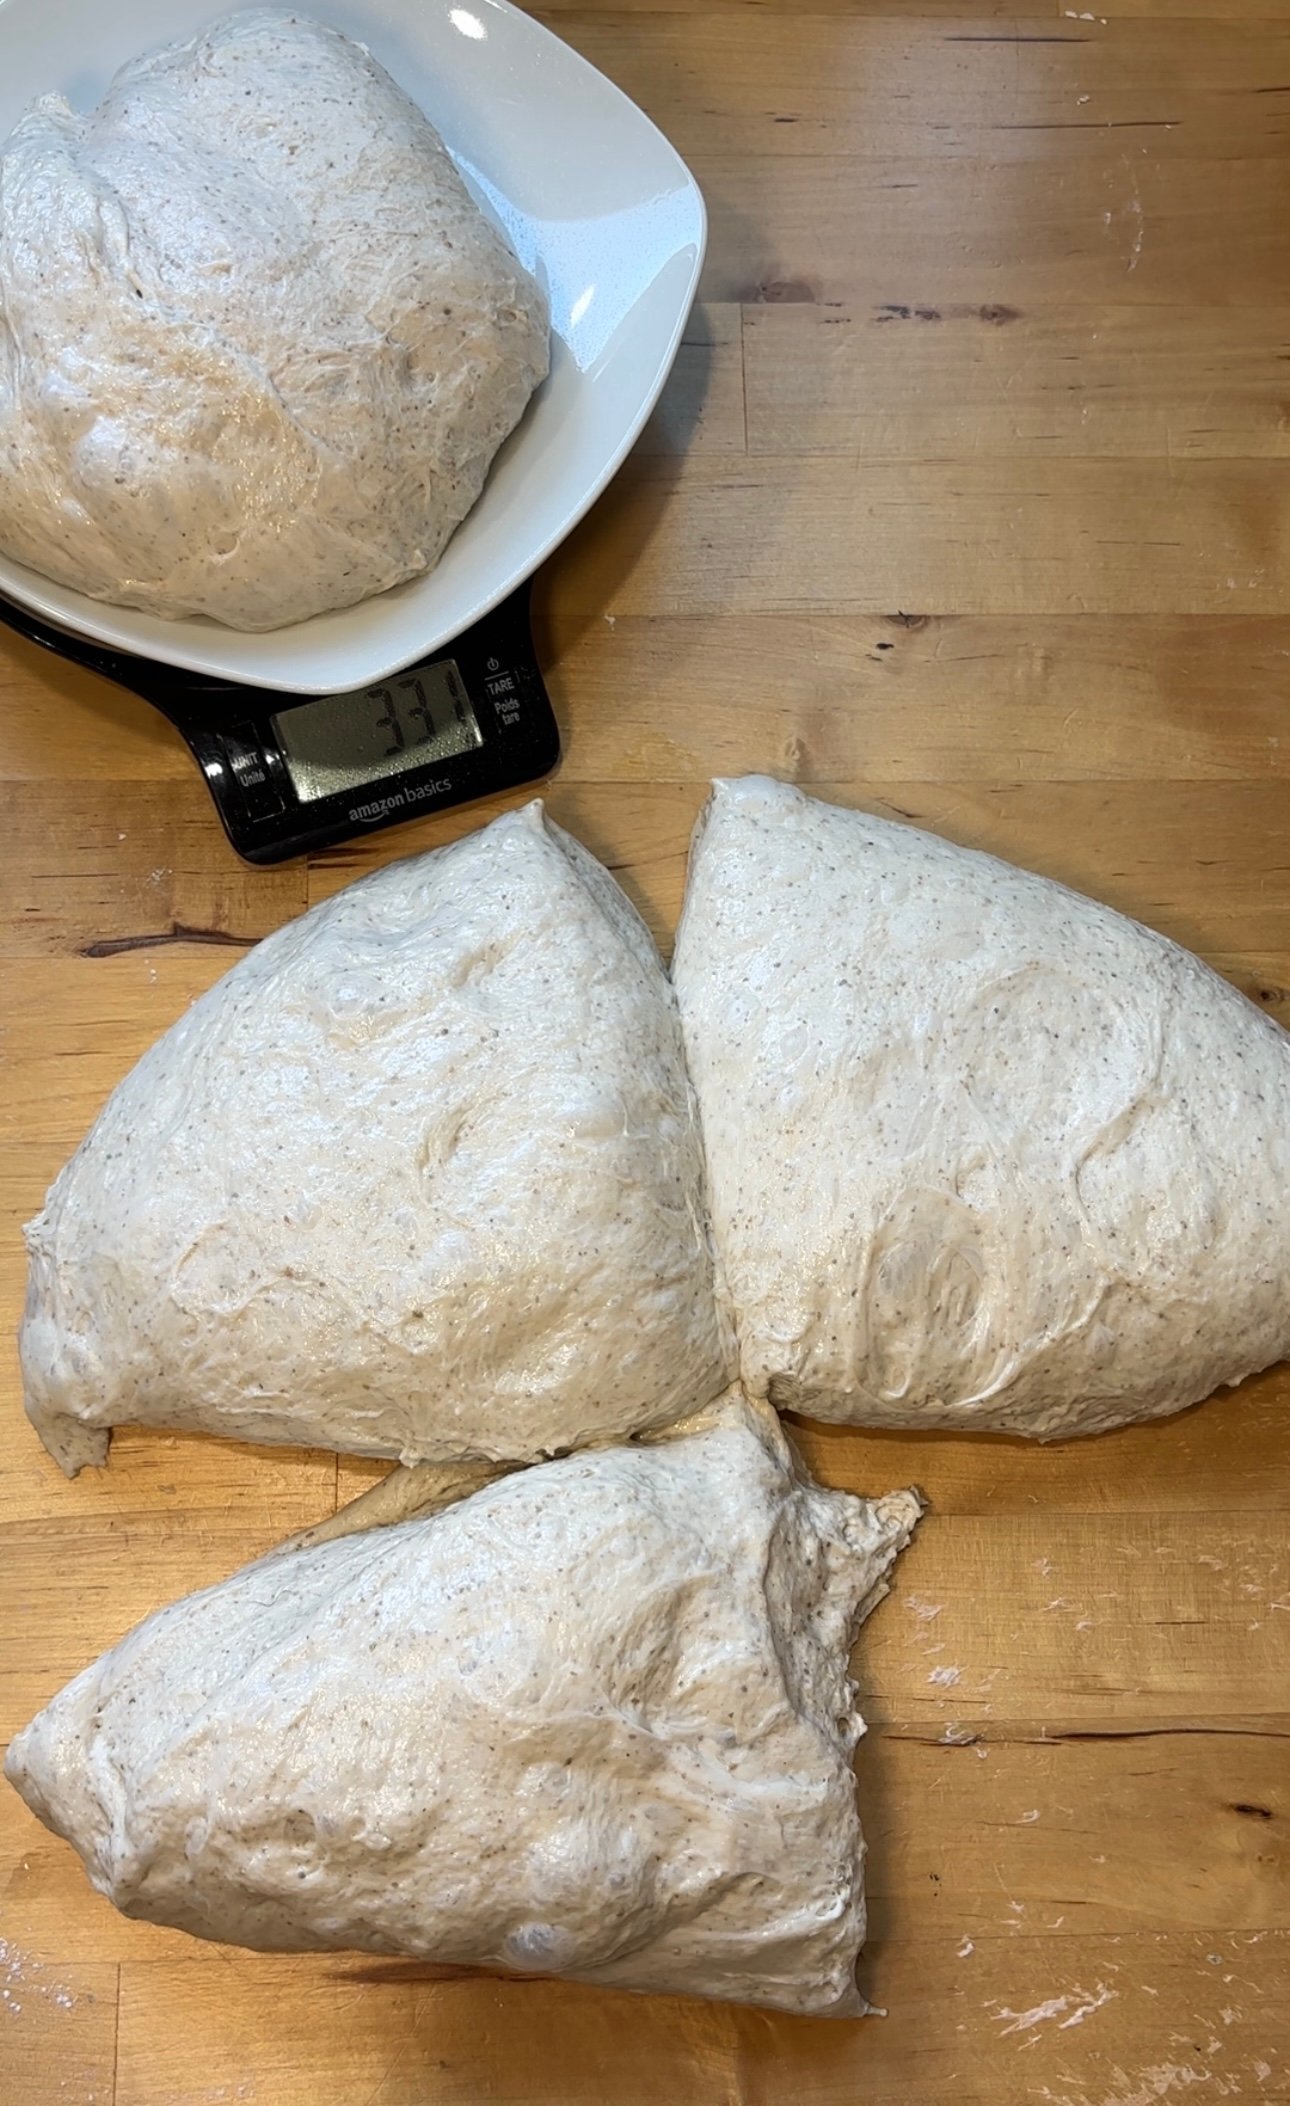
Step 4 – Divide and Shape the Loaves
Once your dough is ready, gently turn it onto a surface. Using wet hands and a wet bench scraper, divide it into 4 equal pieces (about 320g each). Shape each piece into a tight round boule. Tight shaping is important for mini sourdough loaves.
Rye flour can make your dough a little stickier than you might be used to, but it’s worth it for the flavor. If it feels tacky, wet your hands with water or lightly dust your hands and work surface with flour to make handling easier.
Place each mini boule seam-side up in well-floured mini bannetons or towel-lined cereal bowls. I like to dust my mini bannetons (or any proofing bowls) with Thai rice flour. It prevents the dough from sticking and makes for an easy, clean release every time.
If you need a good shaping tutorial, I have one here.
Step 5 – Final Proof
Cold Proof Overnight (recommended): Cover and refrigerate for about 12-14 hours (up to 24 hours).
Room Temp Proof (Same-day option): Let proof at a warm room temperature for about 2 hours, or until puffy and risen.
The cold proof will make scoring easier, improve flavor, and give you more baking flexibility.
Step 6 – Bake
There are two main ways I like to bake these loaves. The method you choose will depend on things like how many Dutch ovens you have and the size of them. Personally, I prefer using two Dutch ovens so I get the best rise. Another option is to open-bake if that works better for you.
Dutch Oven Method-
- Preheat oven to 450°F (232°C) with Dutch oven inside for 30 minutes.
- Remove dough from the fridge, flip onto parchment paper, and score the top (a simple “X” works great).
- Carefully lower dough into the hot Dutch oven.
- Bake covered for 20 minutes, then uncovered for 15 minutes more until deep golden and the internal temperature reaches 205°F (96°C).
- Transfer to a wire rack and cool for at least 1 hour before turning into bowls. Repeat until all loaves are baked.
Open baking Method-
- Preheat a baking sheet in the oven at 450°F (232°C) for 30 minutes with another empty pan placed on the rack underneath (this will be used for steam).
- Remove the dough from the fridge and carefully arrange the four mini loaves evenly on the hot, preheated parchment-lined cookie sheet.
- Score the tops of the loaves (a simple “X” works great).
- Lightly spray the loaves with water right after scoring.
- Place the cookie sheet in the oven. Immediately pour 1 cup of hot water into the bottom pan to create steam, then close the oven door. (Be careful not to splash water on the oven glass—cover with a towel if needed.)
- Bake for 20 minutes with steam.
- Carefully remove the steam pan, lower the oven temperature to 425°F (218°C), and bake for another 15 minutes, or until the loaves are golden brown and reach an internal temperature of 205°F (96°C).
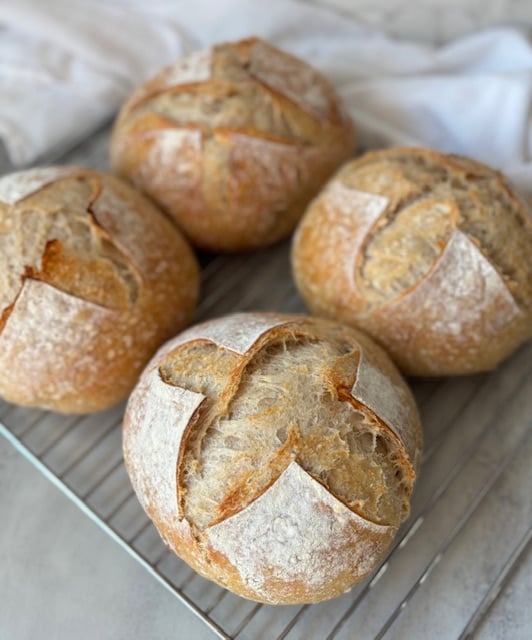
Step 7 – Cool and Make the Bowls
Let cool for 1-2 hours. If making bread bowls, slice a round “lid” off each loaf. Scoop out the inside crumb, leaving some around the wall. Add your favorite soup, chili, or dip! Enjoy!

If You Liked This Recipe, Try These:
- The Fluffiest Sourdough Bread with a Hint of Whole Wheat – my go-to fluffy sourdough recipe with just 10% whole wheat for extra flavor and oven spring.
- Soft Sourdough Sandwich Bread – a light and airy everyday loaf that’s perfect for sandwiches and toast.
- Sourdough Apple Fritter Focaccia – a sweet, cozy bake with cinnamon apples that makes the best brunch treat.

Sourdough Mini Loaves for Bread Bowls (Makes 4)
Equipment
- 1 Large mixing bowl
- Thai Rice Flour for dusting bannetons
- 4 mini bannetons or cereal bowls + lint-free towels
- 1 Dutch Oven or Bread Oven (or baking steel + steam pan)
- 1 Wire cooling rack
Ingredients
- 133 g active sourdough starter
- 467 g warm filtered water
- 600 g unbleached bread flour
- 67 g dark rye flour (can sub with bread flour)
- 13 g sea salt
Instructions
- Mix the Dough: In a large mixing bowl, stir together 133g active sourdough starter and 467g warm filtered water until the starter dissolves and the water looks milky. Add 600g unbleached bread flour, 67g rye flour (or sub with bread flour), and 13g sea salt. Mix until you have a shaggy dough. Cover and rest for 1 hour.
- Stretch & Fold (or Coil Fold): With wet hands, grab one side of the dough, stretch it up, and fold it over itself. Rotate the bowl and repeat on all four sides. Cover and rest for 30 minutes. Repeat this process four times total, 30 minutes apart. This builds the gluten so your bowls hold their shape.
- Bulk Fermentation: Cover and let rise until roughly doubled in size, jiggly, and bubbly on the tops and sides. I like to use this chart as a guideline, but I use the visual cues (mentioned above) to know when my dough is done.Dough temp vs. bulk time 80°F / 27°C → 5–6 hours75°F / 24°C → 7–8 hours70°F / 21°C → 11–12 hours65°F / 18°C → 15–16 hours(Time starts when you mixed your dough in step 1)Start checking early to avoid overfermentation.
- Divide and Shape the Loaves: Gently turn dough out onto a surface. Using wet hands and a wet bench scraper, divide into 4 equal pieces (about 320g each). Shape each into a tight round boule.Place seam-side up in well-floured mini bannetons or towel-lined cereal bowls.
- Final Proof:Cold Proof (recommended): Cover and refrigerate for 12–14 hours (up to 24 hours).Room Temp Proof (same-day option): Let proof at warm room temperature for about 2 hours until puffy and risen.
- Bake:Dutch Oven Method: Preheat oven to 450°F (232°C) with Dutch ovens inside for 30 minutes.Remove dough from fridge, flip onto parchment paper, and score the top.Carefully place in hot Dutch oven.Bake 20 minutes covered, then 15 minutes uncovered until deep golden.OROpen Baking Method: Preheat a baking sheet in the oven at 450°F (232°C) for about 30 minutes with another empty pan placed on the rack underneath (this will be used for steam).Remove the dough from the fridge and carefully arrange the four mini loaves evenly on the hot, preheated parchment-lined cookie sheet.Score the tops of the loaves (a simple “X” works great). Lightly spray the loaves with water right after scoring.Place the cookie sheet in the oven. Immediately pour 1 cup of hot water into the bottom pan to create steam, then close the oven door. (Be careful not to splash water on the oven glass—cover with a towel if needed.)Bake for 20 minutes with steam. Carefully remove the steam pan, lower the oven temperature to 425°F (218°C), and bake for another 15 minutes, or until the loaves are golden brown and reach an internal temperature of 205°F (96°C).
- Enjoy: Let cool for 1-2 hours. If making bread bowls, slice a round “lid” off each loaf. Scoop out the inside crumb, leaving some around the wall. Add your favorite soup, chili, or dip!
Video