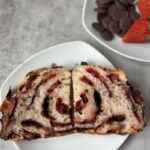
Chocolate and Strawberry Swirl Sourdough Loaf
Servings: 1 loaf
A fun twist on classic sourdough, this Chocolate and Strawberry Swirl Sourdough Loaf is filled with melty chocolate ribbons and jammy strawberry swirls using freeze-dried strawberries. It’s beginner-friendly, festive for Valentine’s Day, and just as delicious year-round.
Print Recipe
Equipment
- Large mixing bowl
- Bowl cover or plastic wrap
- Banneton Basket or bowl with towel
Ingredients
Dough
- 100 g active sourdough starter
- 365 g filtered water
- 500 g unbleached bread flour
- 10 g salt
Add-ins
- 100 g chocolate melting wafers or chocolate chips
- 35 g freeze-dried strawberries
Instructions
- Step 1: Mix the DoughIn a large bowl, combine the active sourdough starter and filtered water. Stir until the starter dissolves and the water looks milky. Add the bread flour and salt. Mix until a shaggy dough forms. Cover and let rest for 1 hour.100 g active sourdough starter, 365 g filtered water, 500 g unbleached bread flour, 10 g salt
- Step 2: Stretch and FoldsPerform four rounds of stretch and folds, spaced 30 minutes apart.To do stretch and folds: with wet hands, grab one side of the dough, stretch it up, and fold it over itself. Rotate the bowl and repeat on all four sides. Cover and rest between each round.
- Step 3: Bulk FermentationAfter the final stretch and fold, let the dough rise, covered, until it’s about doubled, bubbly, and jiggly. This may take anywhere from 5 to 16 hours depending on dough temperature. I like to follow this chart as a guideline but mainly go off of my visual cues (mentioned above).Dough temp vs. Time80°F (27°C) → 5–6 hours75°F (24°C) → 7-8 hours70°F (21°C) → 11–12 hours65°F (18°C) → 15–16 hoursDon’t let it go too long! Overproofed dough can become sticky and hard to shape.This bulk fermentation process may take some practice to get down if you’re new to baking sourdough.
- Step 4: Add the Chocolate and Strawberries and Shape the DoughTurn the dough out onto a clean surface.1. Using wet hands, gently stretch the dough into a rough rectangle. 2. Evenly sprinkle a portion of the chocolate melting wafers (or chocolate chips) and freeze-dried strawberries down the center of the rectangle. 3. Fold the right side of the dough into the center to cover the inclusions. Sprinkle more of the chocolate and strawberries on top. 4. Fold the left side over, adding the remaining inclusions on top of that.5. Gently roll the dough up into a log, popping any large air bubbles as you go and pinching the sides to keep all of the inclusions tucked inside the dough.6. Flip the dough seam-side up into a rice floured banneton basket. (Check out the blog post above for detailed pictures of these steps!)100 g chocolate melting wafers, 35 g freeze-dried strawberries
- Step 5: Final Proof- Two options depending on your timeline: Cold Proof (recommended): Cover and refrigerate overnight or up to 24 hours.Counter Proof: Let the dough proof in a warm spot for 2–3 hours until puffed up, then bake.*I recommend the cold proof because it improves flavor, makes the dough easier to handle, and lets you bake on your own schedule.
- Step 6: BakePreheat the oven to 450°F (232°C) with a Dutch oven inside for 30 minutes.Flip the dough onto parchment paper and score the top with a bread lame.Transfer to the hot Dutch oven. Bake covered for 40 minutes, then uncovered for 5 minutes.Check internal temperature. The bread is fully baked when the center reaches 205°F.
- Cool on a rack for 1–2 hours before slicing.
Notes
Dried strawberries will also work, but they tend to be darker and more brown in color, so they don’t create the same bright, pretty swirl as freeze-dried strawberries.
Chocolate melting wafers create more even chocolate ribbons, but chocolate chips work too
