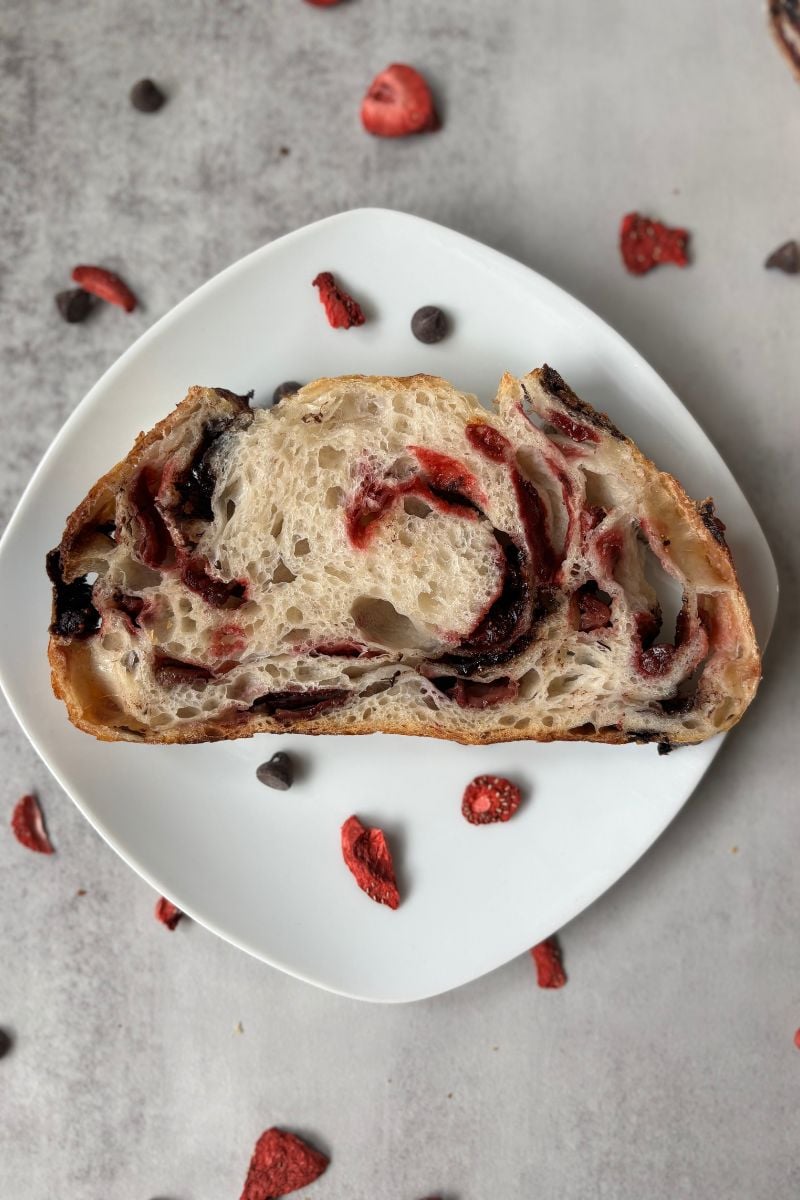
Chocolate and Strawberry Swirl Sourdough Loaf
Nothing says love like chocolate covered strawberries. And since sourdough is always in the mix around here, I figured why not combine the two for a special Valentine’s Day sourdough loaf. But honestly, this one is just as good year round!
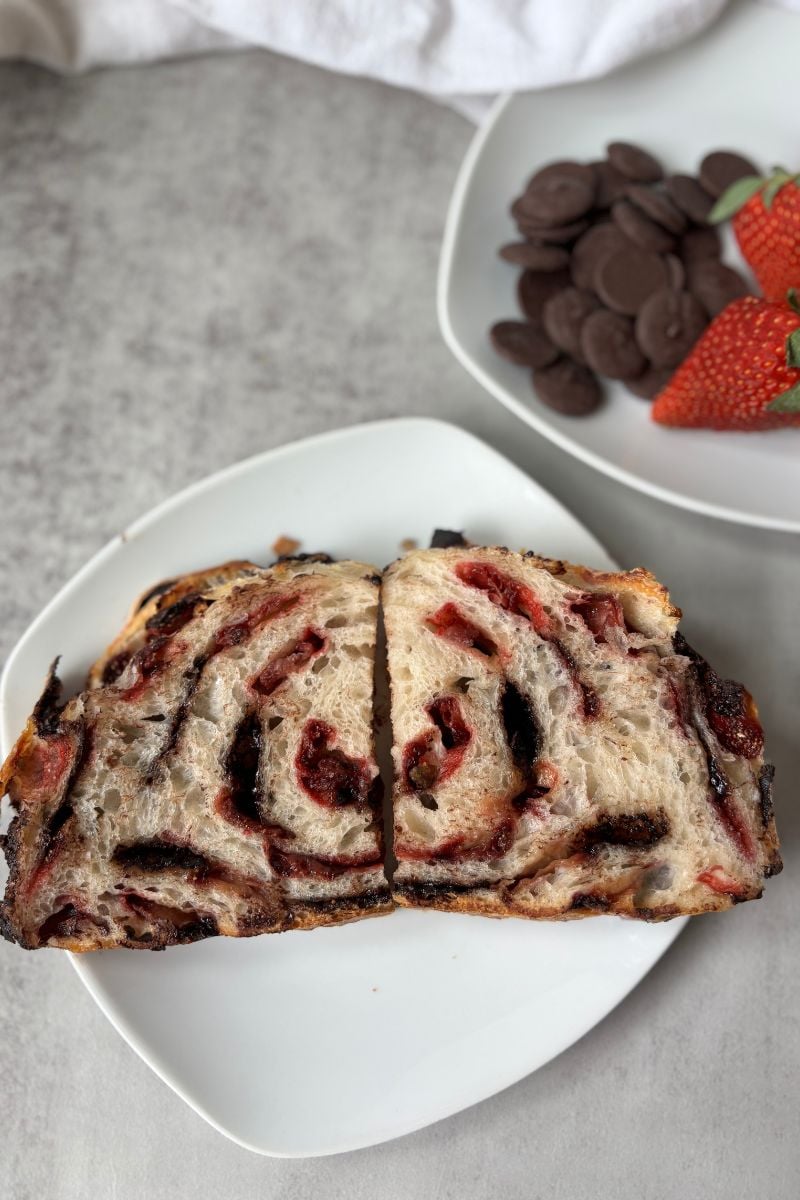
The base of this chocolate strawberry swirl sourdough is my beginner sourdough recipe (with a little extra water) to keep things simple, but don’t let that fool you! I tested this version a lot, including adding the chocolate and strawberries during stretch and folds, and while it worked, the distribution was not my favorite. I finally landed on this swirled loaf instead, and it bakes up beautifully with melty chocolate ribbons and jammy strawberry swirls in every slice.
Disclosure: This post contains affiliate links. If you purchase something through them, I may earn a small commission at no extra cost to you. These links help fund the free sourdough recipes and tips I share with our sourdough community. Thank you for your support!
Why Freeze-Dried Strawberries Are Key
Fresh strawberries contain a lot of moisture, which can create dense, gummy, or underbaked pockets in sourdough bread.
Freeze-dried strawberries work differently. As the dough proofs and bakes, they slowly rehydrate, creating a jammy strawberry swirl without adding excess moisture to the dough. This keeps the crumb light, evenly baked, and full of flavor.
You can usually find freeze-dried strawberries in the snack or dried fruit section of most grocery stores. I typically buy mine at Walmart, Trader Joe’s, or Costco, but most grocery stores carry them.
Chocolate Melting Wafers vs. Chocolate Chips
I like to use good quality chocolate melting wafers in this loaf because they melt and spread more evenly, creating chocolate ribbons throughout the bread. You can absolutely use chocolate chips if that’s what you have on hand, but melting wafers are my favorite for this recipe.
Tools & Equipment
These are the tools I use and recommend for this Chocolate Strawberry Swirl Sourdough Loaf:
- Digital kitchen scale– Accurate measurements are key for consistent sourdough results.
- Large mixing bowl– Big enough to allow the dough to rise and move during stretch and folds.
- Dough whisk– Makes mixing the dough quick and easy, especially when combining the starter, water, flour, and salt.
- Proofing banneton basket or bowl with a towel– Helps the dough hold its shape during the final proof.
- Bowl covers or plastic wrap– Helps prevent the dough from drying out during rest periods, bulk fermentation, and the final proof.
- Dutch oven– Traps steam in the oven, prevents chocolate from burning, and helps create a good rise and crust.
- Parchment paper– Makes transferring the dough into the hot Dutch oven easy and safe.
Ingredients
Dough
- 100 grams active sourdough starter
- 365 grams filtered water
- 500 grams unbleached bread flour
- 10 grams salt
Inclusions
- 100 grams chocolate melting wafers or chocolate chips
- 35 grams freeze-dried strawberries
How to Make Chocolate Strawberry Swirl Sourdough
Step 1: Mix the Dough
In a large bowl, combine:
- 100g active sourdough starter
- 365g filtered water
Stir until the starter dissolves and the water looks milky. Then add:
- 500g unbleached bread flour
- 10g sea salt
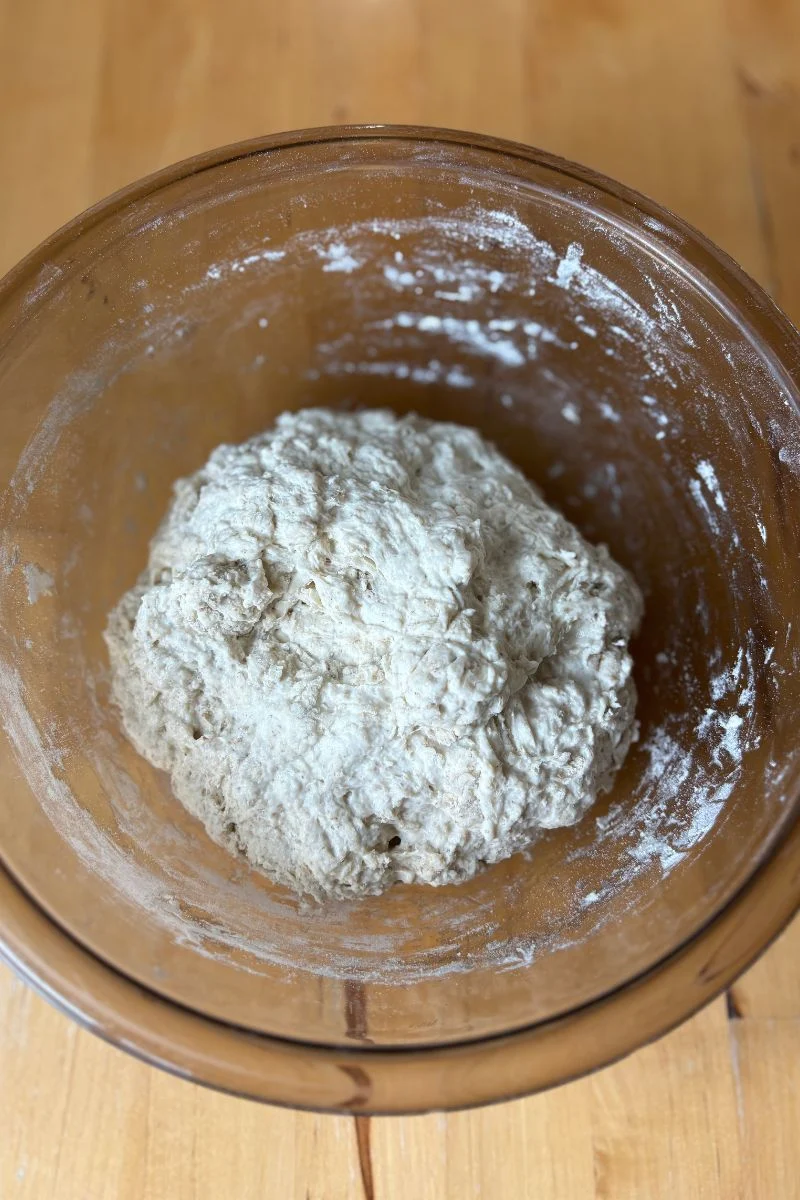
Mix until you have a shaggy dough. Cover and let rest for 1 hour.
Step 2: Stretch & Folds (Builds Strength)
After the dough has rested, you’ll do four rounds of stretch and folds, 30 minutes apart:
- With wet hands, grab one side of the dough, stretch it up, and fold it over itself.
- Rotate the bowl and repeat on all four sides.
- Cover and let rest for 30 minutes.
Repeat this process four times total.
This step helps develop the gluten, so your bread has structure.
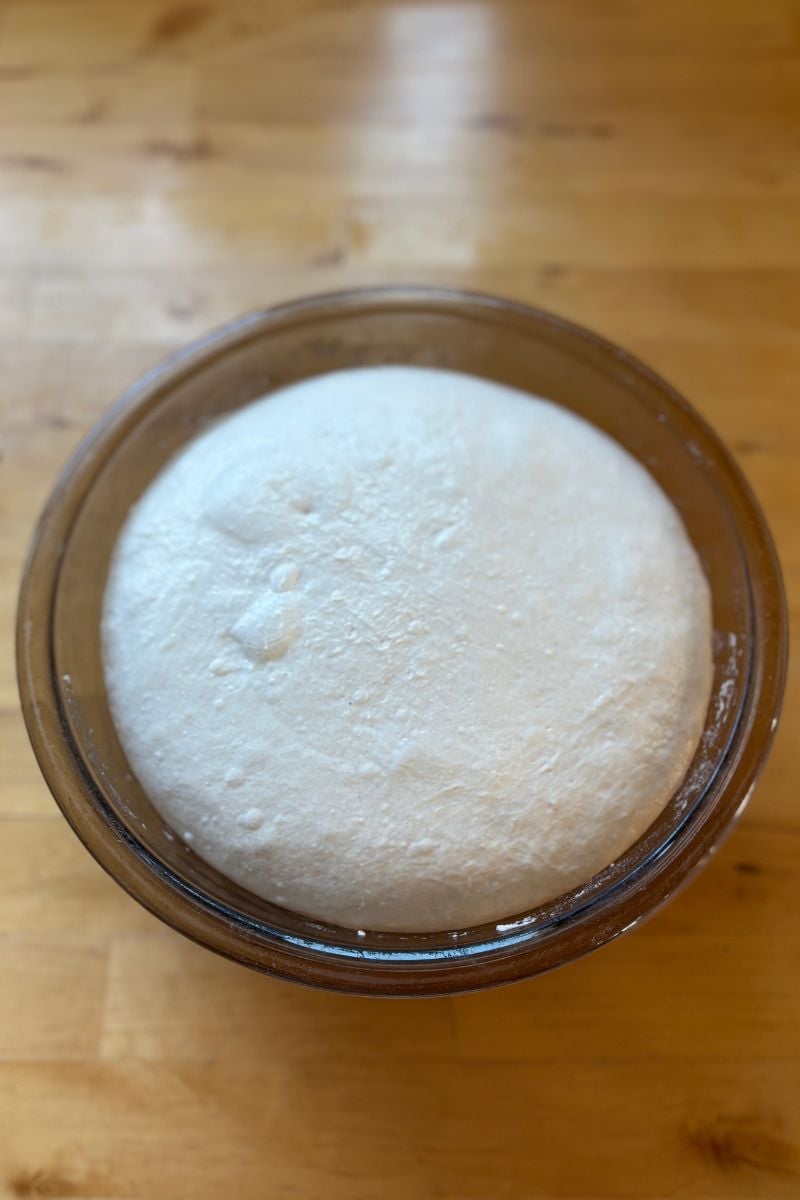
Step 3: Bulk Fermentation (The First Rise)
Bulk fermentation is the first long rise after mixing your dough. This is when the sourdough starter ferments the flour, creating air bubbles and developing flavor. The dough will grow, strengthen, and become airy.
After the final stretch and fold, let your dough rise at room temperature until about doubled in size, bubbly, and jiggly.
I like to use this chart as a guideline. Timing starts when you first mixed your dough in Step 1 and depends on dough temperature:
| Dough Temp | Typical Bulk Time* |
|---|---|
| 80°F / 27°C | 5–6 hours |
| 75°F / 24°C | 7–8 hours |
| 70°F / 21°C | 11–12 hours |
| 65°F / 18°C | 15–16 hours |
If your house is warmer, it will be quicker. If your house is cooler, it will take longer.
Be careful not to let this stage go too long—overfermentation can cause the yeast to break down the gluten structure, leaving you with dough that’s overly sticky and hard to shape.
This bulk fermentation process may take some practice to get down if you’re new to baking sourdough.
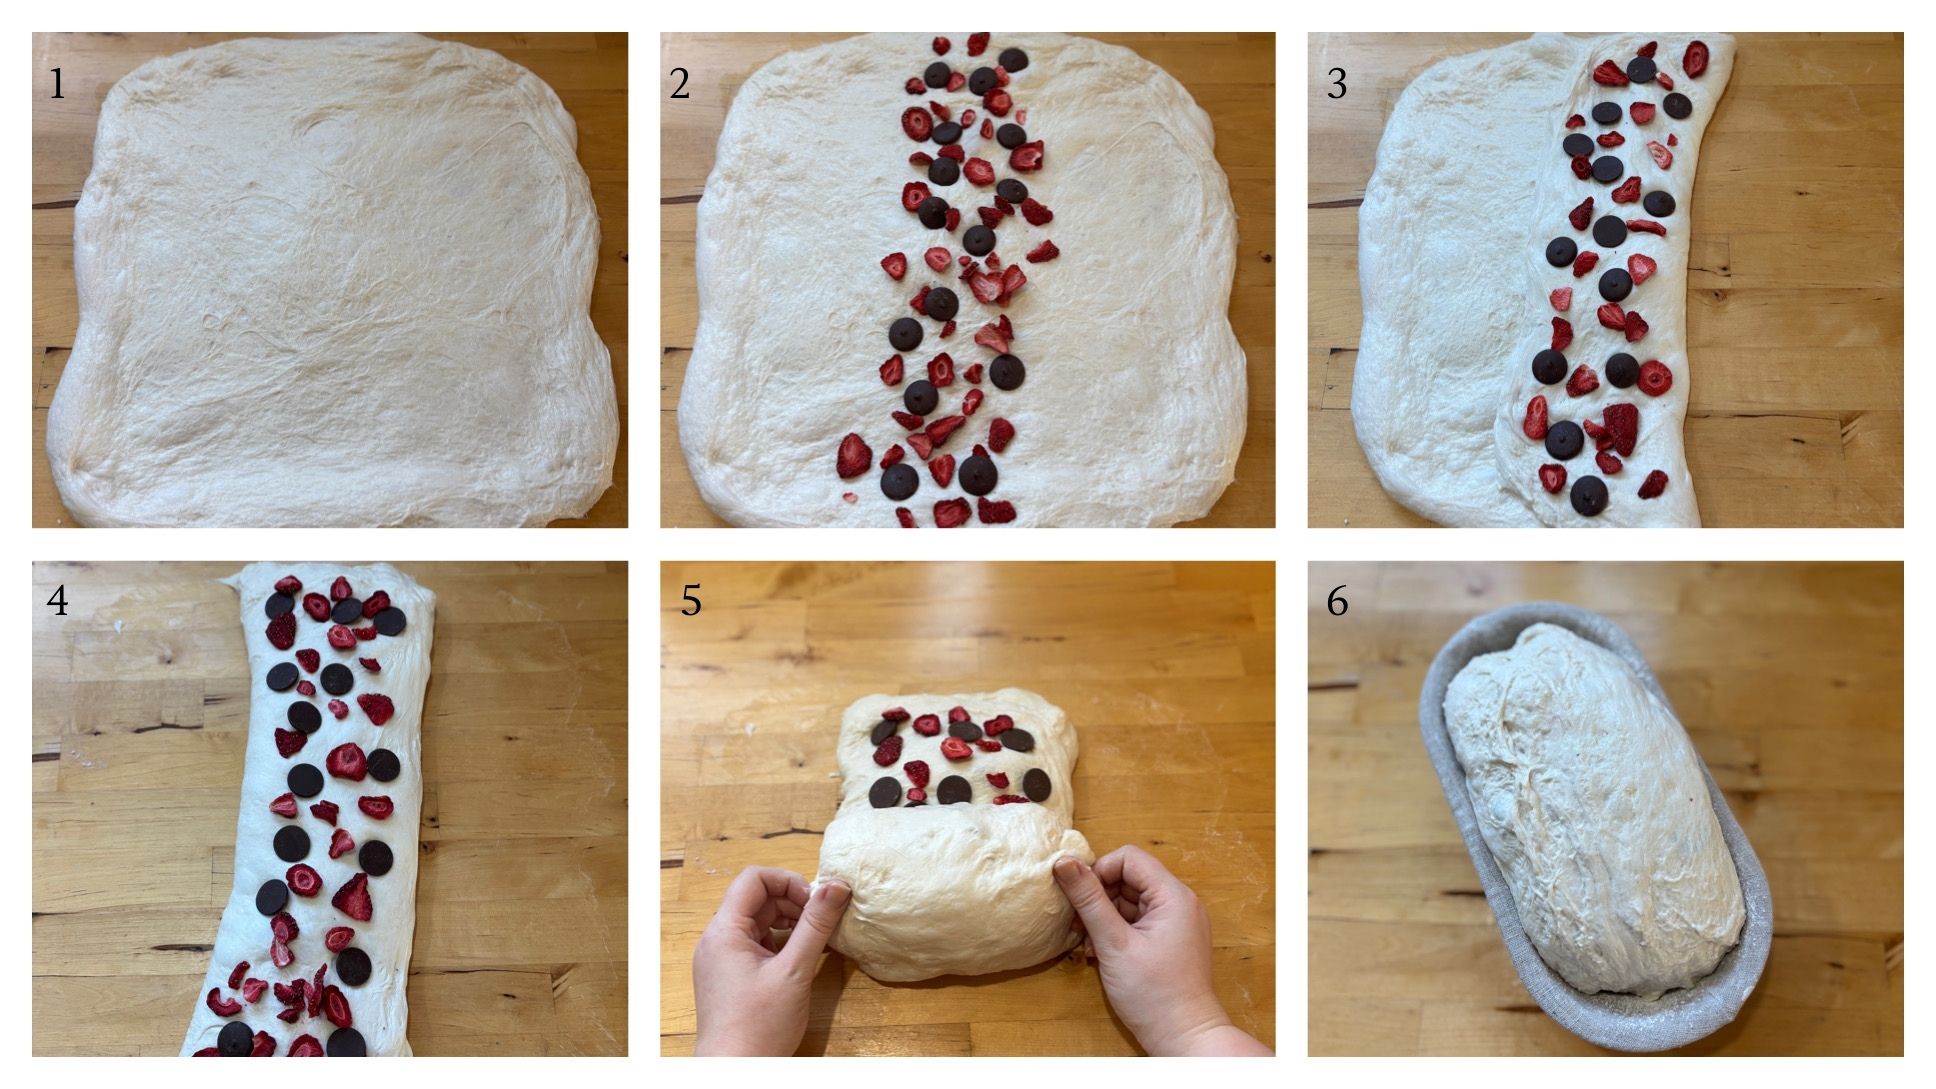
Step 4: Add the Chocolate and Strawberries + Shape the Dough
Once your dough is showing visual signs that it’s ready (doubled, bubbly, and airy), gently turn it out onto a clean surface.
- Using wet hands, gently stretch the dough into a rough rectangle.
- Evenly sprinkle a portion of the 100g chocolate melting wafers (or chocolate chips) and 35g freeze-dried strawberries down the center of the rectangle.
- Fold the right side of the dough into the center to cover the inclusions. Sprinkle more of the chocolate and strawberries on top.
- Fold the left side over, adding the remaining inclusions on top of that.
- Gently roll the dough up into a log, popping any large air bubbles as you go and pinching the sides to keep all of the inclusions tucked inside the dough.
- Flip the dough seam-side up into a rice-floured banneton basket.
Step 5: The Final Proof (Fridge or Counter)
Now that your dough is in the banneton basket, it’s time for the second rise. You have two options:
Best for beginners (cold proof):
Cover and place in the refrigerator overnight (or up to 24 hours).
Faster option:
Let the dough proof in a warm spot for about 2-3 hours, until it’s puffed up in the banneton, then bake immediately.
I recommend the cold proof because it improves flavor, makes the dough easier to handle, and lets you bake on your own schedule.
Step 6: Bake Your Bread
When you’re ready to bake:
- Preheat your oven to 450°F (232°C) with a Dutch oven inside for 30 minutes.
- Take your dough out of the fridge and flip it onto a piece of parchment paper.
- Score the top with a bread lame so it can expand in the oven.
- Carefully place the dough into the hot Dutch oven.
- Bake covered for 40 minutes, then uncovered for 5 minutes.
- Check internal temperature. The bread is fully baked when the center reaches 205°F.
Remove the bread from the Dutch oven and let it cool on a rack for at least 1–2 hours before slicing. The bread continues to bake as it cools, and cutting too early can lead to a gummy texture.
Tips for Best Results
- Use freeze-dried strawberries, not fresh or frozen
- Add inclusions after bulk fermentation
- Let the loaf cool fully before slicing to set the crumb
Chocolate and Strawberry Swirl Sourdough Loaf
Equipment
- Large mixing bowl
- Bowl cover or plastic wrap
- Banneton Basket or bowl with towel
Ingredients
Dough
- 100 g active sourdough starter
- 365 g filtered water
- 500 g unbleached bread flour
- 10 g salt
Add-ins
- 100 g chocolate melting wafers or chocolate chips
- 35 g freeze-dried strawberries
Instructions
- Step 1: Mix the DoughIn a large bowl, combine the active sourdough starter and filtered water. Stir until the starter dissolves and the water looks milky. Add the bread flour and salt. Mix until a shaggy dough forms. Cover and let rest for 1 hour.100 g active sourdough starter, 365 g filtered water, 500 g unbleached bread flour, 10 g salt
- Step 2: Stretch and FoldsPerform four rounds of stretch and folds, spaced 30 minutes apart.To do stretch and folds: with wet hands, grab one side of the dough, stretch it up, and fold it over itself. Rotate the bowl and repeat on all four sides. Cover and rest between each round.
- Step 3: Bulk FermentationAfter the final stretch and fold, let the dough rise, covered, until it’s about doubled, bubbly, and jiggly. This may take anywhere from 5 to 16 hours depending on dough temperature. I like to follow this chart as a guideline but mainly go off of my visual cues (mentioned above).Dough temp vs. Time80°F (27°C) → 5–6 hours75°F (24°C) → 7-8 hours70°F (21°C) → 11–12 hours65°F (18°C) → 15–16 hoursDon’t let it go too long! Overproofed dough can become sticky and hard to shape.This bulk fermentation process may take some practice to get down if you’re new to baking sourdough.
- Step 4: Add the Chocolate and Strawberries and Shape the DoughTurn the dough out onto a clean surface.1. Using wet hands, gently stretch the dough into a rough rectangle. 2. Evenly sprinkle a portion of the chocolate melting wafers (or chocolate chips) and freeze-dried strawberries down the center of the rectangle. 3. Fold the right side of the dough into the center to cover the inclusions. Sprinkle more of the chocolate and strawberries on top. 4. Fold the left side over, adding the remaining inclusions on top of that.5. Gently roll the dough up into a log, popping any large air bubbles as you go and pinching the sides to keep all of the inclusions tucked inside the dough.6. Flip the dough seam-side up into a rice floured banneton basket. (Check out the blog post above for detailed pictures of these steps!)100 g chocolate melting wafers, 35 g freeze-dried strawberries
- Step 5: Final Proof- Two options depending on your timeline: Cold Proof (recommended): Cover and refrigerate overnight or up to 24 hours.Counter Proof: Let the dough proof in a warm spot for 2–3 hours until puffed up, then bake.*I recommend the cold proof because it improves flavor, makes the dough easier to handle, and lets you bake on your own schedule.
- Step 6: BakePreheat the oven to 450°F (232°C) with a Dutch oven inside for 30 minutes.Flip the dough onto parchment paper and score the top with a bread lame.Transfer to the hot Dutch oven. Bake covered for 40 minutes, then uncovered for 5 minutes.Check internal temperature. The bread is fully baked when the center reaches 205°F.
- Cool on a rack for 1–2 hours before slicing.
Notes
Frequently Asked Questions
Can I use fresh strawberries instead of freeze-dried?
I don’t recommend it. Fresh strawberries contain a lot of moisture, which can create dense, gummy, or underbaked pockets in sourdough bread. Freeze-dried strawberries rehydrate during proofing and baking, giving you a jammy strawberry swirl without affecting the structure of the loaf. Dried strawberries will also work, but they tend to be darker and more brown in color, so they don’t create the same bright, pretty swirl as freeze-dried strawberries.
Can I use chocolate chips instead of chocolate melting wafers?
Yes, you can use chocolate chips if that’s what you have. That said, I prefer chocolate melting wafers for this recipe because they melt and spread more evenly, creating chocolate ribbons throughout the loaf instead of staying in distinct chunks.
Can I add the chocolate and strawberries during stretch and folds?
You can, and I tested it that way, but it wasn’t my favorite. Adding the inclusions during shaping using a lamination style method gives better distribution and a more defined swirl throughout the loaf.
How do I store this loaf?
Once fully cooled, store the loaf at room temperature in a bread bag for up to 2 days. For longer storage, slice the bread and freeze it in a freezer bag for up to 3 months. Toast slices straight from frozen as needed. Avoid storing this loaf in the refrigerator, as it can dry out the crumb.