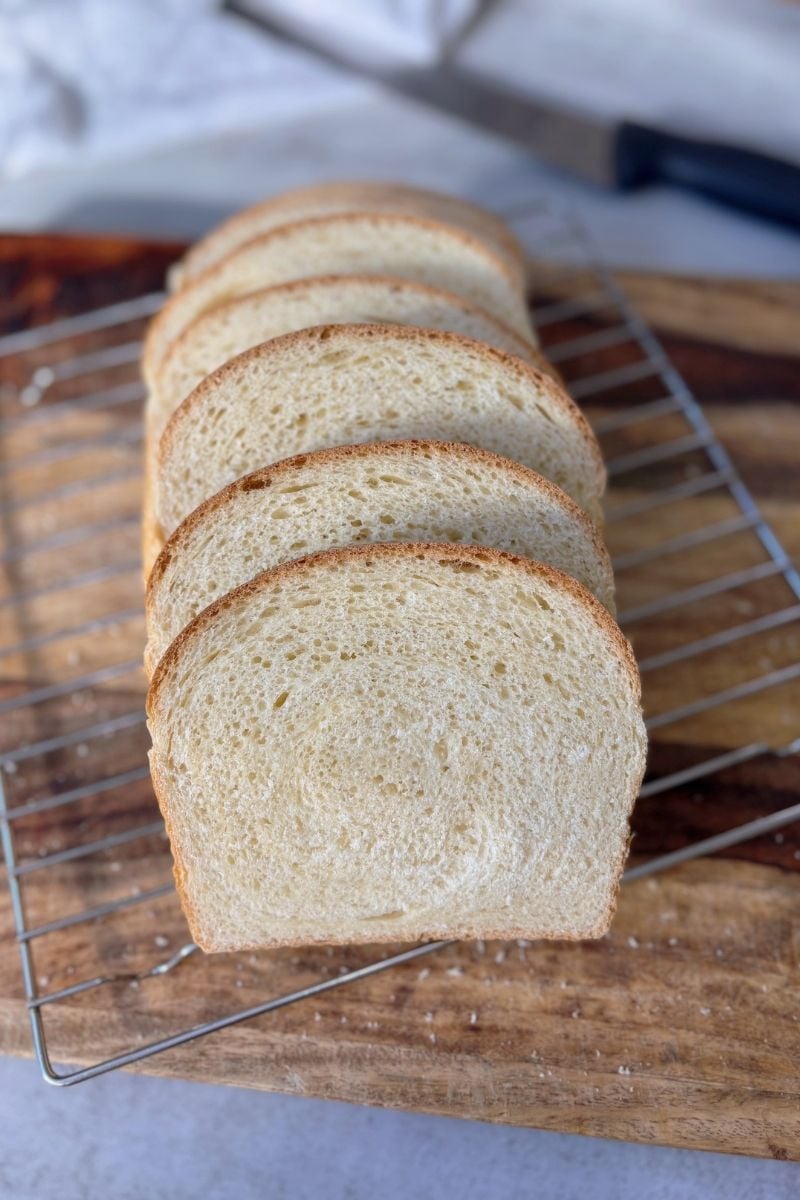
The Softest Sourdough Sandwich Bread You’ll Ever Bake!
This soft sourdough sandwich bread recipe has gone viral on social media, with over 1.5 million views, and I get messages every day from people who love how easy and foolproof it is. Whether you’re a beginner or a seasoned baker, this method—using two loaf pans—creates the softest, fluffiest sourdough bread you’ll ever make!
This website uses affiliate links which may earn commission made for purchases at no extra cost to you. Thank you for using them and supporting my content!
Why You’ll Love This Recipe
- Beginner-friendly: Simple steps and pantry ingredients make this approachable for new bakers.
- Same Day or Overnight recipe: No need to wait 24+ hours for your bread.
- Soft & fluffy: The two-pan method locks in moisture, creating a tender crust.
- Customizable: Add inclusions inside or on top for different flavors.
How to Make Soft Sourdough Sandwich Bread
Step 1: Mix the Dough
In a large mixing bowl, whisk together 150g active sourdough starter, 325g warm filtered water, 20g avocado oil (or cooled melted butter/olive oil), and 25g honey until combined. Stir in 500g unbleached flour and 10g salt until a shaggy dough forms. Cover and let it rest for 1 hour.
Step 2: Stretch & Fold
Perform four sets of stretch and folds every 30 minutes to build structure in the dough. This helps develop the gluten for a soft yet structured loaf. Spray or wet your hands with water to prevent the dough from sticking.
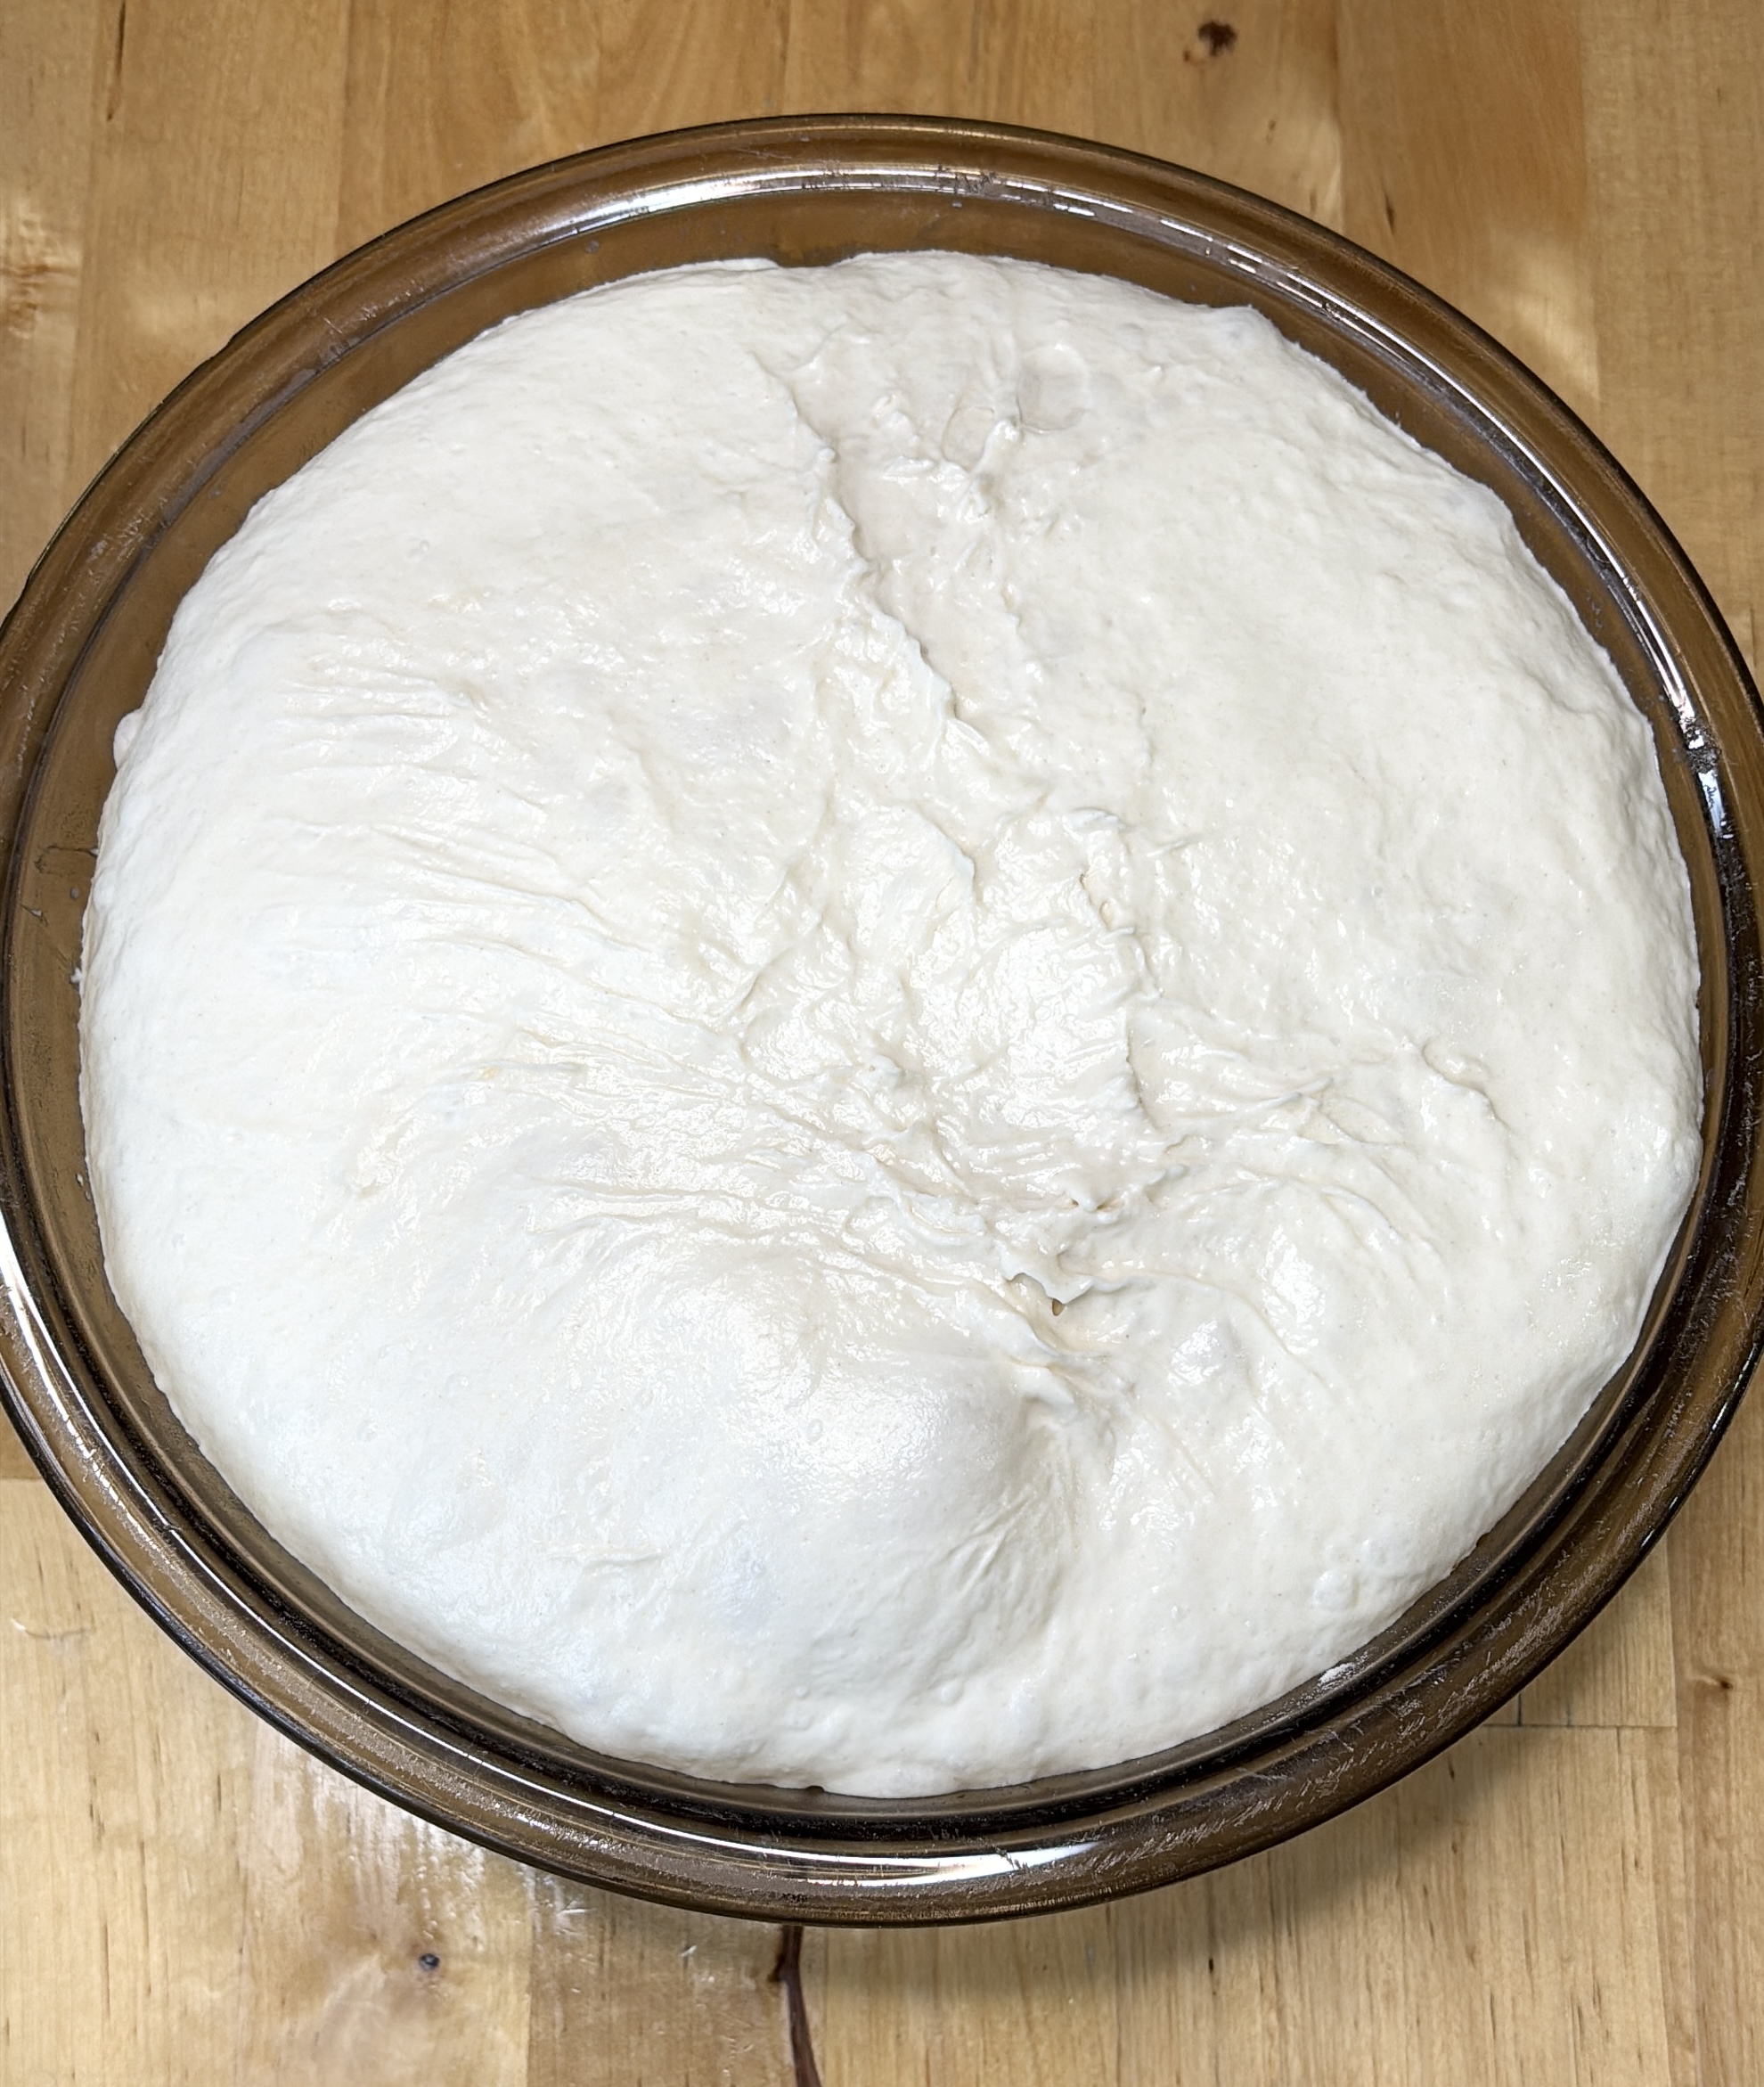
Step 3: Bulk Ferment
Cover and let the dough continue to bulk ferment. Bulk fermentation is the first long rise after mixing your dough, where the sourdough starter ferments the flour, creating air bubbles and developing flavor.
Bulk Fermentation times depend on your dough temperature, so they are different for everyone. If your house/dough is warmer it will ferment faster. If it’s cooler, it will ferment slower. You’ll know it’s ready when it’s doubled in size, bubbly, and airy.
I like to use this chart as a guideline, but I use the visual cues (mentioned above) to know when my dough is done. This may take some practice to get down if you’re new to baking sourdough.
| Dough Temp | Typical Bulk Time* |
|---|---|
| 80°F / 27°C | 5–6 hours |
| 75°F / 24°C | 7–8 hours |
| 70°F / 21°C | 11–12 hours |
| 65°F / 18°C | 15–16 hours |
*Time starts from the initial mix in step 1.
Be careful not to let this stage go too long—overfermentation can cause the yeast to break down the gluten structure, leaving you with dough that’s overly sticky and hard to shape.
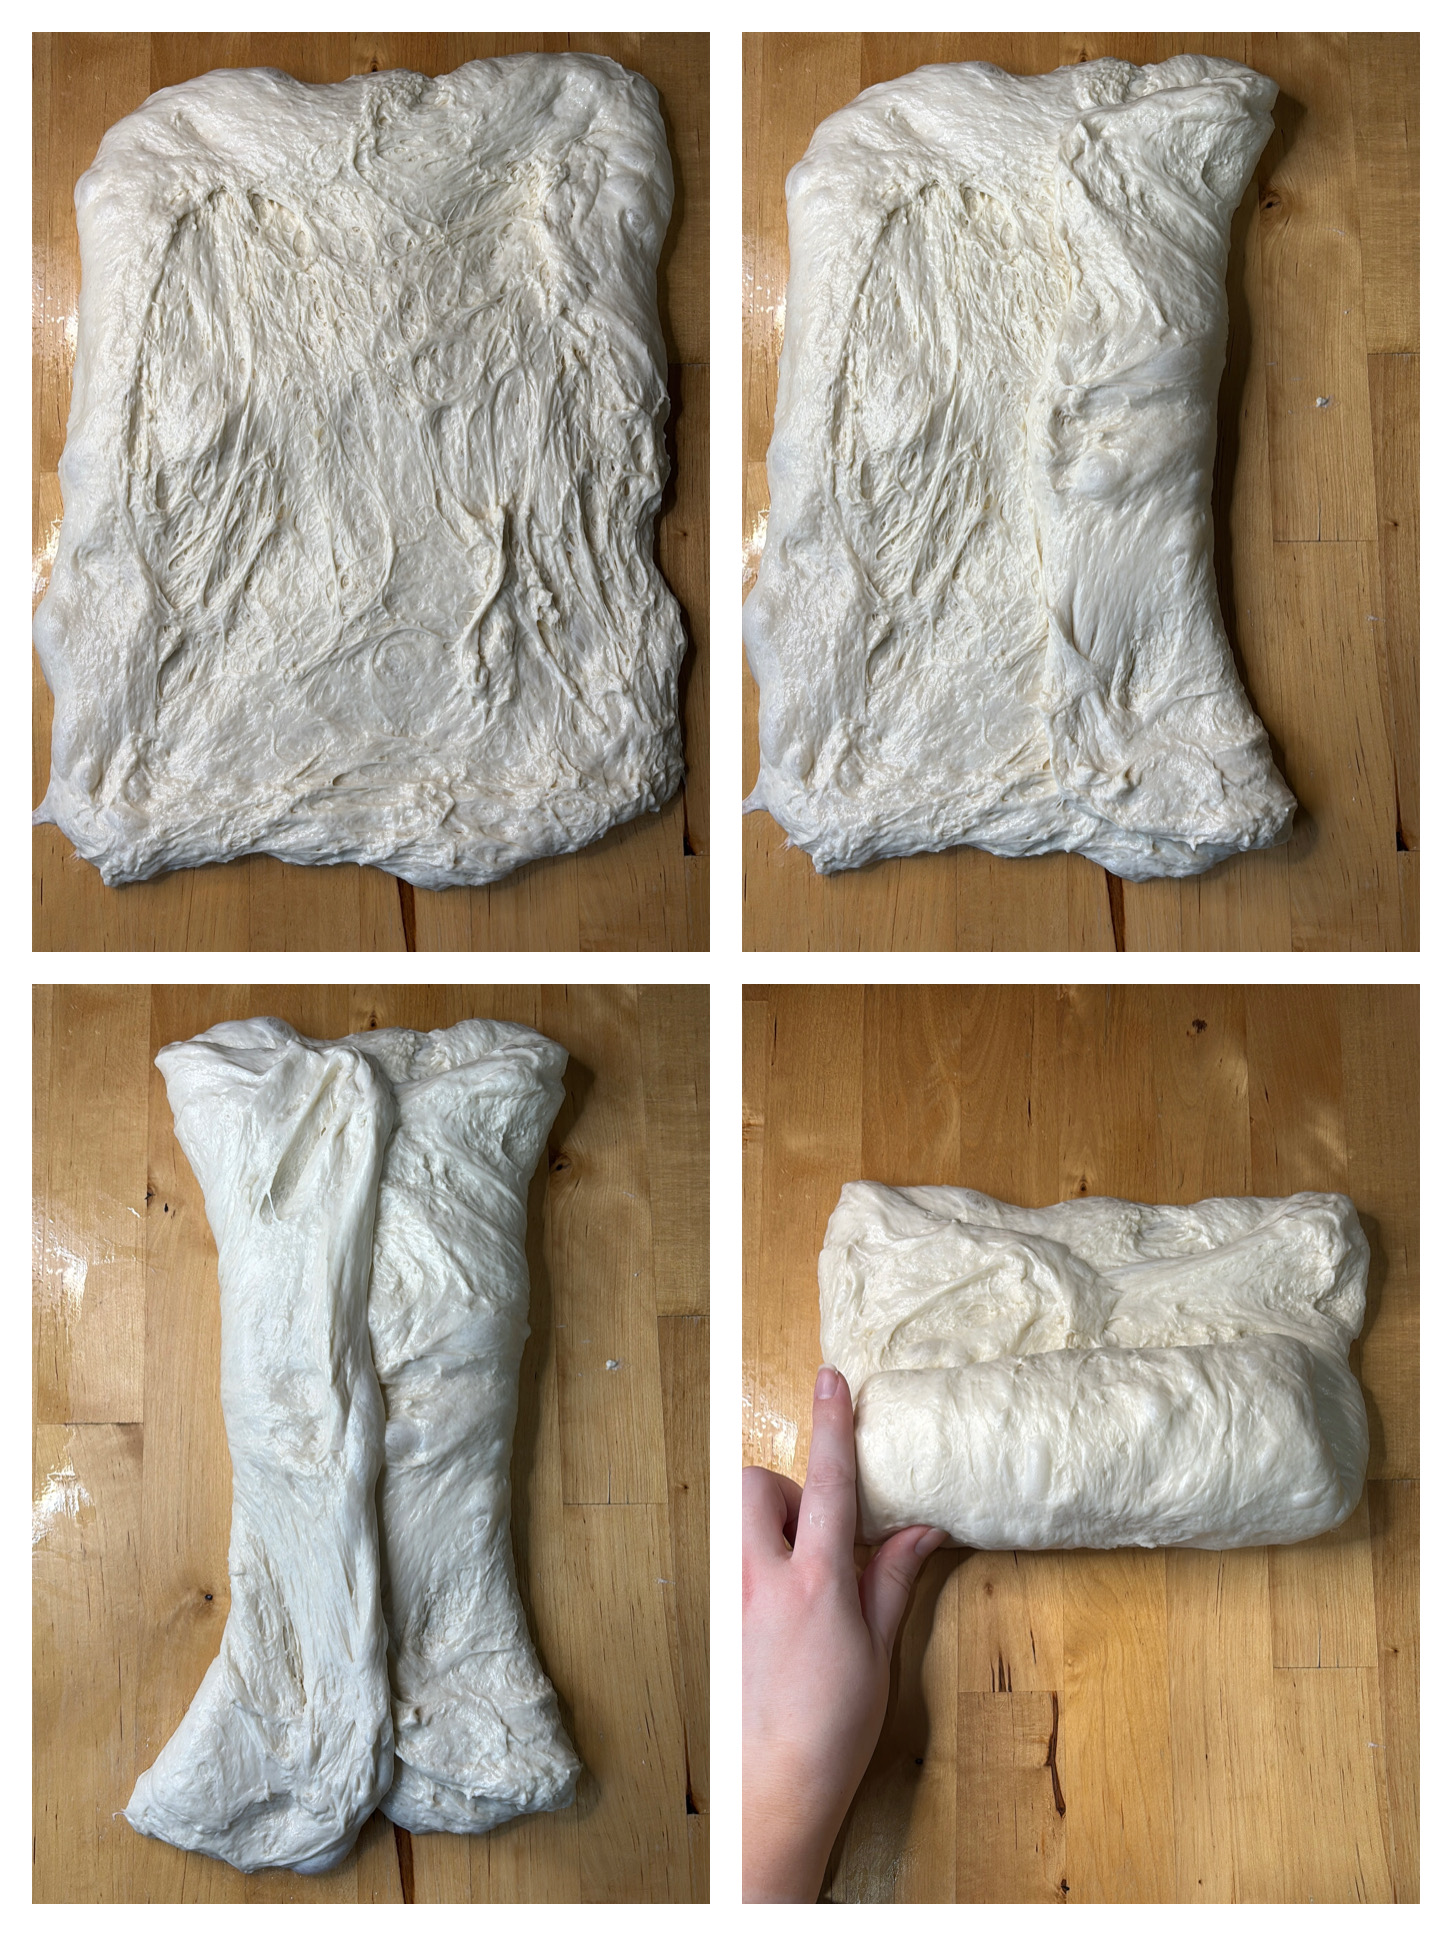
Step 4: Shape the Dough
Dump the dough from the bowl onto a clean surface. Spray or wet your hands with water to prevent the dough from sticking. Gently shape the dough into a loaf by stretching it into a rectangle, folding in the right side to the middle, then the left side into the middle, and rolling upward into a log. I also show this technique in my video below. Place it seam-side down in a well greased loaf pan.
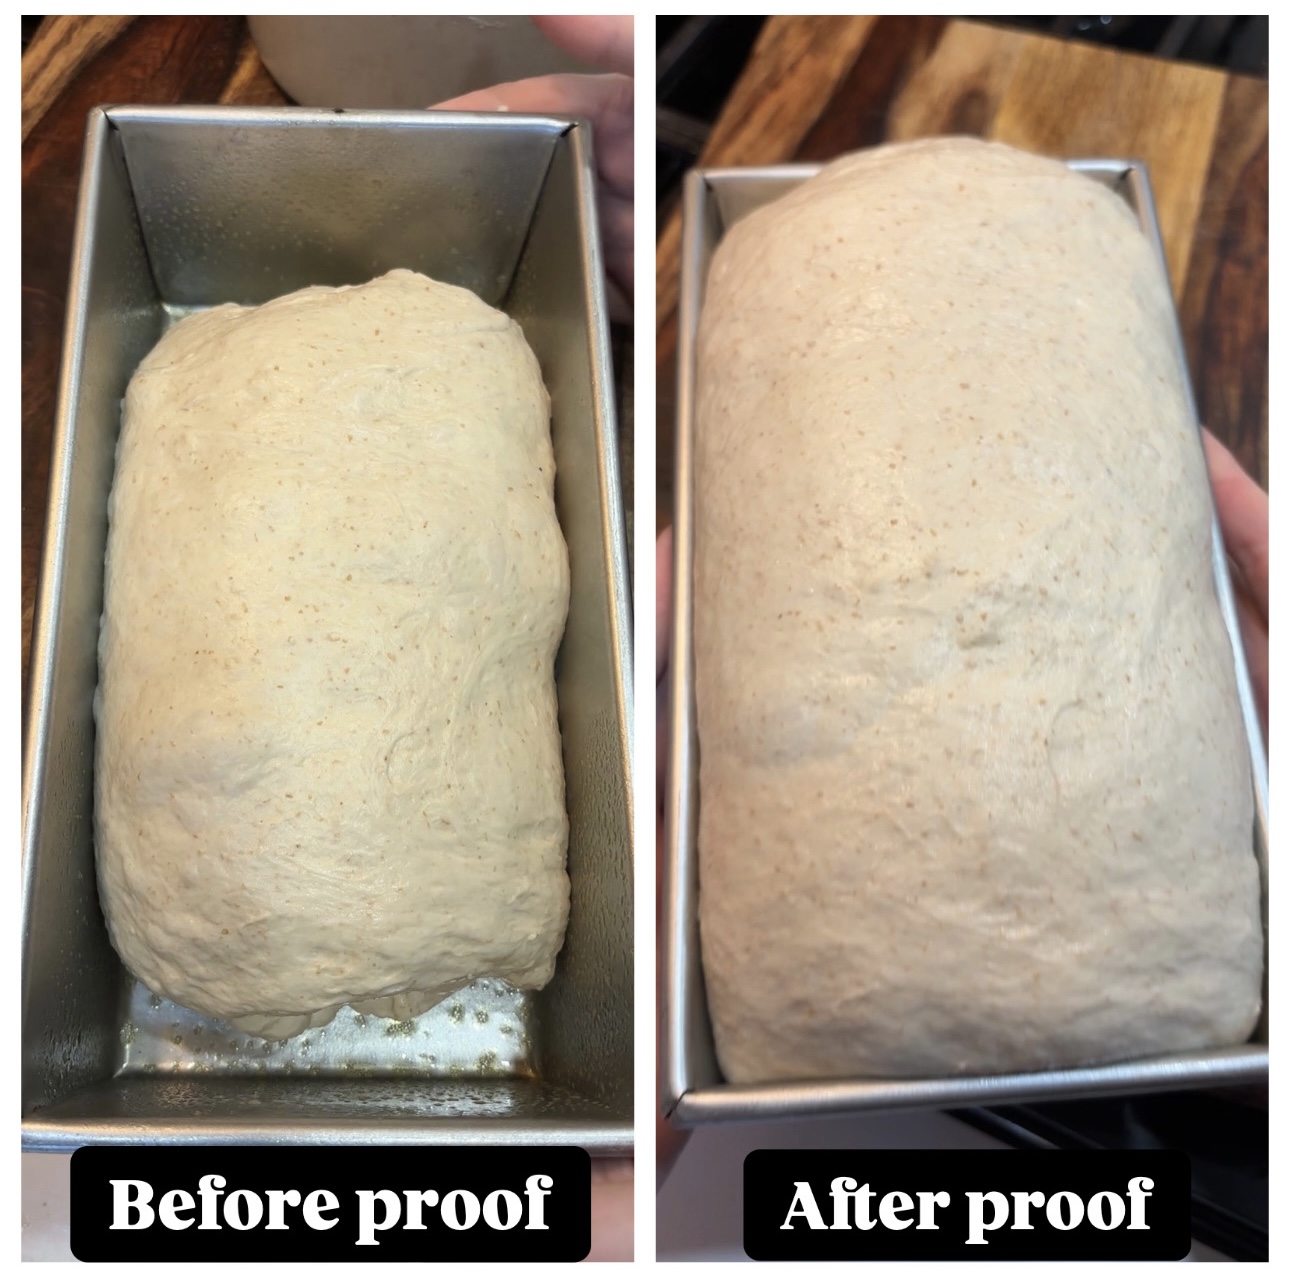
Step 5: Second Rise–Proof
Now it’s time for the second rise. You have two options:
- Same day option: Let it proof at room temperature for about 2 more hours before baking.
- Overnight cold proof: Let it cold proof in the refrigerator overnight or up to 24hrs.
Step 6: Bake
- Preheat oven to 400°F (200°C).
- Score the top of the dough and spray it lightly with water.
- Cover with an inverted second loaf pan (or loosely greased foil) to trap steam for the softest loaf. The inverted loaf pan method is shown below.
- Bake for 30 minutes at 400°F, then uncover and bake for 15 minutes at 375°F.

Step 7: Check for Doneness
Use a digital thermometer—your bread is fully baked when the internal temperature reaches 205°F (96°C).
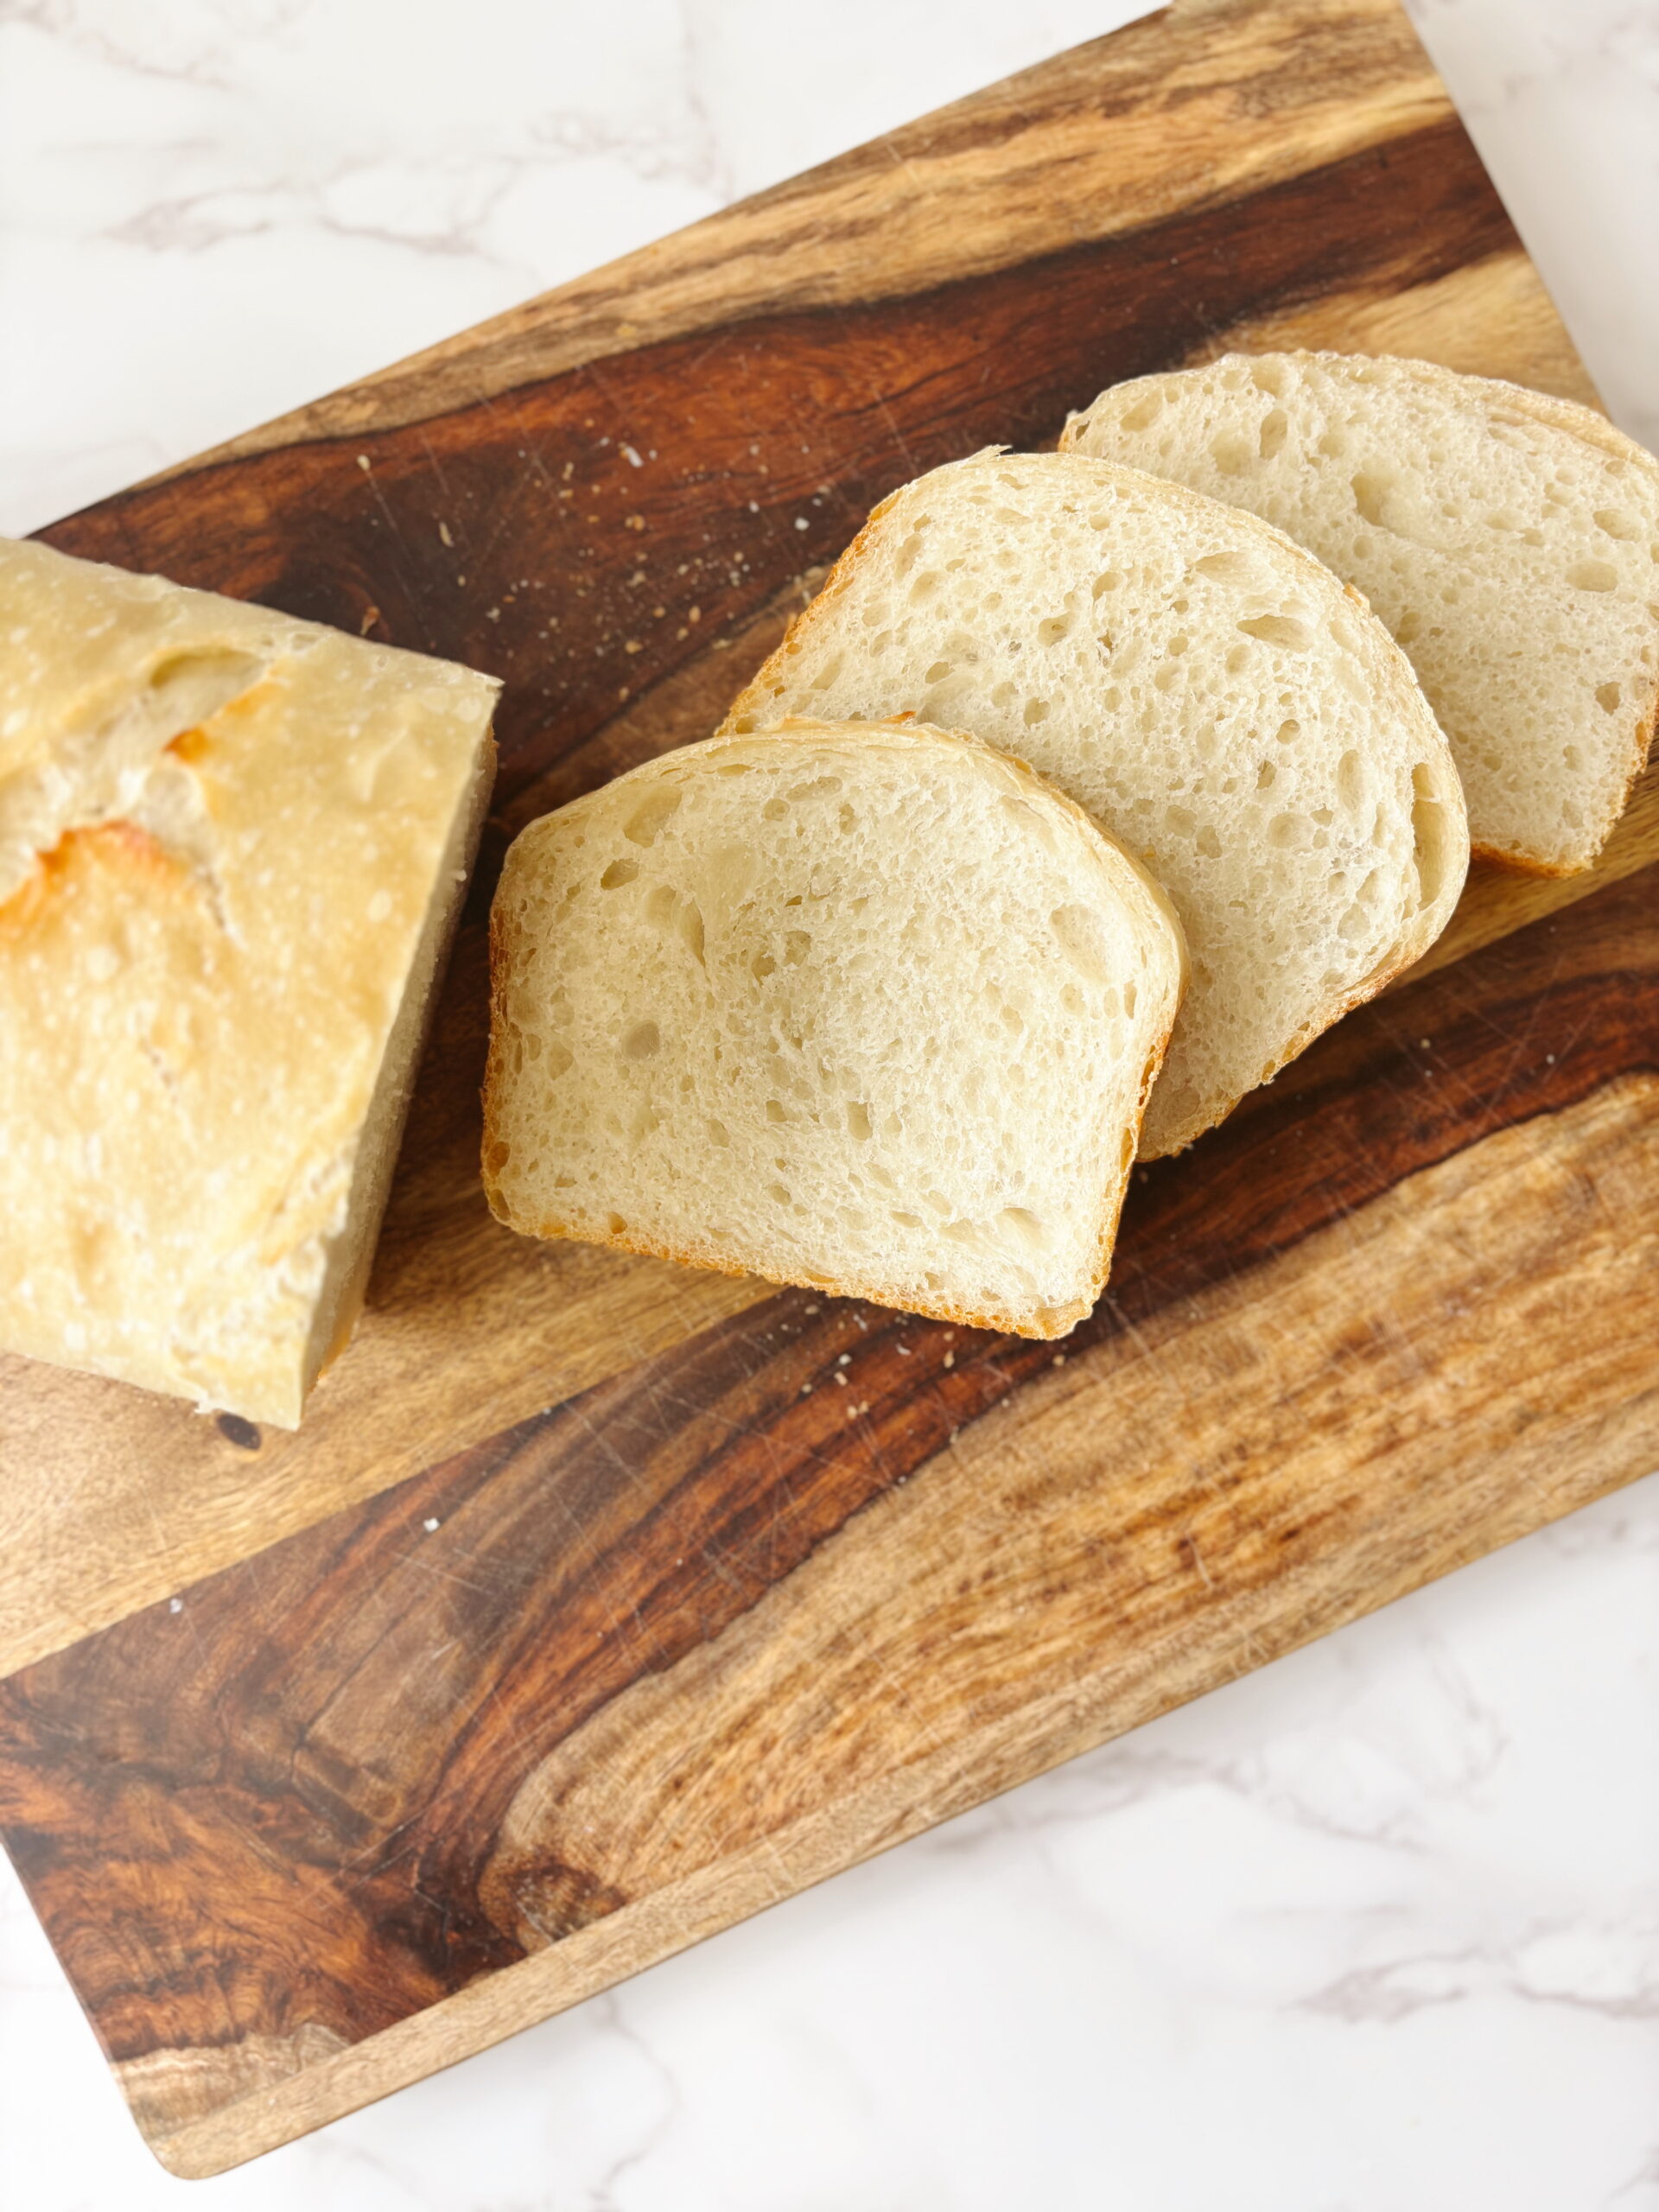
Step 8: Cool & Enjoy!
Remove from the pan immediately and let it cool completely before slicing. This helps set the crumb and keeps it soft
How to store:
To keep my sourdough fresh, I store it in these sandwich bags from Amazon, which come with twist ties and mimic traditional storage methods. I usually keep the loaf on the counter for up to 2 days, then slice and freeze any leftovers. Sourdough freezes exceptionally well—just thaw slices as needed for fresh-tasting bread anytime!

Make it your own!
This soft sourdough sandwich bread is a great base recipe—and it’s super versatile! Once you’ve nailed the original, feel free to get creative by mixing in your favorite add-ins like shredded cheese, fresh or dried herbs, cinnamon & sugar, or seeds.
Here are a couple fun variations to inspire your next loaf:
–Italian Herb & Cheese Soft Sandwich Bread – Savory herbs and cheesy flavor in every slice!
–Sourdough Lemon Blueberry loaf with Lemon Jell-O Pudding Mix — Soft and lightly sweet, packed with lemon flavor!
–Hot Honey, Jalapeño, & Cheddar Soft Sandwich Bread – a spicy-sweet twist on the classic!
Soft Sourdough Sandwich Bread
Equipment
- 1 Medium/Large bowl
- 1 Bowl cover (I like plastic shower caps for holding in moisture)
- 2 Bread Pans or 1 pan and a sheet of foil (9×5 or 10×5 pans)
- 1 Long sandwich bag for storing
Ingredients
- 150 g Active sourdough starter
- 325 g Warm filtered water
- 20 g Avocado oil can sub for olive oil or cooled melted butter
- 25 g Honey
- 500 g Unbleached Flour bread or all purpose work here
- 10 g salt
Instructions
- Combine Ingredients: Mix 150g starter, 325g water, 20g avocado oil, and 25g honey until milky. Add 500g unbleached flour and 10g salt, mix until you get a shaggy dough. Cover with a damp cloth or plastic cover and rest 1 hour.
- Stretch & Fold: Do 4 sets of stretch and folds, 30 minutes apart. Spray or wet your hands with water to prevent the dough from sticking.
- Bulk Ferment: Cover and let dough rise, you’ll know your dough is done when it’s just about doubled in size, bubbly, jiggly, and airy.I like to use this dough temp vs. time as a guideline, but I use the visual cues (mentioned above) to know when my dough is done. This may take some practice to get down if you’re new to baking sourdough.Dough Temp vs. Typical Bulk Time*80°F / 27°C 5–6 hours75°F / 24°C 7–8 hours70°F / 21°C 11–12 hours65°F / 18°C 15–16 hours*Time starts from the initial mix in step 1.
- Shape: Dump the dough from the bowl onto a clean surface. Spray or wet your hands with water to prevent the dough from sticking to them. Gently shape the dough into a loaf by stretching it into a rectangle, folding in the right side to the middle, then the left side into the middle, and rolling upward into a log. I also show this technique in my video below. Place it seam-side down in a well greased loaf pan.
- Second Rise/Proof:Same day option: Let it proof at room temperature for about 2 more hours before baking. Make sure it has puffed up in the pan before baking.Overnight cold proof: Let it cold proof in the refrigerator overnight or up to 24hrs. Make sure it has puffed up in the pan before baking.

- Bake: Preheat oven to 400°F (200°C). Score dough, spray with water, cover with an inverted second loaf pan or greased foil loosely, and bake: 400°F for 30 minutes (covered) then 375°F for 15 minutes (uncovered)
- Temp bread: Use a digital thermometer to check for doneness. Bread should be 205°F.
- Cool: Remove from pan immediately and let cool before slicing.

Video


49 responses to “Soft Sourdough Sandwich Bread Recipe”
Soft fluffy bread with a nice crust. Yum! Detailed instructions and easy to follow.
Because of this recipe right here our family no longer eats store bought bread! This recipe is very easy! All you need is a healthy starter that I also purchased from musclemommasaoursoughs Etsy shop! Thank you so much! Happy to see you growing on all these platforms! 🙏
That means so much to me! Knowing my recipe has become a staple in your home is the best compliment. So happy you’re loving your starter too!
I have made this bread for my family and they absolutely love it. I am new to sourdough baking and this recipe was really easy to accomplish! Very soft and tasty! Thank you for sharing!
Yay! So glad this recipe was a win for you and your family!
I started with regular sourdough before Christmas but didn’t necessarily enjoy every chewy crust. I found this on her Instagram and love it…so easy and tastes awesome
This recipe is great. I’m a newbie to the world of sourdough and I’ve made this sandwich bread twice and it’s a hit! The step by step instructions are clear and easy for someone new to achieve a very tasty loaf. Thank you!!!
Absolutely best sandwich bread recipe! We no longer buy store bread because of it. It was one of the first recipes I tried after establishing my starter and it was so easy, simple, and easy to follow.
This is my favorite sourdough recipe that I’ve tried! I got beautifully soft bread even with whole wheat flour.
I looooveeee this soft sandwich bread recipe. It can also be used for those who like the rounds but prefer their bread a bit softer. I have literally baked this recipe via loaf pans for sandwich bread AND in the Dutch oven for round or oval loaves.
Haley has amazing recipes and online tutorials!
And grab her starter to avoid the hassle !
Ten stars! ⭐️⭐️⭐️⭐️⭐️⭐️⭐️⭐️⭐️⭐️
This is my go-to recipe! It has been fool proof since my first ever loaf and I now average 4 every weekend for my family and friends. I am excited to be able to print it rather than my hand written, water spotted copy 😁
All I can tell is great things about this recipe. 👌🏼 super easy step by step instructions.
I found this recipe originally on Instagram and it has become my goto recipe. It’s so easy and versatile. It works with a relaxed schedule and always comes out delicious. Thank you for sharing!
My family and I love this recipe. I make it all the time. Easy to make and great directions.
I have tried many other soft sourdough recipes and this one always turns out great. The kids love the soft crust and I love that is simple and still tastes like sourdough.
I just started doing sourdough bread about a month ago and my daughter really wanted me to make a sandwich bread because she says store bread now taste terrible after having the sourdough. I tried this recipe and it was absolutely perfect! I’ll definitely be doing this one again many times.
For someone who’s tried sourdough and wanted to give up, this was the one recipe that stuck and now I’ve made it so many times I have it memorized!!! After randomly coming across her video on Facebook, I’m so glad I saved it and made it!! Tried and true recipe. I’ve made mine with honey or pure maple syrup—either is great.
Thank you, thank you! This loaf has become our family favorite. It took some attempts to get it consistently just right, but it’s there now and I love that my 15 yr old grandson tells me how much he enjoys it toasted in the morning. He also remarks that it’s the best school bread I’ve baked for him. So glad I have your help. I wish you the very best, as you proceed on this journey. Thank you for sharing your skill.
Time-comsuming – much of it is “idle” time, but the result was delicious! Have enjoyed every one of your recipes so far.
This is my favorite sourdough bread recipe!!! Delicious every time!!
I’m a seasoned baker, but new to sourdough. This is one of our go-to loaves. Easy recipe to follow. Soft and delicious results!
This is my go-to sandwich loaf!
Everybody, and I mean everybody, loves it. It’s so easy.
I’ve cut the dough in half and baked them in smaller loaf pans which is also a hit.
You gotta make it!
I have made this several times! It’s so delicious and truly is foolproof 😋
Great recipe! Easy to follow. I love the option of making my sourdough into a sandwich loaf. My grandkids don’t always like the crusty loaf. Hard on their mouth, but they love this.
I want to make this recipe. How would I mix in my kitchen aid mixer?
Hi! I haven’t tested this recipe with a KitchenAid mixer, but I did some research and here’s what I’d do: With a paddle attachment, I would mix all wet ingredients, then add dry ingredients and mix with a dough hook in 2 minute increments for about 4-6 minutes. Usually there is no need for stretch and folds if you knead with a stand mixer! Hope that helps you out!
I’ve been making sour dough for a few years now but never tried a soft sandwich loaf before. This recipe was so easy and fun and delicious. I was so excited to see the web and recipe for printing. This will definitely be a regular in our home! Thanks!
A nice soft everyday sandwich bread. I make this one weekly, slice and freeze. It toasts so nicely I have to use a lot of self control .
I have tried several white bread recipes. My search is over! This is sooo good. Fluffy and soft.
Easiest and tastiest not to mention the softness! I’ve made this 4 times and it comes out perfect everytime!
I kept putting the actual bread making off. The starter was perfected but so many recipes on-line got confusing. Yours had the video and recipe. I could see what yours looked like compared to mine. 1st and 2nd loaf baked were excellent. TY for sharing. Could not have been a success without you.
This means so much to me! Thank you for trying and trusting my recipe for your first loaves!
My search is over! Thank you!
Thank you so much for this recipe I’ve tried a handful of other sandwich recipes with no luck. This recipe was my best loaf yet!
Delicious! So soft and fluffy! I’m so happy with this recipe!
Hi, what size of bread pan did you use? Can you link where you purchased them from? Thank you!
Hi Sherry, I use pans similar to this one from amazon. This link should take you there! Soft sandwich bread pans
I have been making sourdough every few days for 5 years. It’s the only bread I will eat. This is my new recipe. It’s so much easier to do than the heavy pans I been using, softer and tastier. I’m so glad I tried it!
This…..this is the best sourdough bread recipe I’ve made! Thank you for sharing! I almost threw mine out because it was so wet and sticky but I baked it anyway and it tastes incredible!
Curious…Would this work for making cinnamon rolls?
Usually cinnamon roll dough is a little less hydrated than this dough. I personally wouldn’t use this as cinnamon roll dough, but you could add a cinnamon sugar swirl during shaping!
I was worried because my after proof did not proof nearly as much as yours…mine looked very wimpy BUT after baking it, it was so soft and fluffy and good!! Best bread. Thank you!!
SO GOOD! I can’t wait to try inclusions on this. Curious if this could possibly be converted into buns?
Yes! I use this for my roll and hamburger bun recipe!
First time using this technique. It’s absolutely amazing! I used King Arthur All purpose and it turned out really good. I’m going to try it with bread flour to see which one I like best.
I’m making your recipe right now, however, I will need to cold proof second rise. Do I need to let it set at room temp after pulling from the fridge before baking, or can I bake immediately?
Hi Sharon, Before baking, I like to make sure that the dough has risen above the edge of the bread pan. That’s my visual cue that it’s ready. If you take your pan out of the fridge and your dough hasn’t risen, I would let it rise a little more at room temp.
Is the dough supposed to be sticky after bulk rise? I had a difficult time trying to fold and roll into a log, but did the best I could and managed to get it into the greased pan. I cold proofed it and it is has almost risen to top of pan; I’m praying it will bake up nice. I’ve been at this sourdough experience for almost two months and can’t say I’ve had a successful loaf yet, but this is first attempt at sandwich bread.
Hi Sharon, I always recommend wetting your hands and bench scraper while doing stretch and folds and shaping. This keeps the dough from sticking to you. If you still find that it is sticky, it may have over fermented during your bulk fermentation period. That results in overly sticky and unmanageable dough. Luckily this recipe does pretty well with over fermented dough. I hope you had a successful loaf!